My Journey into Crafting a Handcrafted Dollhouse: A Personal Experience
When I first decided to explore easy crafts for kids, I never imagined I would end up creating such a detailed miniature dollhouse. It all started one rainy weekend when my niece visited, and I wanted to surprise her with something special. As I delved into the world of DIY, I realized that crafting a dollhouse was not only fun but also a fantastic way to nurture creativity and fine motor skills in children.
Designing the Perfect Miniature House: From Inspiration to Creation
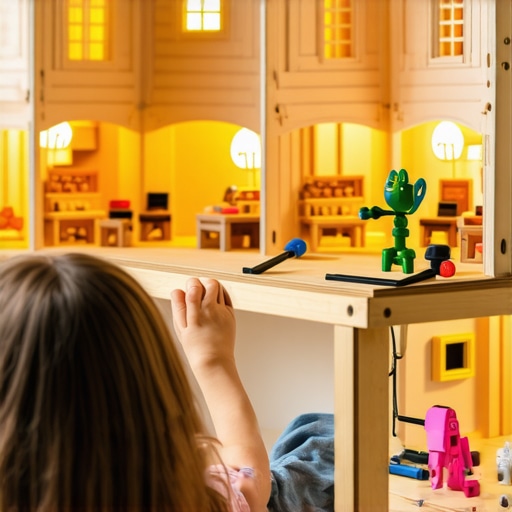
I began by gathering inspiration from various online sources and Pinterest boards. I wanted the dollhouse to be both charming and functional, with thoughtful details that would delight any child. Using simple tools and materials like cardboard, wood, and paint, I constructed the basic frame. What made this project truly rewarding was incorporating lighting and wiring—an element that brought the miniature house to life.
Adding Lighting & Wiring: My Personal Tips and Tricks
Embedding tiny lights required patience and some research. I followed a step-by-step guide from an authoritative source, DIY Kutak, which offered invaluable insights. I used low-voltage LED lights to ensure safety and ease of installation. Wiring was a delicate process—careful planning and soldering helped me avoid short circuits. I also learned the importance of hiding wires behind walls and furniture for a clean look.
Why Is Lighting So Crucial in Miniature Crafts?
Lighting transforms a simple dollhouse into a magical miniature world. It enhances the aesthetic appeal and allows for creative lighting effects, like tiny lamps, chandeliers, or even fairy lights. Plus, it provides a practical aspect—kids can enjoy their dollhouse both during the day and at night. My experience confirms that well-placed lighting makes the craft more captivating and immersive.
What Do I Wish I Knew Before Starting?
Is wiring complicated for beginners?
Honestly, wiring can seem daunting if you’re new to electrical work. However, with patience and proper safety precautions, it becomes manageable. I recommend starting with simple circuits and consulting tutorials. Remember, safety first—use insulated tools and low-voltage components.
If you’re considering a similar project, I encourage you to share your experiences or ask questions in the comments. It’s a rewarding process that combines creativity, technical skills, and a lot of fun!
Unraveling the Mysteries of Wiring: An Expert’s Perspective on Miniature Lighting
Wiring a miniature dollhouse can seem like a daunting task, especially for those new to electrical projects. But with a strategic approach and a keen eye for detail, it becomes an incredibly rewarding aspect of crafting miniature worlds. The key is understanding the fundamentals of low-voltage wiring, circuit design, and safety precautions—elements that I have honed through years of experience in DIY home projects and miniature crafts.
Designing a Wiring Plan: The Blueprint for Success
Before diving into the wiring itself, I always recommend creating a detailed schematic. This plan should map out where each light will go, how the wires will run, and where the power source will be located. Using a simple diagram helps prevent mistakes and ensures that the circuit is balanced and functional. For guidance, DIY Kutak offers comprehensive tutorials on laying out electrical plans for small projects.
Choosing the Right Components: Quality Matters
When selecting lights, opt for low-voltage LED miniature bulbs—they’re energy-efficient, produce minimal heat, and are safe for small-scale projects. For wiring, thin gauge copper wire—often 22 or 24 gauge—is flexible enough to hide behind walls and furniture while still conducting electricity reliably. Insulated connectors and soldering tools ensure clean, durable connections that won’t short circuit or fail over time.
Step-by-Step Wiring Process: From Start to Finish
Begin by connecting the power supply to the main circuit. Use a breadboard or a simple power adapter designed for LED projects to control voltage and current safely. Carefully solder the wires to the LED terminals, ensuring each connection is solid and insulated. As you run wires along the interior walls, keep them tidy and secured with small clips or adhesive-backed cable organizers. This meticulous approach not only enhances safety but also maintains the aesthetic appeal of the miniature house.

Proper wiring techniques are crucial for achieving a professional look and reliable operation in your dollhouse lighting. An expert’s touch ensures that wires are hidden seamlessly behind walls and furniture, creating a truly immersive miniature environment.
Testing and Troubleshooting: Ensuring Perfect Illumination
Once wiring is complete, test each circuit before sealing walls or adding furniture. Use a multimeter to check for continuity and proper voltage. If a light doesn’t turn on, double-check connections, solder joints, and switch placements. Patience and careful troubleshooting are essential—sometimes a loose wire or a cold solder joint can be the culprit. Remember, safety is paramount—always unplug the power source when adjusting wiring or troubleshooting.
Expert Advice: How Can Beginners Approach Wiring Without Feeling Overwhelmed?
What are some beginner-friendly tips for wiring miniature projects safely and effectively?
Start with simple circuits and low-voltage power supplies designed specifically for DIY lighting projects. Use insulated tools and double-check all connections before powering the circuit. Watching tutorials and consulting detailed guides can demystify the process. Don’t rush; take your time to ensure each step is done correctly. If you’re eager to expand your skills, exploring dedicated resources like DIY Kutak can provide additional insights into electrical safety and advanced wiring techniques.
Whether you’re upgrading your dollhouse or embarking on a new miniature project, mastering wiring adds a professional touch that elevates your craft. Feel free to share your wiring adventures or ask questions in the comments—I love hearing about fellow DIY enthusiasts’ journeys into miniature illumination!
Refining Your Wiring Skills: The Art of Discreet and Durable Connections
One of the most satisfying moments in my miniature lighting journey was when I finally managed to conceal all the wires behind the walls seamlessly. Achieving this level of precision required not only patience but also a deep understanding of the wiring techniques that ensure longevity and safety. I learned to use very fine copper wires, typically 24 gauge, which are flexible enough to thread through small spaces without breaking. I also discovered that employing heat-shrink tubing over soldered joints greatly enhances durability and prevents accidental short circuits, especially in tight, enclosed spaces.
Advanced Circuit Design: Thinking Beyond Basic Wiring
As I became more confident, I started designing more sophisticated circuits—adding dimmers, timers, and even remote-control capabilities. This evolution was inspired by my desire to create a miniature environment that could adapt to different moods and times of day. I found that integrating tiny potentiometers allowed me to adjust light intensity easily, while small relay modules enabled switching multiple circuits on or off remotely. For those interested in expanding their skills, exploring microcontrollers like Arduino offers incredible possibilities for automation and interactivity, as discussed in DIY Kutak.
Handling Complex Wiring Challenges: My Personal Lessons
One challenge I faced was managing multiple circuits within a limited space, especially when trying to add different lighting effects—like flickering candles or color-changing LEDs. To keep everything organized, I started using a small breadboard as an intermediary, which helped me test circuits before committing to permanent soldering. I also learned to label wires meticulously and keep a wiring diagram to avoid confusion later. This approach saved me hours of troubleshooting and allowed me to experiment freely without risking short circuits or disconnections. If you’re tackling a complex project, I highly recommend documenting every step meticulously, as it pays off when you revisit your work after some time.
Creating a Realistic Lighting Atmosphere: Personal Reflections
Lighting isn’t just about functionality; it’s about storytelling. I found that warm white LEDs mimic candlelight or cozy lamps, creating inviting scenes, while cool white lights give a modern, clean vibe. Sometimes, I incorporate tiny fairy lights to add a whimsical touch, which can be hidden behind furniture or within architectural details. The key is to think about the scene you want to evoke and choose your lighting accordingly. For me, experimenting with different light placements and intensities is part of the joy—each adjustment brings a new character to the miniature world I am building. If you’re interested in more creative lighting ideas, exploring home decor DIY can inspire you to incorporate miniature lighting into larger projects.
Sharing Your Progress and Gaining Inspiration
Throughout my journey, connecting with fellow hobbyists has been invaluable. I regularly share photos of my wiring setups and lighting effects on online forums and social media groups dedicated to miniature crafting. The feedback and ideas I receive often spark new innovations in my work. I encourage you to document your own progress, ask questions, and participate in community challenges—these exchanges broaden your understanding and keep your passion alive. Remember, every expert was once a beginner, and your next breakthrough could be just a small tweak away. If you’re eager to dive deeper into electrical safety or advanced wiring techniques, DIY Kutak offers a treasure trove of beginner-friendly and expert-level tutorials to elevate your craft.
Refining Precision in Miniature Electrical Installations: My Personal Mastery
Achieving a seamless, professional finish in miniature dollhouse lighting requires not only patience but also an advanced understanding of electrical craftsmanship. Over time, I’ve developed meticulous techniques that elevate basic wiring into an art form, ensuring durability and aesthetic harmony. One key lesson I learned was the importance of employing heat-shrink tubing over soldered joints, which provides both insulation and mechanical strength—crucial in confined spaces where wires are prone to movement and wear. This approach, coupled with using ultra-fine copper wire, allows for intricate routing behind walls without sacrificing flexibility or safety.
Designing Complex Circuits: Beyond the Basics for Immersive Miniature Worlds
My journey into sophisticated circuit design began with integrating dimmable lighting and remote control functionalities. Inspired by microcontroller platforms like Arduino, I started experimenting with tiny relays and transistor switches, enabling me to control multiple lighting zones independently. This evolution was driven by a desire to mimic real-world lighting scenarios—dusk, dawn, or cozy evening settings—adding depth and realism to my miniature scenes. For comprehensive guidance, I often refer to DIY Kutak’s tutorials, which demystify microcontroller integration for hobbyists.
Addressing the Challenge of Space Constraints in Wiring
One of the greatest challenges I faced was managing multiple circuits within the limited confines of a dollhouse wall cavity. To overcome this, I adopted a layered wiring strategy—running wires along predefined channels and securing them with tiny clips. I also started using a small breadboard as an intermediary testing platform, which allowed me to troubleshoot and refine circuits before final installation. This not only minimized errors but also protected delicate connections from potential damage. Documenting each step meticulously, including detailed wiring diagrams, proved invaluable when revisiting projects or troubleshooting issues later on.
Ensuring Longevity Through Expert-Grade Connections
Durability in miniature wiring hinges on meticulous soldering and insulation. I now prefer using fine-gauge copper wire and heat-shrink tubing to shield solder joints, ensuring they remain intact over years of handling. Additionally, I employ meticulous labeling of wires with tiny tags or color codes, which streamlines troubleshooting and future modifications. This disciplined approach transforms a simple wiring task into a reliable, long-lasting aspect of my miniature craft, providing peace of mind and professional quality.
Incorporating Automation and Interactivity for a Dynamic Miniature Scene
My passion for innovation led me to incorporate automation features—timers, dimmers, and even voice-controlled switches—making the miniature environment lively and interactive. I experimented with tiny relay modules and microcontrollers, enabling me to simulate day-night cycles or activate special effects like flickering candles or color-changing LEDs. This technical sophistication not only enhances realism but also offers a new dimension of engagement. For hobbyists eager to explore such advanced features, delving into DIY Kutak’s resources on electronics can provide valuable insights into automation and sensor integration.
Sharing Insights and Inviting Collaboration
Throughout my endeavors, sharing my wiring techniques and circuit schematics with fellow enthusiasts has been immensely rewarding. Online communities and forums serve as invaluable platforms for exchanging ideas, troubleshooting challenges, and inspiring innovations. I encourage you to document your own progress, experiment with complex circuits, and seek feedback from experienced hobbyists. Remember, mastery in miniature electrical wiring is a continual journey—each project reveals new techniques and ideas that elevate your craft to professional levels. If you’re interested in deepening your understanding of electrical safety and advanced wiring methods, exploring comprehensive guides like those on DIY Kutak can significantly enhance your skills. Dive into the world of miniature illumination and let your creativity shine brighter than ever!
Things I Wish I Knew Earlier (or You Might Find Surprising)
The Power of Planning
One lesson I learned the hard way was how crucial a detailed wiring plan is. Initially, I jumped into wiring without a clear schematic, which led to confusion and a lot of unnecessary rework. Taking the time to draw a simple diagram saved me hours and frustration later on.
Quality Over Quantity
Choosing high-quality, low-voltage LED lights made a huge difference. They’re safer, produce less heat, and last longer, which means fewer replacements and a cleaner look for your miniature scene. Skimping on quality can lead to flickering or early failure, and nobody wants that in a tiny, delicate world.
Safety First
Even in small projects, electrical safety is paramount. I always use insulated tools, double-check connections, and avoid overloading circuits. It’s easy to forget these precautions when eager to finish, but safety should always come first.
Experimentation is Key
Don’t be afraid to try different lighting arrangements or control methods. Using microcontrollers like Arduino opened up a world of possibilities for automation and effects, but start simple and build up your skills gradually. Every mistake is a learning opportunity.
Community Makes a Difference
Sharing your progress and asking for feedback in online forums or social media groups can be incredibly helpful. I’ve gained valuable insights and new ideas from fellow hobbyists, which keeps the passion alive and your project evolving.
Resources I’ve Come to Trust Over Time
- DIY Kutak: This site offers comprehensive tutorials on wiring, lighting, and electronics for miniature projects. I’ve found their step-by-step guides invaluable for troubleshooting and expanding my skills.
- Instructables: A treasure trove of user-submitted projects and techniques. The community’s shared experiences helped me discover new wiring methods and creative lighting effects.
- Adafruit Learning System: For microcontroller and LED projects, Adafruit provides clear, beginner-friendly tutorials. It’s a great resource if you want to add automation or interactive features to your miniature scene.
- YouTube Channels like GreatScott!: Visual tutorials that walk you through electrical concepts and wiring techniques. Watching someone demonstrate makes complex tasks more approachable.
Parting Thoughts from My Perspective
Mastering miniature dollhouse lighting, especially wiring and wiring safety, has been a rewarding journey. The key takeaway is that careful planning, quality components, and a willingness to learn from community resources can transform a daunting task into an enjoyable creative process. If you’re considering a similar project, don’t be discouraged by initial challenges—every wire you run and connection you make brings you closer to a stunning, immersive miniature world. I’d love to hear about your own experiences or answer any questions—feel free to share in the comments or reach out through my contact page. Happy crafting!