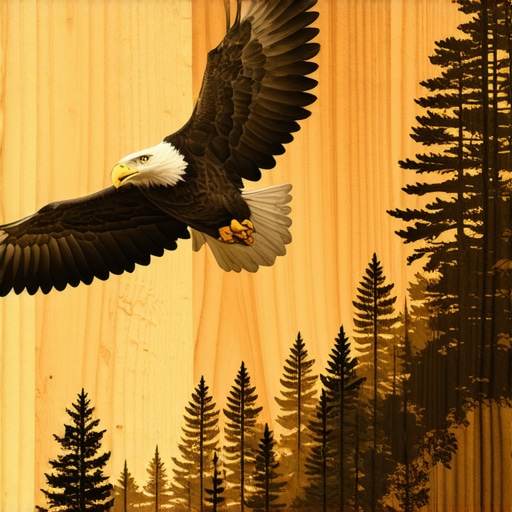
My Journey into the World of Pyrography
Ever since I picked up a pyrography pen, I was fascinated by the way simple wood surfaces could be transformed into stunning works of art. My fascination deepened when I started experimenting with advanced techniques to bring wildlife images to life. Today, I want to share my personal experience and insights into mastering pyrography, especially focusing on creating photorealistic wildlife art on wood.
Why Advanced Techniques Elevate Your Wildlife Art
When I first began, basic pyrography tools limited my ability to capture the intricate details and textures of animals and nature. As I advanced, I learned to control shading, layering, and fine line work, which are essential for realism. Incorporating techniques like stippling and gradient shading allowed me to achieve a depth and dimension that truly mimic photographs. According to expert pyrographers, mastering these details distinguishes amateur work from professional-quality art (see Advanced Copperplate Calligraphy for related detailed control tips).
How Do I Create Photorealistic Wildlife on Wood?
I start with high-resolution reference images of wildlife, focusing on lighting and texture. Transferring the image onto wood can be done with carbon paper or freehand sketching, depending on your skill level. Then, I carefully layer different shades of burn marks, building up shadows and highlights gradually. The key is patience and a keen eye for detail. Using different pyrography tips helps me achieve varied textures, like fur, feathers, and rugged bark, enhancing realism.
What Are the Challenges in Creating Photorealistic Wildlife Art?
One challenge I faced was controlling the heat to avoid overburning delicate areas. It took time to develop a steady hand and an understanding of my tools. Also, achieving true color-like effects with just shades of brown requires skillful layering and sometimes, even combining pyrography with colored pigments or stains for added depth. I recommend practicing on scrap wood to refine your technique before working on your main piece.
For those interested in exploring more about advanced pyrography, I suggest checking out advanced stripping and makeover techniques to understand surface preparation and finishing, which are crucial for professional results.
Sharing My Passion and Inviting Your Stories
If you’ve tried creating wildlife art on wood or are just starting out, I’d love to hear about your experiences. Feel free to share your tips or ask questions in the comments below. Sometimes, a little community feedback can inspire new ideas and techniques.
Remember, mastery in pyrography isn’t just about technical skill but also about patience and passion. Keep experimenting, and soon, you might be creating photorealistic masterpieces that captivate everyone who sees them.
Refining Your Control Over Texture and Depth in Wildlife Pyrography
Achieving photorealism in pyrography goes beyond shading; it requires an expert understanding of how to manipulate the burn marks to emulate textures like fur, feathers, and rugged bark. One effective approach is to vary the tip pressure and speed, creating subtle differences in burn intensity that mirror natural surfaces. For instance, short, rapid strokes can simulate fur, while longer, softer lines evoke feathers. Developing this nuanced control takes practice but significantly elevates your art’s realism. Additionally, layering multiple shades—starting with light touches and gradually adding darker tones—helps build depth and contrast, making your wildlife images pop from the wood surface.
Advanced Surface Preparation for Flawless Wildlife Portraits
Surface preparation is crucial for professional-grade pyrography. The smoothness of the wood directly impacts the clarity and detail of your work. I recommend using fine-grit sanding to achieve a velvety surface, removing any imperfections that could distract from intricate details. Applying a light, even coat of a clear finish or wood conditioner ensures the surface remains stable during burning. This step also prevents uneven absorption of heat, which can distort your artwork. For those seeking a polished finish, experimenting with surface treatments like French polishing techniques can add a layer of elegance and protection, especially for display pieces.
How Can Incorporating Colored Pigments Enhance Realism?
While pyrography traditionally relies on shades of brown, combining it with colored pigments or stains can dramatically improve realism. For example, subtle touches of colored pencil or watercolor can highlight specific features like the glint in an animal’s eye or the iridescence of bird feathers. Applying a transparent stain over the burned areas can also add depth and vibrancy, mimicking natural coloration more accurately. This hybrid approach requires careful planning and a steady hand but can produce stunning, lifelike wildlife art that captures the viewer’s attention. For guidance on surface finishes and color integration, exploring custom framing and finishing techniques can provide valuable insights.
What Are the Most Common Pitfalls and How to Avoid Them?
One common mistake is overburning delicate details, which can cause loss of fine lines and textures. To prevent this, always test your tips on scrap wood before working on your main piece and adjust the heat accordingly. Another challenge is inconsistent shading, which can be mitigated by maintaining a steady hand and working in small sections. Patience is essential—rushing through a complex piece can lead to uneven results. Additionally, neglecting surface preparation can result in uneven burn marks and poor detail rendering. Regularly inspecting your tools and practicing controlled, deliberate strokes will help you develop the finesse required for photorealistic wildlife art.
If you’re eager to expand your skills further, I recommend exploring advanced surface finishing techniques. These methods are invaluable for achieving a professional look and ensuring your artwork lasts for generations.
How Do You Keep Your Inspiration Fresh and Stay Updated on Techniques?
Staying inspired and improving your craft involves continuous learning. Attending workshops, joining online pyrography communities, and studying the work of master artists can provide fresh perspectives. Regularly experimenting with new tips, textures, and surface treatments keeps your process exciting and your results innovative. Moreover, documenting your progress through a dedicated journal or blog not only tracks your growth but also helps you identify areas for improvement. Sharing your projects and exchanging feedback in forums or social media groups encourages a vibrant learning environment where seasoned pyrographers can mentor newcomers and vice versa.
If you’re interested in exploring more advanced pyrography projects, check out creative DIY ideas for all skill levels. They can inspire your next masterpiece and deepen your understanding of this versatile art form.
Refining Your Technique: The Subtle Art of Texture Manipulation
One of the most rewarding aspects of advanced pyrography is mastering the delicate control over textures that bring wildlife portraits to life. I remember spending hours experimenting with pressure variations and tip angles to emulate the softness of fur or the sheen of feathers. For instance, applying rapid, short strokes with a fine tip can create the illusion of a fluffy squirrel’s tail, while gentle, sweeping motions work well for bird plumage. Developing this nuanced control is akin to a form of visual storytelling, where each stroke narrates a part of the animal’s character. According to seasoned pyrographers, this level of detail requires not only technical skill but also an intuitive understanding of natural textures—something that comes with patience and persistent practice (see advanced calligraphy techniques for parallels in precision control).
The Power of Surface Preparation: Setting the Stage for Masterpieces
Another insight I’ve gained is the critical importance of surface preparation. A perfectly smooth, well-sanded wood surface acts as a clean canvas, preventing uneven burn marks and allowing fine details to shine through. I often use multiple sanding grits, starting with a coarse grit to remove imperfections and finishing with ultra-fine sandpaper for a velvety texture. To enhance the clarity of intricate details, I sometimes apply a light coat of wood conditioner or shellac, which stabilizes the surface and ensures consistent absorption of heat. This step might seem minor, but it profoundly impacts the overall quality of the finished piece, making the difference between amateurish work and professional-grade art (explore surface finishing techniques for more insights).
Integrating Color for Photorealism: A Hybrid Approach
While pyrography excels in creating rich shades of brown, I’ve found that selectively incorporating colored pigments elevates wildlife portraits to a new level of realism. Subtle touches of colored pencil or watercolor over the burned areas can highlight eyes, add vibrancy to feathers, or emphasize the iridescence of scales. For example, a hint of blue or green over a bird’s feathers can mimic the natural shimmer, making the artwork more captivating. I also experiment with transparent stains applied over the pyrography, which deepens the shadows and adds depth. This hybrid technique requires patience and a steady hand, but the results are often breathtaking. For those interested, exploring custom finishing and color integration can provide valuable guidance.
Sharing Personal Journeys and Embracing Mistakes
Throughout my journey, I’ve learned that mistakes are invaluable teachers. Overburning delicate fur areas taught me to adjust my heat and working speed, while uneven shading pushed me to develop a more consistent technique. I encourage fellow enthusiasts to document their progress—whether through photos, notes, or a dedicated blog—because reflection accelerates growth. If you’ve been experimenting with wildlife pyrography or are just starting, I invite you to share your stories or ask questions in the comments. Our community thrives on collective learning and mutual inspiration. Remember, mastery is an ongoing journey, and each piece you create is a step closer to achieving your artistic vision.
Deepening Control: The Nuances of Layering and Gradients
Achieving a photorealistic effect involves more than just shading; it’s about building layers of depth gradually. I typically start with light, broad strokes to map out the general form, then progressively add darker tones, paying close attention to transitions and gradients. Varying the pressure and burn time creates a spectrum of shades, which, when layered carefully, mimic the subtle nuances of natural light and shadow. This process demands patience but rewards with richly detailed images that seem to breathe with life. Additionally, practicing on scrap wood allows you to experiment with different techniques without risking your main work, gradually building your confidence and finesse. For advanced surface treatments, exploring DIY surface preparation tips can be very beneficial.
Encouragement to Explore and Evolve
As I continue to evolve in pyrography, I realize that the journey is as important as the destination. Every new technique learned, every mistake corrected, and every piece finished adds to a deeper understanding of this intricate art form. I encourage you to stay curious, experiment boldly, and embrace the learning process. Whether you’re crafting a detailed owl or a majestic elk, each project is an opportunity to refine your skills and express your unique perspective. If you’re interested in further expanding your craft, exploring advanced surface finishing techniques or integrating other artistic mediums can open new horizons. Keep sharing your progress, and let’s inspire each other to push the boundaries of what’s possible in pyrography.
Unlocking the Secrets of Texture Manipulation in Wildlife Pyrography
One of the most rewarding challenges in advanced pyrography is capturing the intricate textures that define wildlife realism. From the softness of a fox’s fur to the shimmering feathers of a bird, each surface demands a nuanced approach. Over the years, I have refined my technique by experimenting with a combination of tip angles, pressure variations, and stroke speeds. For example, quick, stippled strokes mimic fur’s fluffiness, while long, gentle lines can replicate the sleekness of feathers. These subtle manipulations elevate a simple burn into a vivid storytelling element, revealing the animal’s character and environment.
Varying burn intensity, achieved through controlled pressure and burn time, is crucial. Lighter touches create softer textures, whereas darker, more intense burns emphasize depth and shadow. Layering these shades gradually allows me to build a three-dimensional effect, adding vibrancy and realism. This layered approach, combined with an understanding of natural surface properties, forms the cornerstone of photorealistic wildlife art. To deepen your mastery, I recommend studying how natural textures behave under different lighting conditions and practicing on scrap wood to fine-tune your control.
How Do I Perfect Surface Preparation for Ultra-Precise Animal Portraits?
Surface preparation is often underestimated but remains vital for achieving professional-grade results. A smooth, velvety surface ensures that every fine detail is rendered sharply, avoiding uneven burn marks or surface imperfections. I begin with a meticulous sanding process, progressing from coarse to ultra-fine grit, which smooths out the wood’s surface and eliminates blemishes. Applying a clear finish or wood conditioner stabilizes the surface, preventing absorption inconsistencies that could distort my work. For the final touch, I sometimes employ French polishing techniques, which enhance the surface’s gloss and smoothness, giving my wildlife portraits a refined appearance—an approach I detail further in my article on surface finishing techniques.
By investing time in surface prep, you establish a pristine canvas that responds predictably to your pyrography tool, allowing your textures and shading to stand out with clarity. This preparation step is not just about aesthetics but also about ensuring longevity and durability of your artwork. If you’re eager to elevate your surface techniques, exploring advanced surface treatments like sealing with protective coatings can be transformative.
The Power of Color Integration for Lifelike Wildlife Art
While pyrography excels in creating tonal depth through shades of brown, integrating colored pigments can add an extraordinary layer of realism. I frequently use subtle touches of colored pencil or watercolor over the burned areas to highlight specific features—like the glint in an animal’s eye or the iridescence of feathers. Applying transparent stains or glazes over the pyrography further enhances depth, mimicking natural vibrancy. This hybrid approach requires patience and precision but results in wildlife portraits that seem to breathe with life, capturing viewers’ attention instantly. For advanced guidance on color techniques, exploring surface finishing options can help protect and enhance these subtle hues, as discussed in my comprehensive guide on custom framing and finishing.
Experimenting with color not only broadens your artistic palette but also enables you to create more engaging, realistic pieces. I encourage artists at all levels to explore this technique, as it can dramatically elevate your work from fine craft to fine art.
Join the Creative Journey and Share Your Experiences
Throughout my journey into advanced pyrography, I’ve learned that patience, experimentation, and community feedback are invaluable. Every mistake taught me new control techniques, while every success fueled my passion. I invite you to share your experiences, ask questions, or showcase your wildlife art in the comments. Our community thrives when we exchange insights and support each other’s growth. Remember, mastery is an ongoing process—each piece you create brings you closer to your artistic vision, especially when you incorporate refined surface preparation and texture manipulation techniques.
If you’re interested in exploring more advanced projects or discovering new surface treatments, visit this resource on surface finishing for detailed guidance. Keep experimenting, keep learning, and let your wildlife pyrography journey flourish.
Things I Wish I Knew Earlier (or You Might Find Surprising)
Embracing the Imperfections
One of the most valuable lessons I learned was that embracing mistakes can lead to unexpected artistic breakthroughs. Early on, I was frustrated by uneven shading or accidental overburns, but over time, I realized these imperfections often added character and realism to my wildlife portraits. Sometimes, a slight imperfection mimicked the natural irregularities found in animal fur or feathers, making the piece more lifelike.
Layering is Key
Initially, I underestimated the power of layering multiple shades. By gradually building depth with light and dark burn marks, I achieved much more realistic textures. Rushing to finalize a piece often resulted in flat images, but patience and multiple layers transformed my work into vibrant, three-dimensional wildlife scenes.
The Surface Matters More Than You Think
Don’t overlook surface preparation. A smooth, well-sanded wood surface makes a significant difference in detail clarity. I used to work on rough surfaces, but once I started fine sanding and applying surface conditioners, my pyrography became much sharper and more professional-looking.
Color Can Elevate Your Art
Although traditional pyrography is monochromatic, adding subtle touches of colored pigments or stains can dramatically increase realism. I experimented with transparent stains to deepen shadows and highlight features, which brought my wildlife portraits to life in new ways.
Practice on Scrap Wood
Practicing on scrap wood before working on your main piece is invaluable. It helps you control heat, tip pressure, and shading techniques without risking your final artwork. This habit saved me countless headaches and improved my skills faster.
Community and Continuous Learning
Joining online pyrography communities and following master artists kept me inspired and motivated. Sharing progress and receiving feedback accelerated my growth and pushed me to explore new techniques and textures.
Resources I’ve Come to Trust Over Time
- Pyrography Made Easy – This website offers comprehensive tutorials and tips for beginners and advanced artists alike. It’s my go-to for troubleshooting and technique refinement.
- Woodcraft Magazine – A treasure trove of woodworking and pyrography projects, inspiring me with ideas and surface finishing techniques that elevate my work.
- Instagram Artists – Following talented pyrographers on social media gave me real-time inspiration and exposed me to a variety of styles and methods, helping me evolve my own craft.
- Books by Craig Fraser – His detailed guides on advanced pyrography techniques provided deep insights into texture manipulation and surface preparation, which I highly recommend.
Parting Thoughts from My Perspective
Mastering wildlife photorealism in pyrography is a journey of patience, experimentation, and continuous learning. I’ve found that the most impactful improvements come from refining your surface preparation, layering subtle shades, and embracing your unique mistakes as part of the process. Incorporating color and textures thoughtfully can turn a simple burn into a captivating, lifelike portrait that truly captures the animal’s character. If this resonates with you, I encourage you to keep practicing, explore new techniques, and share your progress with the community. Your next masterpiece might be just a few layers away from perfection—so stay curious and passionate about your craft.