My Unexpected Adventure with a Failing Electric Oven
Last winter, I faced a frustrating but surprisingly enlightening experience when my trusty electric oven suddenly stopped working. As someone who loves to cook and experiment with new recipes, this was a real setback. But I discovered that troubleshooting common electrical oven issues isn’t as daunting as it seems once you understand some basic principles and safety precautions.
Recognizing the Signs of a Malfunction
First, I learned to identify the symptoms of common problems. For instance, if your oven isn’t heating at all, it might be due to a faulty heating element or a blown fuse. Sometimes, the oven turns on but doesn’t reach the desired temperature, which could be a thermostat issue. I found that understanding these signs helps narrow down the root cause quickly.
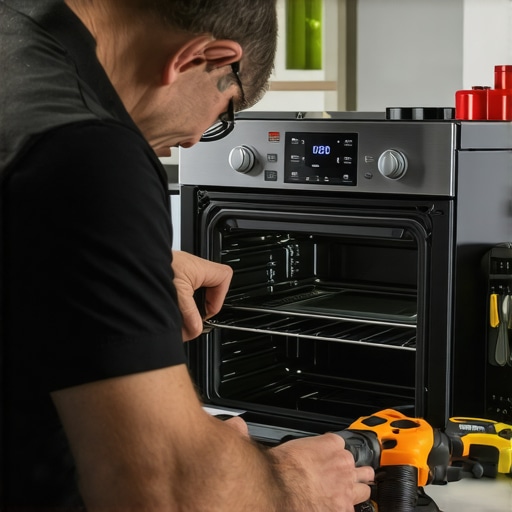
My Go-To Troubleshooting Steps
One of the first things I do is ensure the power supply is stable—checking the circuit breaker and plugging the oven into a different outlet if necessary. Then, I inspect the heating elements for visible damage, such as cracks or blisters. If everything looks fine visually, I use a multimeter to test continuity. This step reminded me how essential it is to have some basic electrical knowledge and tools, especially when dealing with high-voltage appliances. For detailed guidance, I often refer to trusted sources like DIY Kutak’s home improvement tips.
What If Your Oven Still Won’t Cooperate?
Could the problem be something more complex like the control board or sensor?
Indeed, sometimes the issue extends beyond simple parts. In my case, after replacing the faulty heating element, the oven still refused to turn on. That’s when I suspected the control board or temperature sensors. These components can fail over time, especially in older models. Testing and replacing them requires careful attention, and I recommend consulting a professional if you’re unsure. Nevertheless, understanding these components makes you more confident when discussing repairs with technicians.
Sharing My Experience and Inviting Your Stories
Through my journey, I realized that troubleshooting electric oven malfunctions is about patience and methodical steps. It’s also a great way to learn about your appliances and save money on repairs. If you’ve faced similar issues, I’d love to hear your experiences—did you manage to fix it yourself or call in a pro? Feel free to share in the comments below!
For those interested in expanding their DIY skills, exploring related projects like easy crafts to brighten up your home decor or home decor ideas can be both fun and rewarding. Remember, safety always comes first when working with electrical appliances.
Understanding the Complexities of Modern Electric Ovens
As appliances become more sophisticated, troubleshooting issues requires not only patience but also a nuanced understanding of their intricate components. For instance, many newer models incorporate smart control boards, temperature sensors, and safety features that can complicate repairs for the average DIY enthusiast. Recognizing when to seek professional help is crucial, especially for high-voltage components, but knowing the basics can empower you to diagnose problems more effectively.
How to Safely Diagnose Electrical Components in Your Oven
Before diving into repairs, ensure safety first—disconnect the oven from power. Using a multimeter, test the continuity of heating elements, sensor wiring, and control boards. It’s essential to remember that even after replacing obvious parts like the heating element, issues can persist due to faulty sensors or control modules. For example, faulty thermostats or temperature sensors often cause inconsistent heating, which can be diagnosed with precise resistance testing. For comprehensive guides, you might explore step-by-step DIY guides that include electrical testing procedures.
Expert Insight: When Should You Replace the Control Board?
The control board acts as the brain of your oven, coordinating heating, timers, and safety features. If your oven displays error codes, fails to respond to commands, or exhibits erratic behavior, the control board could be at fault. Diagnosing these issues often involves visual inspection for burnt components or corrosion and testing with a multimeter or professional diagnostic tools. Replacing the control board can be complex, but understanding its function helps you weigh repair options. For more detailed insights, consult trusted sources like expert repair techniques.

Could Your Oven’s Sensor Be the Hidden Culprit?
Temperature sensors are vital for accurate heating regulation. A faulty sensor can cause your oven to overheat, underheat, or shut down unexpectedly. Testing a sensor involves measuring its resistance at room temperature—if readings are outside the manufacturer’s specifications, replacement is advisable. Sometimes, cleaning the sensor or ensuring proper wiring can resolve issues without replacement. For precise testing methods, explore detailed repair guides that cover sensor diagnostics.
What Are the Practical Advantages of Upgrading to High-Quality Replacement Parts?
Investing in premium, compatible replacement parts can extend your oven’s lifespan and improve performance. For example, high-quality heating elements resist warping and corrosion, providing consistent heat over time. Similarly, using certified sensors and control modules ensures compatibility and reliability. This approach not only saves time and money but also enhances safety—reducing risks associated with faulty components. If you’re interested in expanding your DIY skills, consider exploring related projects like home decor ideas or garden DIYs for further inspiration.
Share Your Troubleshooting Triumphs and Challenges
By sharing your experiences, you contribute valuable insights to the DIY community. Did you manage to fix a stubborn oven problem on your own? Or did you learn a lesson the hard way? Comment below or join online forums to exchange tips and tricks. Remember, patience and methodical troubleshooting are your best tools. For more advanced projects, such as crafting intricate DIY solutions, continuous learning is key. Keep experimenting, stay safe, and enjoy the satisfaction of mastering your appliances!
Unveiling the Nuances of Modern Oven Troubleshooting
As I delved deeper into troubleshooting my oven, I realized that the complexities of modern appliances demand a nuanced understanding beyond basic checks. The integration of smart control boards, digital sensors, and safety features can sometimes turn a straightforward repair into a labyrinth of electronic diagnostics. For instance, when my oven displayed intermittent heating issues, I suspected the control module but also considered the role of firmware glitches, a factor often overlooked by DIY enthusiasts. According to expert repair guides, modern appliances increasingly rely on embedded software, making firmware resets and updates a crucial part of troubleshooting.
Deep Dive: The Role of Firmware and Software in Appliance Failures
One of the most profound realizations I had was that hardware replacements aren’t always the silver bullet. Sometimes, a simple firmware reset—akin to rebooting a computer—can resolve persistent glitches. This process involves disconnecting power, waiting for a few minutes, and then restoring power to allow the control board to recalibrate. If issues persist, updating the firmware through manufacturer-specific procedures might be necessary. This approach requires careful reading of the appliance’s technical manual, highlighting the importance of understanding the software layer that controls these devices. Sharing experiences from others who have successfully performed firmware updates can be incredibly enlightening, so I invite you to comment below with your stories.
Advanced Diagnostic Tools: Going Beyond Multimeters
While a multimeter is an essential tool, advanced diagnostics often require specialized equipment like diagnostic scanners or firmware programmers. For example, some high-end ovens have error codes stored in internal memory, which can only be retrieved with manufacturer-specific diagnostic tools. Investing in or borrowing these tools can make a significant difference, especially when dealing with complex control boards. I remember consulting with a professional technician who used a dedicated diagnostic device to identify a hidden fault in the control firmware—an issue that wouldn’t be detectable through simple resistance tests. This experience underscored the importance of recognizing when to escalate from DIY fixes to professional diagnostics, especially for intricate electronic faults.
Reflecting on the Journey: Learning from Complexity
My journey through oven troubleshooting has taught me that understanding the intertwined hardware and software systems enhances our confidence and competence. It’s not just about replacing parts but about interpreting signals, error codes, and firmware behaviors. This experience has also inspired me to explore further into related DIY projects, such as building a smart home automation system or upgrading electrical circuits, to better understand the underlying principles. If you’ve faced similar challenges or have mastered advanced troubleshooting techniques, I encourage you to share your insights. Engaging with a community of DIY enthusiasts can provide invaluable support and inspiration, driving us all toward more sophisticated and rewarding projects.
Unraveling Firmware Mysteries in High-Tech Appliances
As I delved deeper into the complexities of modern electric ovens, I realized that firmware and software layers are often the silent culprits behind persistent malfunctions. Faulty firmware can lead to erratic behavior, unresponsive controls, or error code ambiguities that leave even seasoned DIYers scratching their heads. For example, a recent experience involved an oven that intermittently failed to heat, despite all hardware components testing perfect. This anomaly pointed me toward firmware glitches, which I diagnosed with manufacturer-specific diagnostic tools that read internal error logs, revealing firmware corruption as the root cause (expert repair guides).
How Can Firmware Resets and Updates Resolve Persistent Faults?
A simple firmware reset, akin to rebooting a computer, can often clear temporary glitches. This involves disconnecting the appliance from power, waiting a few minutes, then restoring power to allow the control board to recalibrate. If problems persist, updating the firmware via manufacturer-provided procedures ensures the appliance runs the latest software version, fixing known bugs and enhancing stability. This process demands meticulous reading of technical manuals, emphasizing the importance of understanding embedded software layers within these advanced devices. Sharing your experiences with firmware updates can inspire others—feel free to comment below with your success stories or challenges.
Advanced Diagnostic Tools: Beyond Basic Multimeters
While multimeters are invaluable for electrical component testing, diagnosing firmware-related issues requires specialized equipment. Diagnostic scanners capable of interfacing directly with control modules can retrieve error logs, reset firmware, or perform calibration routines. For instance, in my own troubleshooting journey, I utilized a dedicated diagnostic device to access hidden error codes stored internally, which pinpointed firmware corruption as the culprit—a task impossible with just a multimeter (professional diagnostic tools).
Are There Risks to Firmware Manipulation and How to Mitigate Them?
Firmware updates and resets carry inherent risks, including bricking the device if procedures are misapplied. Always ensure you follow official manuals, use manufacturer-approved tools, and maintain a stable power supply during updates. If you’re uncertain, consulting a professional technician with experience in electronic appliance firmware can save you time and prevent damage. Remember, understanding firmware behaviors empowers you to diagnose issues more confidently and decide when professional help is warranted.
Engaging with the DIY Community for Troubleshooting Wisdom
Sharing your firmware troubleshooting adventures not only enriches the collective knowledge but also provides practical insights for others facing similar challenges. Have you successfully updated or reset your appliance’s firmware? Or encountered setbacks that taught you a valuable lesson? Join online forums, comment sections, or local DIY groups to exchange tips and experiences. The journey of mastering complex appliance diagnostics is ongoing and collaborative efforts accelerate learning—so don’t hesitate to contribute your story.
Exploring Further: Building a Smarter Home with Integrated Diagnostics
If you’re eager to extend your DIY mastery, exploring integration of smart sensors and automation systems can provide real-time diagnostic capabilities. Installing IoT-enabled sensors to monitor temperature, humidity, or electrical loads can preemptively flag potential issues before appliance failure. For example, connecting smart thermostats or control modules with your oven can allow remote diagnostics and firmware updates, transforming your kitchen into a high-tech hub (smart home solutions). Such projects marry hardware upgrades with software management, elevating your DIY prowess and appliance longevity.
Things I Wish I Knew Earlier (or You Might Find Surprising)
Unexpected Complexity
At first, I thought fixing an electric oven would be straightforward, but I soon realized that modern appliances are more intricate than they appear. The control boards and sensors can hide issues that aren’t obvious without proper diagnosis.
The Power of Patience
Rushing into repairs often leads to mistakes. Taking my time to systematically test each component saved me from unnecessary replacements and frustration, teaching me that patience truly pays off.
Safety Comes First
Handling high-voltage appliances is risky. Disconnecting power and using the right tools isn’t just advice—it’s essential. I learned this the hard way when I neglected safety precautions and nearly caused an electric shock.
Diagnosing Isn’t Just Guesswork
Using a multimeter and following step-by-step guides helped me identify the faulty part accurately. Relying on intuition alone can lead you astray—diagnosis requires methodical testing.
Firmware Can Be the Culprit
Sometimes, the problem isn’t hardware but software. Resetting or updating the control board firmware fixed issues that hardware replacement couldn’t solve, opening my eyes to the importance of software diagnostics.
Professional Help Isn’t a Failure
Knowing when to call in a professional saved me from damaging my oven further. Recognizing my limits was a valuable lesson in DIY repair.
Resources I’ve Come to Trust Over Time
- DIY Kutak’s Home Improvement Tips – A reliable source for step-by-step guides that helped me understand electrical diagnostics better.
- Manufacturer’s Manuals – Always my first reference for troubleshooting specific models and firmware updates.
- Online Forums – Communities like Reddit’s DIY section provided practical advice and shared experiences that I found invaluable.
Parting Thoughts from My Perspective
Embarking on the journey of troubleshooting my electric oven taught me that patience, safety, and a willingness to learn are key. Modern appliances may be complex, but understanding their inner workings—both hardware and software—can make DIY repairs not only possible but rewarding. If this resonates with you, I’d love to hear your own stories or tips. Sharing our experiences helps build a stronger DIY community and encourages everyone to take on challenges with confidence. Remember, every repair is a learning opportunity—so keep experimenting and stay safe!