My Journey to Perfect Drywall Repairs: From Frustration to Confidence
I’ll never forget the day I discovered how satisfying it was to fix a large drywall hole with precision. It was a disaster waiting to happen—an accidental punch through during a home improvement project. I initially thought it would be a complicated, messy job, but after some research and practice, I realized that proper drywall patching can be straightforward and even enjoyable. Today, I want to share my personal tips on seamless drywall repair, especially for those large holes that seem daunting.
Why Precision Matters When Repairing Large Drywall Holes
In my experience, patching large holes is not just about covering the damage; it’s about restoring the integrity and aesthetic of your wall. Using high-quality materials like joint compound, mesh tape, and a sturdy drywall patch is essential. I learned that a meticulous approach—measuring, cutting accurately, and smoothing each layer—makes all the difference. For detailed guidance, I often refer to resources like DIY guides for all skill levels.
Step-by-Step Personal Tips for Seamless Drywall Repair
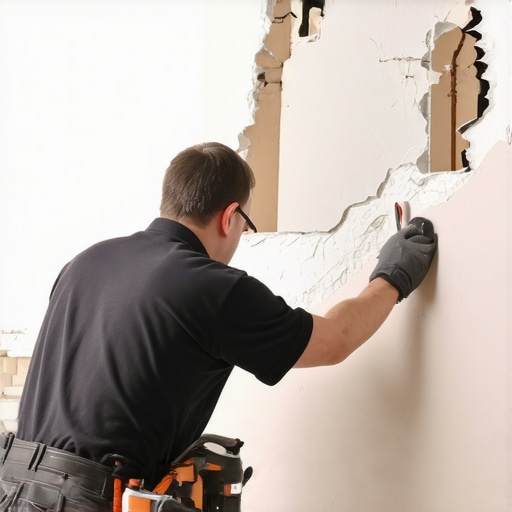
How do I ensure my patch blends perfectly with the existing wall?
Great question! Achieving a seamless blend starts with preparing the surface. I always sand the area around the hole to ensure the patch adheres well. Using a drywall saw, I cut a clean, square piece of drywall slightly larger than the hole. I then secure it with drywall screws, making sure it’s flush. Applying mesh tape over the seams, I spread a thin layer of joint compound, feathering the edges for a smooth transition. Sanding between coats and applying multiple layers helps create a flat, even surface that’s ready for painting.
The Role of Patience and Practice in Drywall Repair
At first, I struggled with getting the joint compound smooth, but over time, I developed a steady hand and patience. I found that lighting the wall from different angles during sanding reveals imperfections I might have missed. This process, although time-consuming, pays off in the final result—walls that look as if the hole was never there. If you’re interested in more advanced techniques, exploring advanced DIY repair methods can be inspiring.
Why Do Some Drywall Patches Fail, and How Can I Prevent It?
In my experience, poor surface preparation and rushing the drying process are common culprits. I’ve learned that patience and proper technique—like allowing each layer of joint compound to dry completely before sanding—are key. Additionally, using a primer before painting helps the patch blend in more naturally. Trust me, taking your time results in a professional-looking repair that lasts for years.
What’s the best way to finish and paint after drywall patching?
Once the patch is smooth and dry, I use a high-quality primer to seal the surface. Then, matching the wall color with a good-quality paint makes the repair nearly invisible. I recommend exploring creative solutions for home decor, like DIY home decor ideas, to complement your newly repaired wall. And don’t forget—sharing your experience in the comments can help others master their drywall repairs too!
Mastering the Art of Seamless Drywall Finishing
Once the patching process is complete, the journey toward a flawless wall continues with precise finishing techniques. Achieving a professional look involves more than just applying joint compound; it requires a keen eye for detail and patience. For instance, I always recommend applying thin coats of joint compound, letting each layer dry thoroughly before sanding. This prevents cracks and uneven surfaces, ensuring your repair blends seamlessly with the existing wall.
The Nuances of Sanding and Surface Preparation
Sanding can make or break your drywall repair. I suggest using fine-grit sandpaper and a sanding block for better control. Light, even strokes help avoid gouges that can be difficult to fix later. Additionally, ensure the surface is dust-free before applying primer. This step is crucial because dust particles can cause paint to bubble or obscure the smoothness of your finish. Proper preparation lays the foundation for a paint job that is both durable and visually appealing.
Choosing the Right Primer and Paint for a Seamless Finish
Priming is an often overlooked but vital step. I favor high-quality primers that seal the surface and provide a uniform base for paint. When selecting paint, matching the sheen and color precisely to your existing wall is key. For example, using a satin finish often helps hide minor imperfections better than flat paint. If you want to elevate your wall’s aesthetics further, exploring creative home decor ideas—like textured finishes or decorative techniques—can add personality to your space. Check out DIY home decor ideas for inspiration.
How Can I Address Common Drywall Repair Challenges?
One recurring issue I see is the appearance of visible seams or texture mismatch. To combat this, I recommend feathering the edges of the joint compound generously and using a damp sponge to smooth out the surface after applying each layer. For textured walls, matching the existing pattern with a sponge or brush can make the repair nearly invisible. Sometimes, subtle adjustments in paint sheen or employing a small roller can blend the repaired area seamlessly. If you’re interested in advanced techniques, exploring advanced DIY repair methods can provide valuable insights.
What Are the Benefits of Professional-Grade Tools and Materials?
Investing in quality tools—such as a drywall sander, high-quality joint compound, and professional-grade brushes—can significantly reduce frustration and improve results. For example, a good drywall sander with a dust collection attachment minimizes mess and ensures a smoother surface. Using premium materials not only enhances durability but also provides a more refined finish, which is particularly important if you plan to sell or rent your property. Remember, the effort you put into using the right tools pays off in a wall that looks flawless and lasts for years.
Have you considered the impact of lighting when evaluating your drywall repair?
Lighting plays a critical role in detecting imperfections. I often move a flashlight around the repaired area at different angles to catch any uneven spots or minor flaws before painting. Proper lighting reveals shadows and highlights that can make imperfections more apparent, allowing for precise touch-ups. For additional ideas on creating a well-lit workspace, see smart DIY lighting solutions.
Deepening Your Drywall Repair Skills: Navigating Complex Challenges and Innovative Techniques
As I’ve delved further into drywall repair, I’ve realized that mastering the basics is just the beginning. The real artistry lies in addressing nuanced challenges and embracing innovative solutions that elevate your craftsmanship. For instance, when working with textured walls or matching intricate patterns, every step demands a keen eye and a strategic approach. The journey from a rough patch to a seamless wall is filled with opportunities to refine your techniques and push your creative boundaries.
How Do I Achieve Perfect Seamless Blends on Textured Walls?
One of the most rewarding yet complex aspects of drywall repair is blending patches into textured walls. My experience shows that the key is understanding the specific texture—be it knockdown, popcorn, or swirl—and replicating it during the finishing process. I often use specialized tools like stippling brushes or sponges to mimic the existing pattern before applying primer and paint. For example, when matching a knockdown texture, I apply a thin layer of joint compound, then lightly spray it with water, and use a drywall knife to create the knockdown effect before it dries. This technique requires patience and a gentle touch but results in a virtually invisible repair that maintains the wall’s character.
< >
>
To master these techniques, I recommend studying advanced tutorials and experimenting with small test patches. Each wall has its unique quirks, and understanding how to adapt your methods accordingly makes all the difference. If you’re interested in exploring more sophisticated DIY projects, check out advanced DIY repair methods.
How Can I Correctly Handle Texture Mismatch and Seam Visibility?
Texture mismatch is a common frustration, but I’ve found that meticulous feathering and layering can minimize its appearance. Using a damp sponge or a fine-tipped brush, I gently blend the edges of the joint compound into the existing wall. Sometimes, I employ a technique called “feathering on a curve,” which involves gradually thinning the compound outward from the repair, creating a smoother transition. If the mismatch persists, I consider applying a light texture over the entire wall or the repaired area — a process that can be achieved with textured spray or sponge techniques. This way, the repair becomes part of the wall’s overall aesthetic rather than a flaw.
Matching the wall’s finish is equally important. For example, if the existing surface has a matte finish, using a semi-gloss paint can highlight the repair. Conversely, a satin sheen often helps hide minor imperfections. For added durability and visual consistency, I always recommend applying a high-quality primer before painting, which seals the joint compound and enhances adhesion.
What Are the Most Advanced Tools and Materials for Flawless Drywall Repairs?
Investing in professional-grade tools can dramatically improve your results. For instance, a pole sander with dust collection helps achieve a perfectly smooth surface without the mess, while high-quality taping knives allow for better control and less joint lines. I’ve also experimented with setting compounds that have faster drying times or superior adhesion, especially when working on larger patches or textured surfaces. Additionally, using a lighted magnifier or a bright LED lamp while sanding reveals imperfections that might otherwise go unnoticed, ensuring a final finish that’s truly seamless.
In my journey, I’ve come to appreciate that patience and the right tools are as crucial as skill. Sometimes, taking the extra time to use a fine-grit sanding sponge or multiple thin coats of joint compound results in a wall that looks professionally finished and lasts for years. For those eager to explore more advanced projects, see advanced DIY techniques.
How Do Lighting and Observation Techniques Impact the Final Finish?
Lighting is often overlooked but plays a pivotal role in assessing your repair work. I always move a flashlight around the wall from different angles after sanding and before painting. Shadows reveal surface imperfections, such as gouges, uneven patches, or brush strokes, that might not be visible in flat light. By addressing these flaws at this stage, I ensure the final coat of paint will look smooth and flawless. Additionally, I find that natural light during daytime is ideal for evaluating color matching and texture consistency.
Creating a well-lit workspace and developing an eagle eye for detail are skills that come with practice. If you’re interested in enhancing your DIY environment, explore smart DIY lighting solutions to make your projects even more successful.
Refining Your Skills: Tackling Texture Mismatch with Artistic Precision
One of the more subtle yet complex challenges in drywall repair is seamlessly integrating textured surfaces. Over the years, I’ve developed nuanced methods for matching textures like knockdown, popcorn, or swirl patterns. Achieving a flawless blend requires understanding the specific texture’s characteristics and employing specialized tools such as stippling brushes, sponges, or spray equipment. For example, when restoring a knockdown texture, I apply a thin layer of joint compound, lightly spray it with water, and use a drywall knife to create the knockdown effect before it dries. This process demands patience, a gentle touch, and a keen eye for detail, but the results are remarkably satisfying, as the repair becomes virtually invisible to the discerning eye.
Strategic Layering and Feathering: The Art of Seamless Transitions
To prevent seams from betraying your repair, I emphasize meticulous feathering and layering. Starting with thin coats of joint compound, I gradually extend the coverage beyond the repair area, creating a soft transition into the existing wall. Using a damp sponge or a fine-tipped brush, I gently blend the edges, ensuring no harsh lines remain. This layered approach, coupled with patience between coats, helps in achieving a surface that appears uniform and natural. For textured walls, I often replicate the existing pattern on the feathered edges before priming and painting, which adds an extra layer of authenticity to the repair.
Advanced Tools and Materials: Elevating Your DIY Drywall Game
Investing in professional-grade tools significantly enhances the quality of your repairs. A pole sander with a dust-collection system, high-quality taping knives, and setting compounds with rapid drying times are game-changers. I’ve also experimented with specialized primers that seal joint compound more effectively, preventing paint absorption differences. These tools and materials reduce frustration, save time, and produce a finish that rivals professional work. For those eager to push their skills further, exploring advanced DIY repair techniques can open new creative avenues and technical mastery.
The Power of Lighting in Detecting Imperfections
Lighting remains one of my most powerful allies in drywall repair. I often move a bright flashlight around the repaired area at different angles after sanding and before painting. Shadows illuminate surface imperfections—gouges, uneven patches, or brush strokes—that are otherwise hidden in flat lighting. This practice allows me to make precise touch-ups, ensuring a smooth, flawless finish. Natural daylight provides the most accurate assessment of color matching and texture consistency, and I recommend creating a well-lit workspace for optimal results. Developing this observational skill is crucial for achieving professional-grade repairs and is a technique I continually refine in my projects.
Engage with Advanced Insights: Elevate Your Drywall Mastery
If you’re passionate about elevating your drywall repair skills, I invite you to explore more advanced methods and share your experiences. Mastering these techniques can transform your DIY projects into works of art that blend seamlessly into your home’s aesthetic. For comprehensive guides and personalized advice, don’t hesitate to reach out to me. Together, we can unlock the full potential of your DIY craftsmanship and achieve results that stand the test of time.
Things I Wish I Knew Earlier (or You Might Find Surprising)
Patience Is Your Best Friend
Early in my drywall repair journey, I often rushed through the process, only to regret uneven surfaces and visible seams. It wasn’t until I slowed down, letting each coat of joint compound dry thoroughly, that I saw real improvement. Trust me, patience pays off with a flawless finish.
Lighting Reveals Everything
Moving a bright flashlight around the repaired wall at different angles helps me spot imperfections I might miss in flat light. Shadows can highlight gouges or uneven patches, guiding me to make precise touch-ups before painting.
Quality Tools Make a Difference
Investing in a good drywall sander, high-quality taping knives, and professional-grade joint compound really elevates your results. The difference between a DIY patch and a professional finish often comes down to the tools used.
Texture Matching Is an Art
Replicating existing wall textures like knockdown or swirl patterns requires understanding and the right tools. I’ve learned that experimenting with small test patches helps me perfect the technique before tackling the main repair.
Proper Surface Preparation Is Non-Negotiable
Sanding the area around the hole and cleaning off dust before applying primer ensures the patch adheres well and blends seamlessly. Skipping this step can lead to cracks or uneven paint coverage.
Layering and Feathering Are Key
Applying thin coats of joint compound and feathering the edges into the wall creates a smooth transition. Rushing this step often results in visible seams that are hard to hide.
Resources I’ve Come to Trust Over Time
- DIY guides for all skill levels: These practical step-by-step instructions helped me understand the basics and more advanced techniques, making DIY drywall repair less intimidating.
- Home Improvement Expert Websites: Sites like The Family Handyman provided valuable tips on tools and surface preparation, boosting my confidence in tackling repairs.
- YouTube Channels: Watching professionals demonstrate textures and finishing techniques gave me visual guidance that’s hard to find elsewhere.
- Paint Manufacturer Recommendations: Their guides on primer and paint matching helped me achieve seamless color blends, especially on textured walls.
Parting Thoughts from My Perspective
Ultimately, mastering drywall repair is about patience, attention to detail, and investing in the right tools. I’ve found that small improvements—like perfecting surface prep or carefully feathering joint compound—make a huge difference in the final look. If this resonates with you, I’d love to hear your own experiences or tips. Sharing our stories can inspire others on their DIY journey. Feel free to drop a comment or share this with someone who might find it helpful. Happy repairing!