My Personal Journey with Veneer Repair
Recently, I found myself staring at a small but stubborn veneer chip on my beloved coffee table. At first, I was tempted to ignore it, but I knew that with a bit of patience and the right techniques, I could restore its beauty. Sharing my experience here, I hope it helps you tackle your veneer damage with confidence.
Understanding Veneer Damage: What I Learned
Veneer damage can be caused by moisture, impact, or even age. I discovered that assessing the extent of the damage is crucial before choosing a repair method. For minor scratches and chips, simple touch-ups can do wonders, but deeper gouges might require more involved solutions, like veneer patching or replacement.
Expert Tips for a Seamless Finish
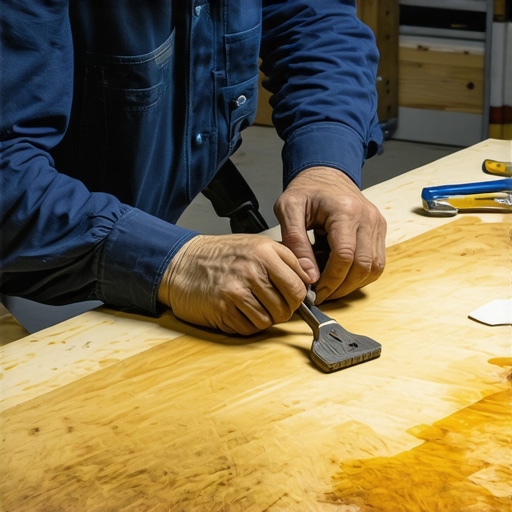
One of the first tricks I picked up was using a fine-grit sandpaper to lightly smooth the area around the damage. This helps the repair material bond better and reduces rough edges. When applying filler, I made sure to match the color closely—mixing wood stain with the filler or choosing a pre-colored product. A little patience with drying times ensures the repair blends seamlessly.
How Can I Achieve a Professional Look?
To make the repair invisible, I used a color-matched veneer patch cut precisely to size. Carefully gluing it in place and pressing it with a damp cloth helped adhere it smoothly. After sanding and staining, I finished with a clear coat to protect the surface. The result was so satisfying that I felt like a true DIY pro!
What Are the Best Products for Veneer Repair?
From my research, I found that high-quality wood fillers and veneer patches are essential. I recommend checking out products like DIY home improvement tips for detailed product reviews. Using reputable brands ensures durability and a natural look.
Sharing My Success and Inviting Your Stories
If you’re considering repairing veneer damage, don’t hesitate to give it a try. It’s a rewarding process that saves money and preserves your furniture’s character. Have you tried similar repairs? I’d love to hear your tips or stories—please share in the comments below!
Delving Deeper into Veneer Repair Techniques
Once you’ve assessed the extent of veneer damage, the next step is understanding the nuances of repair materials. It’s not just about choosing any wood filler; selecting products with elastic properties helps accommodate wood movement over time, preventing future cracks. For veneer patches, thin slices of matching veneer are ideal, but in a pinch, high-quality veneer patches from reputable brands can save time and ensure uniformity.
Advanced Methods for Concealing Repairs
To achieve an invisible repair, experts often employ a technique called feathering. This involves sanding the edges of the patch or filler to gradually blend into the surrounding veneer. Using a fine-grit sanding block, gently taper the repair area ensures a smooth transition. Post-sanding, applying a matching stain or dye is critical. For best results, apply stain in thin layers, allowing each to dry thoroughly, then lightly buff with a soft cloth for a natural finish.
Expert Insights on Protecting Your Restoration
After completing the repair, sealing the surface with a clear polyurethane or lacquer not only protects the repair but also enhances the veneer’s natural beauty. Matte, satin, or gloss finishes can all be suitable depending on your furniture’s existing sheen. Remember, applying multiple thin coats yields a more durable surface than a single thick layer. For furniture in high-moisture areas, consider using water-resistant finishes to prolong the repair’s lifespan.
How Can You Prevent Future Veneer Damage?
Prevention is often overlooked but essential. Maintaining consistent humidity levels in your home minimizes wood expansion and contraction. Using coasters and placemats prevents impact damage and moisture exposure. Regularly cleaning with gentle, non-abrasive products preserves veneer integrity. For outdoor or exposed furniture, applying a UV-protective finish can prevent sun damage and color fading.
What Are the Most Reliable Products for Veneer Repair and Preservation?
From my research and experience, high-quality wood fillers like Timbermate or Minwax offer excellent adhesion and color-matching capabilities. For veneer patches, manufacturers such as Ironwood or Lee Valley provide authentic, thin veneer sheets that blend seamlessly. Additionally, consulting trusted sources like DIY home improvement tips can offer comprehensive reviews and product comparisons to guide your choice. Using reputable brands ensures durability, a natural appearance, and long-term satisfaction.
Share Your Veneer Repair Experiences and Tips
If you’ve undertaken veneer restoration or are planning to, sharing your insights can help others learn and succeed. Remember, patience and attention to detail are key. Whether it’s a minor scratch or a significant gouge, every repair improves with practice. Feel free to comment below with your tips, questions, or success stories. And don’t forget—sometimes, exploring creative solutions like DIY veneer inlays or decorative borders can elevate your furniture to new artistic heights. For ideas on enhancing your space, check out home decor DIY projects for inspiration.
Reflections on the Art of Veneer Restoration and Personal Growth
As I delved deeper into the nuances of veneer repair, I realized that each project is more than just a technical challenge; it’s an opportunity for personal growth and creative expression. My journey has taught me patience, precision, and the importance of embracing imperfections as part of the unique character of furniture. Every repair I undertake feels like a conversation with the piece, respecting its history while enhancing its beauty.
Embracing the Complexity: When Repairs Reveal Deeper Layers
Sometimes, beneath the veneer damage, I discover hidden flaws or previous repairs that tell a story of past mishaps or loving restoration efforts. These moments remind me that furniture, much like life, is layered and complex. Addressing these deeper issues requires a thoughtful approach—using flexible fillers and delicate feathering techniques—to ensure that the repair not only looks seamless but also respects the piece’s integrity. For advanced techniques, I often consult resources like encaustic painting layering methods to draw inspiration for blending repairs artistically.
How Can I Ensure Long-Term Durability in Veneer Repairs?
In my experience, the longevity of a veneer repair hinges on meticulous surface preparation and the choice of high-quality products. Applying a thin, even layer of a flexible veneer adhesive before placing the patch minimizes the risk of future cracks caused by wood movement. Sealing the repair with multiple coats of a durable, UV-resistant clear finish, like polyurethane, further safeguards against moisture and UV damage. I learned that understanding the environmental conditions—such as humidity fluctuations—is crucial for maintaining the repair over time. For outdoor furniture, I now always recommend using water-resistant and UV-protective finishes, which can be found in trusted brands and help preserve the aesthetic appeal for years.
What Inspired My Passion for DIY Furniture Restoration?
My fascination with furniture repair began as a necessity—finding beauty in old, worn pieces and transforming them into personalized art. Over time, this passion evolved into a hobby that combines craftsmanship, sustainability, and creativity. Sharing my successes and failures with fellow DIY enthusiasts in the community has enriched my understanding and fueled my curiosity to explore more advanced techniques, such as advanced layering in art or eco-friendly finishes. These explorations remind me that every project is an ongoing learning process, and that the art of repair is deeply intertwined with self-expression and environmental consciousness.
Inviting Your Stories and Experiences
If you have embarked on your own veneer repair journey, I invite you to share your stories and insights. Each experience adds a valuable perspective to our collective knowledge, whether it’s a clever trick, a lesson learned, or a creative solution. Remember, mastering veneer repair is not just about achieving a perfect finish, but about embracing the process and appreciating the history embedded in every piece. Feel free to comment below or explore more inspiring DIY projects like home decor DIY ideas to elevate your space and skills.
Refining Your Approach: The Art of Feathering and Blending
After mastering basic veneer repairs, I delved into the subtleties of feathering, a technique that elevates the quality of restoration from satisfactory to professional-grade. Feathering involves gently sanding the edges of a veneer patch or filler with a fine-grit sandpaper, such as 400 or 600 grit, to create a smooth, tapered transition that seamlessly merges with the surrounding surface. This delicate process requires patience and a steady hand, as over-sanding can cause further damage, while under-sanding leaves a visible edge. When executed correctly, feathering allows the stain or finish to diffuse naturally across the repair, making the intervention virtually invisible.
The Role of Advanced Color-Matching and Dyes
Achieving a flawless aesthetic demands more than just a close color match; it requires a nuanced understanding of how light interacts with different finishes and wood tones. I often use a combination of water-based or alcohol-based dyes to fine-tune the hue of my repairs. These dyes can be layered in thin, controlled applications, allowing me to replicate the subtle variations in the original veneer. For instance, mixing a small amount of ebony dye with a transparent base can deepen the color, while a touch of amber can warm up the tone. Applying these dyes with a soft brush or cotton swab, then allowing ample drying time, ensures an even, natural appearance. For more insights on color-matching, I recommend exploring advanced layering techniques in encaustic painting, which shares similar principles of controlled color blending.
Sealing and Protecting Your Restoration for Longevity
To safeguard my repairs against future wear and environmental factors, I opt for high-quality, flexible sealants such as polyurethane or varnish designed for veneer surfaces. I prefer multiple thin coats over a single thick layer, as this approach minimizes runs and ensures an even finish. For areas exposed to moisture or sunlight, I choose water-resistant and UV-protective formulations that prolong the life of the repair. When applying the final coat, I use a foam brush or a fine brush, working in a dust-free environment to avoid imperfections. This layer not only seals the repair but also enhances the depth and richness of the veneer’s natural grain. Regular maintenance with gentle cleaning agents and avoiding abrasive tools further preserves the integrity of the restoration.
Encouraging Deep Engagement: Your Next Steps in Veneer Mastery
If you’re eager to elevate your veneer repair skills, I invite you to explore comprehensive resources and share your experiences. Every project deepens your understanding of material behaviors and refines your technique. For those interested in pushing the boundaries of traditional repair, experimenting with artistic inlays or decorative veneer strips can transform a simple fix into a statement piece. Remember, mastering veneer repair is as much about patience and observation as it is about technique. Dive into our detailed guides and join a community of passionate DIYers who are transforming furniture and embracing the art of restoration. Your next masterpiece awaits—start today!
Things I Wish I Knew Earlier (or You Might Find Surprising)
Hidden Layers of Veneer
One thing I learned the hard way is that veneer damage often reveals deeper issues beneath the surface, like previous repairs or hidden flaws. Recognizing these early can save you time and frustration later.
The Power of Feathering
Feathering, or gently blending the edges of your repair, is a game-changer. When I first started, I underestimated how crucial smooth transitions are for a seamless finish. Patience with this step makes all the difference.
Color Matching as an Art
Matching stain or dye perfectly is trickier than it looks. I found that layering multiple thin applications and letting each dry thoroughly creates the most natural look. Don’t rush this process.
Sealing for Durability
Sealing your repair with a quality clear coat protects it from future damage and enhances the veneer’s natural beauty. I recommend multiple thin coats, especially in high-use areas.
Preventative Care
Simple habits like using coasters, maintaining humidity, and gentle cleaning extend the life of your veneer and keep repairs looking fresh for longer.