My Journey from Pallet to Polished Furniture
Several years ago, I stumbled upon a weathered pallet in my backyard, and an idea sparked: could I turn this rough wood into something beautiful and functional? That initial experiment ignited my passion for deconstructed pallet wood and advanced DIY furniture making. Today, I want to share my personal insights and the techniques I’ve refined over the years, hoping to inspire fellow DIY enthusiasts.
Understanding the Unique Character of Deconstructed Pallet Wood
One of the first lessons I learned was appreciating the character and history embedded in pallet wood. Each plank tells a story—weathered textures, nail holes, and rich hues. To harness this charm, I started experimenting with different deconstruction methods, carefully removing nails and separating planks without damaging the wood. Proper cleaning and sanding are crucial to reveal the natural beauty and prepare it for finishing.
Advanced Techniques for Crafting High-Quality Furniture
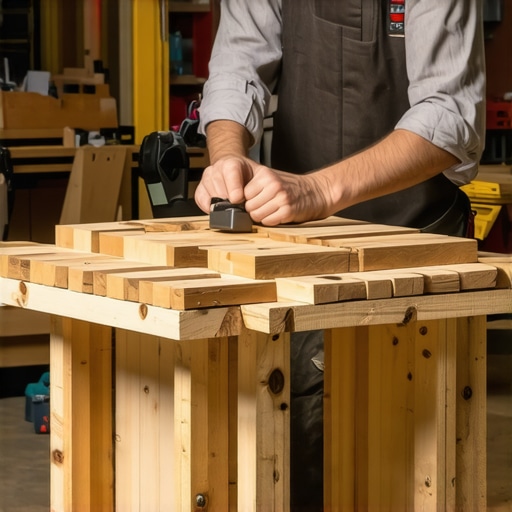
My favorite part of this journey has been mastering joinery techniques suited for reclaimed wood. I often use pocket-hole joinery and dowels, which are both strong and less invasive. For aesthetic appeal, I incorporate visible joinery, emphasizing the rustic charm. Additionally, I pay close attention to grain direction and stability, especially since pallet wood can be uneven. Applying a protective finish, like tung oil or polyurethane, enhances durability while preserving the rustic look.
How Do You Achieve a Fine Finish on Reclaimed Pallet Wood?
Achieving a fine finish requires patience and the right materials. I typically start with a thorough sanding, progressing from coarse to fine grit. To enhance the wood’s natural hues, I sometimes use a wood conditioner before applying stain or oil. For sealing, I prefer matte polyurethane for a subtle, non-glossy finish that complements the rustic aesthetic. Remember, the goal is to highlight the wood’s character, not mask it.
What Are Some Common Challenges in Working with Deconstructed Pallet Wood?
One challenge I often face is warped or knotted wood, which can complicate assembly. To tackle this, I select planks carefully and sometimes use clamps or heat to straighten warped pieces. Another issue is nail or staple remnants, which require careful removal to prevent damage. I recommend always inspecting each plank thoroughly before starting your project.
If you’re inspired to try your hand at transforming pallet wood into fine furniture, I encourage you to experiment with different techniques and share your results. Feel free to leave a comment below about your experiences or ask for specific advice. For more tips on DIY woodworking, check out DIY projects for beginners.
Transforming Pallet Wood into Artistic Masterpieces
Ever wondered how to elevate your DIY projects using reclaimed pallet wood? The key lies in understanding the nuances of deconstruction, selecting the right planks, and applying expert finishing techniques. My journey began with simple pieces, and over time, I mastered advanced joinery and finishing methods that bring out the rustic charm while ensuring durability.
Choosing the Perfect Pallet for Your Project
Selection is critical. Not all pallets are created equal; some are treated with chemicals that can be harmful or affect stain absorption. I recommend inspecting each pallet thoroughly, opting for those marked with HT (heat-treated) stamps rather than chemically treated ones. This ensures safety and better quality for your furniture. Moreover, I look for planks with interesting grain patterns and minimal warping, which are essential for achieving a professional finish.
Deconstruction Techniques for Preserving Natural Beauty
Deconstructing pallets without damaging the wood requires patience and finesse. I use a combination of prying tools and careful work with a saw to remove nails and staples. A crucial step is to clean the planks immediately after deconstruction—removing residual nails and debris. For a polished look, I sometimes use a heat gun to straighten warped pieces or to soften old glue, making the process smoother. This meticulous approach ensures each piece retains its character and structural integrity.
Expert Joinery and Assembly Hacks
When it comes to joinery, I prefer pocket-hole screws and dowels, which are less invasive and maintain the rustic appeal. For structural stability, I pay close attention to grain direction, especially since reclaimed wood can be uneven. Clamping and testing fit before final assembly is essential. I also incorporate visible joints intentionally, turning them into design features that enhance the aesthetic appeal. For more detailed guidance, exploring step-by-step DIY guides can be invaluable.
Finishing Touches to Highlight Rustic Charm
Achieving a refined finish involves multiple sanding stages, starting with coarse grit and progressing to very fine. To emphasize the wood’s natural hues, I often apply a wood conditioner before staining or oiling. For sealing, matte polyurethane works wonders, offering protection without gloss. Sometimes, I use tung oil for a more natural, hand-rubbed finish. The goal is to preserve the wood’s character, including knots and grain patterns, while ensuring the piece is resilient for everyday use.
What Are the Practical Challenges in Working with Reclaimed Pallet Wood?
One common issue is warped or knotted wood, which can impede assembly. To address this, I select planks carefully and sometimes use heat or clamps to straighten warped sections. Nail and staple remnants are another obstacle; they require precise removal to avoid damaging the wood. Additionally, some pallets may contain chemical treatments, so I always inspect for safety before starting a project. Understanding these challenges and planning accordingly is vital for producing professional-quality furniture.
If you’re inspired to craft distinctive furniture pieces from reclaimed wood, I encourage you to experiment with different techniques and document your progress. Sharing your experience can inspire others in the DIY community. For further insights and innovative solutions, visit smart DIY solutions.
Deepening the Craft: Navigating Complex Grain and Texture Challenges
One of the most rewarding yet intricate aspects of working with reclaimed pallet wood is managing the unpredictable grain patterns and textures that come with age and previous use. I vividly recall a project where I encountered a plank with a wildly divergent grain, making traditional joinery almost impossible without risking splitting or compromising strength. To address this, I began experimenting with steaming techniques, similar to those used in traditional boat-building, which softened the wood enough to straighten and work with more control. This process not only preserved the integrity of the piece but also revealed hidden beauty in the natural patterns, adding a unique character to the finished piece.
Refining Finishing Techniques to Highlight Rustic Elegance
Achieving a refined finish that accentuates the rustic charm requires a nuanced approach. I’ve found that applying a light coat of tinted oil can deepen the natural hues and bring out subtle variations in the grain. For example, I often use a walnut or cedar oil, which penetrates deeply and enhances the character without adding gloss. After oiling, I prefer a matte polyurethane for sealing, as it preserves the authentic, matte rustic appearance while providing durable protection. For pieces with knots or more pronounced textures, I sometimes lightly distress the surface with fine steel wool to create a tactile, vintage feel that invites touch and interaction.
How Do You Ensure Structural Integrity with Uneven and Warped Pallet Planks?
One of the biggest challenges I’ve faced is maintaining structural integrity when dealing with warped or uneven planks. I learned that pre-treating the wood with a combination of heat and moisture, then clamping it in a custom jig overnight, can significantly reduce warping. Additionally, I now select planks with minimal warp and focus on grain direction during assembly, aligning the strongest fibers with load-bearing elements. Reinforcing joints with hidden metal brackets or corner braces can also add stability without compromising the rustic aesthetic. Furthermore, I’ve started incorporating mechanical fasteners in combination with traditional joinery to ensure longevity, especially for furniture intended for daily use. For more insights into effective joinery techniques, exploring step-by-step DIY guides can be invaluable.
Incorporating Personal Touches: The Art of Customization
One of my favorite aspects of working with reclaimed wood is the opportunity for personal expression. I often carve initials, dates, or decorative patterns into the wood surface using rotary tools or pyrography pens. These subtle details transform a functional piece into a cherished heirloom. I also experiment with adding insets of contrasting woods, like cherry or walnut, to create visual interest. Each project becomes a story, blending history with personal creativity. If you’re interested in exploring decorative techniques, I recommend checking out marquetry and inlay techniques for advanced decorative effects.
Encouraging Personal Exploration and Sharing Experiences
Every project with reclaimed pallet wood presents unique challenges and learning opportunities. I invite you to share your own experiences, whether they involve overcoming warping, perfecting a finish, or adding personal touches. Documenting your journey not only enriches your skills but also inspires others in the DIY community. Feel free to leave a comment or reach out via contact page. Remember, the beauty of working with reclaimed wood lies in its imperfections and stories — embrace them, and let your creativity flow.
Things I Wish I Knew Earlier (or You Might Find Surprising)
The Hidden Strength of Old Wood
One thing I didn’t realize at first was how resilient reclaimed pallet wood can be. I once tried to cut a particularly warped plank, only to find it held up surprisingly well when I used the right techniques. This taught me that patience and proper handling can turn even the most challenging pieces into beautiful furniture components.
The Importance of Inspection
Initially, I overlooked the importance of thoroughly inspecting each pallet for chemical treatments or damage. Learning to identify HT (heat-treated) stamps and avoiding chemically treated wood has been crucial for safety and quality, making my projects more durable and safe for home use.
Deconstruction is an Art
Deconstructing pallets without damaging the wood is an art I’ve refined over time. Using the right pry bars and saws, along with patience, allows me to preserve the natural beauty of each plank, which adds character to my projects.
Finishing Makes All the Difference
Applying the right finish can highlight the wood’s natural hues and textures. I’ve found that using tung oil or matte polyurethane enhances rustic charm while providing protection, making the furniture both beautiful and functional.
Managing Warped and Knotted Wood
Warps and knots are common challenges, but pre-treating with heat and moisture, then clamping overnight, can straighten the wood. Selecting the best planks and aligning grain directions during assembly also helps maintain structural integrity.
Personal Touches Elevate Your Work
Adding carved initials, inlays, or decorative patterns transforms functional furniture into personal heirlooms. These touches make each piece unique and meaningful, reflecting my own style and stories.
Resources I’ve Come to Trust Over Time
- Wood Magazine: This magazine offers in-depth tutorials and insights into woodworking techniques, which I’ve found invaluable for troubleshooting complex projects.
- Fine Woodworking: Their detailed guides and expert tips have greatly improved my understanding of finishing and joinery, especially with reclaimed wood.
- Instructables: A fantastic platform for DIYers, offering step-by-step projects and community support that keeps me inspired and motivated.
- Local Woodworking Classes: Hands-on experience has been irreplaceable, and local classes provide practical skills that textbooks can’t offer.
Parting Thoughts from My Perspective
Working with reclaimed pallet wood has been a journey filled with surprises and learning. From understanding the resilience of old wood to mastering intricate deconstruction and finishing techniques, each step has deepened my appreciation for sustainable craftsmanship. If this resonates with you, I’d love to hear your own experiences or tips. Share this with someone who might enjoy the art of transforming reclaimed wood, and don’t hesitate to drop your thoughts or questions in the comments. Remember, every piece of reclaimed wood has a story — it’s up to us to bring out its best and create something meaningful out of it.