Starting My Drywall Repair Journey: When Large Holes Changed My Home
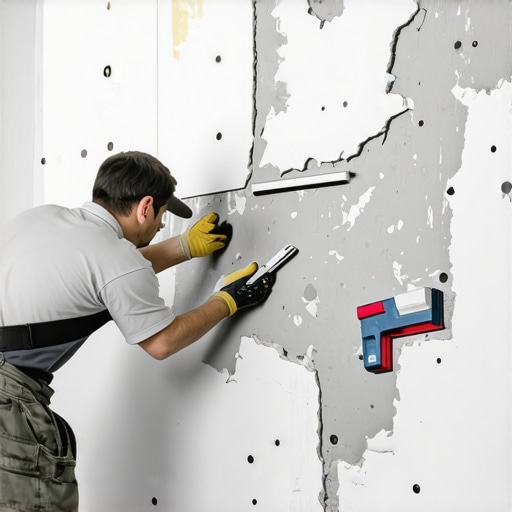
One weekend, I faced the challenge of repairing a sizable hole in my living room wall after a minor accident. I quickly realized that tackling large drywall holes and textured surfaces requires patience, the right tools, and a bit of expert know-how. This experience sparked my curiosity and motivated me to learn the art of professional drywall patching, which I now share with others eager to restore their walls seamlessly.
Understanding the Art of Precision Drywall Patching
My first step was understanding the materials and techniques involved. I discovered that using high-quality joint compound, mesh tapes, and durable patching materials makes a significant difference. The key is to ensure the patch blends perfectly with the textured surface, whether it’s popcorn, knockdown, or swirl finishes. Watching tutorials and consulting reputable sources like home improvement tips helped me grasp the nuances of surface matching and concealment.
My Personal Tips for Repairing Large Holes
When I repaired the large hole, I cut a piece of drywall slightly larger than the opening, secured it with screws, and applied joint compound over the seams. To match the existing texture, I experimented with spray textures and hand tools. Patience was vital—layering the compound and sanding gently created a seamless finish. For textured surfaces, I learned that replicating the original pattern with specialized brushes or sprayers yields the best results. I also realized that proper priming before painting is essential to achieve a uniform look.
How Do You Achieve a Flawless Texture Match?
What are the best techniques to ensure textures blend perfectly after patching?
This question intrigued me during my project. I found that using a texture spray or sponge to mimic the existing finish is effective. Practicing on scrap drywall helped me gain confidence before tackling the actual wall. For textured ceilings or walls, using a brush or roller with a textured roller cover can help blend the new patch with the surrounding surface. Don’t rush the drying process—allowing each layer to cure ensures a more professional appearance.
Join the Conversation and Share Your Experience
If you’ve ever repaired large drywall holes or textured surfaces, I’d love to hear your tips and tricks! Sharing our experiences can make DIY repairs less daunting and more rewarding. Feel free to comment below or explore more DIY home improvement ideas on our home decor inspiration page.
Advanced Techniques for Perfect Texture Blending in Drywall Repair
Once you’ve patched the large hole and applied the initial layers of joint compound, the next challenge is achieving a flawless texture match. This step distinguishes amateur repairs from professional finishes. As I delved deeper into drywall artistry, I discovered that understanding the nuances of texture replication is essential for a seamless look. For textured surfaces like popcorn or knockdown finishes, specialized tools and techniques are crucial to mimic the original pattern convincingly.
What are the best methods for replicating complex wall textures after patching?
Expert drywall finishers often utilize spray texture tools that can be adjusted to match various finishes. Practicing with these spray guns on scrap drywall helps hone control and consistency. For more intricate textures, such as swirl or orange peel, hand tools like sponges, brushes, or custom-made rollers are invaluable. They allow for nuanced control over the pattern, ensuring the repair blends invisibly into the surrounding surface. Additionally, some professionals opt for a stippling brush or sponge to create irregular, natural-looking textures, especially when matching textured ceilings or uneven wall finishes.
Another technique involves tinting the joint compound with subtle colorants, which can help better match the existing surface’s hue and depth. Priming and painting are the final steps — but only after confirming the texture is indistinguishable from the original. The key is patience; layering and carefully sanding between coats can significantly improve the final result. To deepen your understanding, I recommend exploring detailed guides like home improvement tips that cover surface matching techniques comprehensively.
How can a DIY enthusiast improve their texture matching skills for more professional drywall repairs?
Practicing on spare panels or scrap drywall is invaluable. It’s also helpful to record your techniques and compare them to the original finish, gradually refining your approach. Watching tutorials from seasoned professionals or consulting trusted sources such as DIY creative solutions can provide insights into advanced methods. Furthermore, investing in quality spray texture guns and hand tools designed for drywall finishing can significantly elevate your results. Remember, mastering texture matching is a gradual process, but with patience and practice, you can achieve a near-perfect blend that makes your drywall repairs virtually invisible.
If you’re eager to enhance your drywall skills further, consider exploring comprehensive DIY guides like step-by-step DIY guides tailored for all skill levels. Sharing your experiences and challenges in online forums can also provide new perspectives and tips from fellow DIYers.
Reflections on the Nuances of Texture Matching
As I delved deeper into the art of drywall repair, I realized that texture matching is not merely about replicating a pattern but understanding the subtle nuances that give each surface its unique character. Every wall finish, whether it’s a delicate swirl, a coarse popcorn, or a subtle knockdown, carries layers of history and craftsmanship. Achieving a seamless blend requires patience, a keen eye, and a willingness to experiment with different tools and techniques. This journey has taught me that the secret lies in appreciating the complexity of textures and respecting the original artistry embedded in the walls.
Personal Insights on Texture Replication Techniques
One technique I found particularly effective is tinting joint compound with subtle colorants to match the hue and depth of the existing surface. This not only helps in blending the patch visually but also adds a layer of authenticity to the repair. I also discovered that controlling the spray texture gun’s settings meticulously allows for more accurate replication of complex finishes like orange peel or swirl textures. Practicing on scrap drywall before working on the actual wall gives me confidence and helps refine my control. These small adjustments, combined with patience, elevate a DIY repair from amateurish to professional-quality.
Deep Dive: How Can a DIY Enthusiast Improve Their Texture Matching Skills?
What are the most effective ways to develop an intuitive sense for texture blending?
Practicing on various scrap surfaces is invaluable. I started by recording each attempt, comparing it to the original, and noting what worked and what didn’t. Watching tutorials from seasoned drywall finishers and participating in online forums fostered a deeper understanding of advanced techniques. Investing in quality spray guns and hand tools designed for texture replication made a significant difference. Over time, I learned to observe the minute details — the way light hits the surface, the irregularities that make textures feel natural, and how layering and sanding can subtly alter the final appearance. It’s a craft that rewards patience and continuous learning, and I encourage fellow DIYers to embrace the process as a journey of mastery.
For those eager to deepen their skills further, exploring comprehensive guides such as step-by-step DIY guides can provide structured learning pathways. Sharing experiences in online communities also offers fresh perspectives and practical tips that can accelerate your progress.
Encouragement for the DIY Community
Remember, every expert was once a beginner. The key is to approach each project with curiosity and a willingness to learn. Don’t be discouraged by initial setbacks; instead, view them as opportunities to refine your technique. The satisfaction of seeing a seamlessly blended wall after hours of patience is truly rewarding and boosts confidence for future projects. I invite you to share your own experiences and tips — together, we can elevate our DIY skills and transform our homes into personalized masterpieces.
The Nuances of Texture Matching: Going Beyond the Basics
As I delved further into drywall repair, I realized that achieving a flawless texture match is akin to mastering a craft that combines technical skill with artistic intuition. Unlike simple patching, advanced texture matching involves understanding the subtle variations in surface finish, light reflection, and material behavior. For instance, in repairing a popcorn ceiling, it’s crucial to recognize that each batch of spray texture may differ slightly, demanding meticulous adjustments in spray pressure and nozzle distance. This level of precision ensures the patch becomes invisible, even under different lighting conditions. Comprehending the composition of textured finishes, such as the ratio of joint compound to texturizing agents, can significantly influence the final appearance, making research and experimentation indispensable.
Innovative Techniques for Replicating Complex Wall Textures
One technique that has elevated my drywall projects is the use of tinting joint compound with natural earth pigments, which allows for a more authentic match in hue and depth. This approach is especially effective in replicating aged or weathered textures, providing a depth that plain white compound cannot achieve. Additionally, employing controlled spray texture guns with adjustable settings enables precise replication of intricate patterns like swirl or orange peel finishes. Practicing on scrap drywall, as recommended by industry experts, helps refine control and predictability. For complex textures, combining spray techniques with hand-applied stippling or sponging can produce a more natural, organic appearance that seamlessly blends into the original surface. To deepen your mastery, exploring detailed guides from seasoned professionals can offer invaluable insights.
What advanced tools and materials can elevate a DIYer’s texture matching skills?
Investing in high-quality spray texture guns with variable airflow controls and precision nozzles is a game-changer. Coupled with hand tools such as stippling brushes, textured rollers, and sponges, these enable nuanced control over pattern and depth. Tinting joint compounds with custom colorants can also help replicate subtle color variations, adding realism to the repair. For those interested in honing their skills, online tutorials from experienced drywall finishers and forums dedicated to advanced DIY techniques can provide ongoing support and inspiration. Remember, the secret to professional-grade results lies in patience, practice, and a willingness to experiment with different combinations of tools and materials. For a comprehensive exploration of these methods, I highly recommend consulting resources like home improvement tips that cover surface matching techniques in detail.
Share Your Texture Mastery Journey and Connect with Fellow DIYers
Every repair presents an opportunity to learn and refine your craft. I invite you to share your own experiences with advanced drywall techniques—what tools have transformed your results? How do you approach complex textures that challenge even seasoned DIYers? By exchanging tips and stories, we can elevate our collective skills and inspire others to pursue professional-quality finishes. Don’t hesitate to comment below or join online communities focused on drywall artistry. Together, we can foster a vibrant network of passionate DIY enthusiasts committed to excellence and innovation in home improvement. For further inspiration, explore our home decor ideas and take your skills to the next level.
Things I Wish I Knew Earlier (or You Might Find Surprising)
Beyond the Surface
One thing I realized is that texture matching in drywall repairs is as much an art as it is a science. It’s easy to focus on the patch itself but overlooking how light interacts with textured surfaces can make even perfect patches noticeable under certain angles. I learned this the hard way when my first repair looked fine in daylight but glaringly obvious under evening lighting. Paying attention to the original finish’s nuances can save a lot of frustration.
The Power of Practice
Practicing on scrap drywall before working on the actual wall was a game-changer. I discovered that controlling spray texture guns and hand tools requires patience and finesse. Small adjustments in spray distance, pressure, or brush technique can dramatically improve blending. This trial-and-error process is invaluable for achieving professional results.
Color Matters
Tinting joint compound with subtle colorants to match the wall’s hue made a significant difference. It’s surprising how a slight variation in color can reveal a patch that looks perfect in texture but stands out visually. I now always consider both texture and color when finalizing repairs, especially on textured ceilings or walls.
Patience Is a Virtue
Rushing through drying or sanding stages can ruin the smoothness of your finish. I found that layering thin coats and letting each fully cure ensures better adhesion and a more natural look. Sanding gently between coats minimizes scratches and helps blend the patch seamlessly into the surrounding surface.
Understanding Original Finishes
Researching the original texture type—be it popcorn, knockdown, swirl, or orange peel—allows for better replication. Watching tutorials and consulting detailed guides helped me grasp the specific tools and techniques needed for each finish. Recognizing the subtle differences in these textures is essential for a flawless repair.
Don’t Be Discouraged
Every project is a learning experience. Even experienced drywall finishers spend hours perfecting their craft. Embracing the process and viewing each repair as an opportunity to improve keeps me motivated. Sharing tips and asking for advice in online communities has also been incredibly helpful.
Resources I’ve Come to Trust Over Time
- Home Improvement Tips: This site offers comprehensive guides and tutorials on drywall techniques and surface matching. It’s my go-to resource for detailed step-by-step instructions.
- DIY Network: A reliable source for visual demonstrations and expert advice on drywall repair and finishing techniques. Their videos helped me visualize complex textures.
- YouTube Channels like ‘DIY Creators’: Watching seasoned DIYers demonstrate texture replication gave me confidence and new ideas for my projects.
- Professional Drywall Supply Stores: Their product recommendations and tutorials on texture spray guns and finishing tools have elevated my skills significantly.
Parting Thoughts from My Perspective
Mastering drywall texture matching is a rewarding challenge that combines patience, practice, and attention to detail. From understanding the nuances of various finishes to experimenting with tools and colors, each step brings you closer to invisible repairs that blend seamlessly into your walls. If you’re embarking on similar projects, remember that every mistake is a lesson, and persistence pays off. I encourage you to experiment, learn from online resources, and don’t hesitate to share your experiences with fellow DIY enthusiasts. Together, we can turn even the most daunting drywall repairs into a satisfying achievement. If this resonated with you, I’d love to hear your thoughts or tips—feel free to drop a comment below or explore more DIY ideas on our home decor inspiration page.