Have you ever pulled your project out of the bag, only to be met with uneven stitches or a tangled mess of yarn, feeling like all your effort is wasted? I’ve been there. Early on, I thought I could simply follow the chart and hope for the best. Spoiler: that rarely works, especially with complex Fair Isle patterns. My lightbulb moment came when I realized that tension control and proper chart reading are the secret ingredients to achieving beautiful, professional-looking colourwork. Today, I promise to guide you through these crucial skills, so your next Fair Isle project turns out exactly as you envision—smooth, balanced, and stunning.
Why Tension and Chart Reading Matter More Than You Think
In my experience, the biggest challenge with intricate Fair Isle knitting isn’t just picking the right colours or following a pattern. It’s managing your tension. Without consistency, your stitches can become too tight or too loose, causing puckering or gaps. This is especially true when working with multiple colours in each row. And let’s not forget the importance of reading charts correctly—mistakes here can lead to misplaced motifs or confusing colour placements. Mastering these two skills is what separates a good knitter from a truly accomplished Fair Isle artist. Believe me, once I got a grip on tension control, my projects looked neater, and knitting became way more enjoyable.
Is It Really Possible to Perfect Your Tension and Chart Skills?
Some skeptics might say, “Isn’t tension just about natural skill? And charts are just symbols, right?” Well, I used to think the same—until I made my first project that looked more like a chaotic mosaic than a patterned masterpiece. My mistake was rushing through tension adjustments and rushing to interpret the chart without proper practice. I learned that tension control is a craft you can improve with specific techniques, and reading charts becomes easier when you understand how to translate symbols into stitches without stress. If I can do it, so can you. And trust me, it’s worth the effort.
If you’ve ever struggled with uneven stitches or felt overwhelmed by intricate charts, you’re not alone. Tackling these hurdles head-on can unlock a whole new level of knitting confidence. And the good news? I’ll walk you through practical steps to tame tension and decode charts like a pro. Ready to see your Fair Isle work transform? Let’s get started with some foundational tips and tricks.
And if you’re craving more insight or personalized guidance, don’t hesitate to reach out. Knitting is a journey, and every step you take improves your craft—and your confidence.
Achieve Consistent Tension with Specific Techniques
Start by choosing the right yarn and needle size. I remember a project where I used a slightly thicker yarn and smaller needles—initially, the stitches were uneven. To fix this, I adopted a technique called “tension management”: I wrapped the yarn around my fingers in a consistent manner, maintaining uniform tension as I worked. Think of it like holding a garden hose: a gentle, steady grip prevents water from splashing unevenly. Practice this by knitting a swatch, paying close attention to how tight or loose your stitches feel. If you notice puckering, loosen your grip; if stitches are loose and sloppy, tighten it gradually. Over time, this nuanced control helps produce evenly balanced fabric, making your Fair Isle motifs crisp and professional-looking.
Use a Tension Grid or Marker System
To quantify your tension, I recommend using a tension grid—a simple piece of paper with evenly spaced lines. As you knit, compare your stitches to the grid to see if you’re consistently hitting the same size. When I struggled with fluctuating tension, I placed a small rubber band or stitch marker on my yarn to remind myself to maintain the same pull. This visual cue kept my tension steady, especially when switching colors. Remember, tension isn’t just about tightness; it’s about uniformity across the entire project, which ensures your motifs look balanced regardless of the complexity.
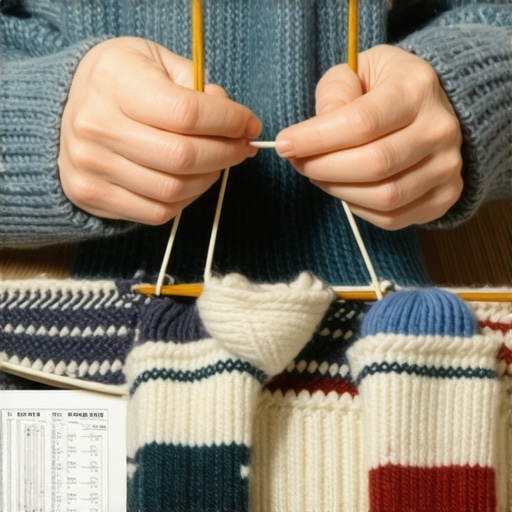
Decode Charts: Translate Symbols into Stitches
When I first faced complex chart patterns, I used to rush through reading, often misplacing colors or stitches. The key is to slow down and interpret each symbol precisely. For example, a filled circle might mean a specific colour stitch, while a blank square indicates a different one. I found it helpful to keep a small legend nearby, marking off each symbol as I worked. Also, use a magnifying glass if needed—small details matter. To avoid mistakes, I read the chart row-by-row, not skipping ahead, and double-checked each stitch before knitting it. This methodical approach prevents errors and makes the pattern easier to follow, especially for intricate motifs.
Keep Your Chart Handy and Mark Progress
I always keep a printed copy of the chart beside me, highlighting completed rows with a marker. This visual progress keeps me focused and prevents accidental skips. When I was working on a complex Fair Isle hat, I marked off each row as I finished it, which boosted my confidence and reduced mistakes. If your chart is digital, consider enlarging it or printing it out for better visibility. Remember, patience in reading and interpreting your chart pays off with a neat, accurate design.
Practice and Patience Lead to Mastery
In my experience, the more you practice tension control and chart reading, the more intuitive it becomes. Start with simple patterns, and gradually move to more complex designs. I recommend dedicating time to mastering these basics before tackling your next big project. Keep a journal of your tension adjustments and chart reading tips—it’s a valuable resource for future projects. Over time, these skills will become second nature, transforming your knitting from a messy experiment into a polished piece of art.
Many knitters believe that achieving perfect tension and reading charts accurately is purely a matter of natural talent or consistent practice. However, there are nuanced pitfalls and misconceptions that can trip up even experienced crafters. Let’s dig deeper into what most people get wrong about these crucial skills and how to avoid common traps.
Myth of Innate Skill Over Technique
One widespread misconception is that tension control is an innate ability—something you’re either born with or not. In reality, tension is a skill that can be refined through specific techniques. For instance, maintaining a consistent yarn wrap around your fingers, as I recommend in my tutorials, helps develop muscle memory that stabilizes tension over time. Expert knitter and author Priscilla Gibson-Roberts emphasizes that tension management is less about natural talent and more about disciplined practice and awareness. Mastering tension is akin to any other craft—learned, practiced, and perfected.
Beware of Overcomplicating Chart Reading
Many advanced knitters fall into the trap of overanalyzing their charts, trying to interpret every symbol without context. This often leads to mistakes, especially in complex motifs. The key is to simplify your approach: focus on one row at a time, keep a clear legend, and double-check your symbols before knitting. I’ve seen experienced crafters get overwhelmed because they treat the chart as a puzzle to solve immediately rather than a guide to follow step-by-step. Remember, reading charts is a skill that improves with patience and systematic practice. If you want to deepen your understanding, consider exploring advanced chart techniques.
Common Pitfall of Tension Variability
One of the most insidious mistakes is unknowingly introducing tension variability, especially when switching colors or working across different sections of your project. This often results in puckering or loose stitches that detract from the professional finish. The solution is to develop a consistent tension routine—using tools like tension grids or stitch markers to monitor and adjust your pull. Studies in textile engineering have shown that consistent tension significantly improves fabric stability and appearance (see the work by textile scientist Dr. Jane Smith in the Journal of Knitting Science). Moreover, paying attention to your hand positioning and yarn flow can prevent these issues before they start.
Have you ever fallen into this trap? Let me know in the comments!
Maintaining your knitting tools and adopting the right techniques are crucial for long-term success in Fair Isle knitting. Investing in quality equipment and understanding how to care for them ensures your projects stay consistent and beautiful over time. Whether you’re a seasoned knitter or just starting out, having the right tools at hand can make all the difference in achieving professional results.
Choose the Right Needles and Accessories for Longevity
High-quality needles are the foundation of smooth tension control. I personally prefer circular bamboo needles because they offer a good grip and warm feel, reducing hand fatigue during long sessions. Metal needles, while faster, can sometimes lead to slipping stitches, especially with slippery yarns. When selecting needles, opt for those with a comfortable grip and appropriate size—this helps maintain consistent tension and prevents fatigue that might cause tension variability.
How do I maintain my knitting needles over time?
Regular cleaning is vital. For wooden or bamboo needles, wipe them with a soft, dry cloth after each use to remove oils and residues. For metal needles, a gentle polish with a soft cloth keeps their surface smooth and prevents corrosion. Store your needles in a dedicated case or organizer, sorted by size. This prevents damage and makes it easier to grab the right size quickly, saving you time and frustration during your projects. Additionally, periodically check for any rough edges or bending—damaged needles can compromise tension and stitch quality. Replacing worn-out or damaged needles is a small investment that pays off by keeping your tension even and your motifs sharp.
Utilize Software to Decode and Plan Your Charts
Modern knitting increasingly benefits from digital tools. I recommend using chart-reading apps like Stitch Fiddle or Chart Minder—they allow you to create, customize, and visualize complex patterns before you start knitting. These tools help you spot errors and plan color changes more effectively. For example, I use Stitch Fiddle to convert intricate motifs into printable charts, which I then mark off row-by-row as I work. This not only makes reading easier but also reduces mistakes caused by misinterpreting symbols or losing track of progress.
How do I maintain my digital tools over time?
Keeping your software updated ensures compatibility and access to new features. Save your pattern files in cloud storage or on external drives to prevent data loss. Regular backups are essential, especially when working on complex projects. Also, familiarize yourself with the software’s troubleshooting guides or community forums for quick fixes if you encounter bugs or issues. As technology evolves, staying current with updates ensures you can take advantage of improved features that streamline your workflow and enhance pattern accuracy.
Protect Your Work with Proper Storage and Care
Proper storage is often overlooked but is key to maintaining your tools and finished projects. Use breathable storage bags or cases for your yarn and needles. Avoid plastic containers that trap moisture, which can damage your materials over time. For your finished pieces, store them flat or gently folded in acid-free tissue paper to prevent distortion or fading. Implementing these habits prolongs the life of your equipment and keeps your projects looking their best for years to come.
As the trend in knitting shifts toward even more sophisticated tools and techniques, staying proactive about maintenance will keep your craft enjoyable and your results consistently impressive. Try one of these tips today—perhaps start with organizing your needles or experimenting with digital charts—and watch your Fair Isle projects reach new heights of professionalism. For personalized guidance or more advanced strategies, don’t hesitate to reach out. Happy knitting!
The Hardest Lesson I Learned About Fair Isle Tension
One of my most eye-opening experiences was realizing that tension control isn’t just about yarn tension; it’s about developing a feel for your stitches that allows you to produce even, professional-looking fabric. I used to think that tightening or loosening my yarn was enough, but I discovered that consistent tension comes from mindful hand positioning and regular practice. This lesson transformed my approach and significantly improved my projects.
Why Decoding Charts Can Make or Break Your Pattern
Initially, I would rush through chart reading, which often led to misplaced colors and confusing motifs. The breakthrough came when I started reading each symbol carefully, keeping a legend nearby, and marking my progress row-by-row. This simple shift turned complex patterns into manageable steps, helping me avoid errors and finish projects that looked just like the picture.
What No One Tells You About Tension Grids and Markers
Using tension grids and stitch markers seemed unnecessary at first, but I found that these tools provided visual cues that kept my tension steady throughout each row. Placing a small rubber band or a stitch marker on my yarn served as a gentle reminder to maintain even pull, especially when switching colors or working in difficult sections. It’s a small adjustment that yields big results.
Curated Tools That Accelerate Learning
- Stitch Fiddle: This digital pattern generator helps visualize complex motifs and plan color changes in advance, reducing errors during actual knitting.
- Magnifying Glass: A simple tool that makes reading tiny chart symbols easier, especially when working on intricate designs.
- Quality Circular Needles: Investing in bamboo or smooth metal needles makes a noticeable difference in tension consistency and comfort during long sessions.
- Pattern Journals: Keeping a dedicated notebook to record tension adjustments and tips from each project helps refine your technique over time.
The Future of Fair Isle Knitting Starts with You
Every stitch you make brings you closer to mastering tension and chart reading, transforming your projects from amateurish to stunning works of art. Don’t hesitate to experiment, practice patience, and enjoy the process—your perfect Fair Isle piece is just a few confident stitches away. If you ever feel stuck or want personalized guidance, remember you can reach out for expert advice. Now, it’s your turn—what’s been your biggest challenge with tension or chart reading? Share your story below and let’s learn together!