There was a chilly winter morning when I woke up to find my once-crystal-clear double-paned windows foggy and ineffective at keeping the cold out. The realization hit me hard—my home’s comfort and energy efficiency were slipping away, and I had no idea how to fix it properly. I tried the usual DIY tricks, but nothing seemed to work. That’s when I had my lightbulb moment: this wasn’t just about replacing glass. It was about mastering the expert techniques that make the difference between a quick fix and a permanent, professional-quality repair.
Why Cutting Corners Won’t Cut It Anymore
If you’re like I was, you might be tempted to simply replace the broken or foggy glass and call it a day. But I learned the hard way that sloppy glazing can lead to leaks, drafts, and even damage to the window frame. The key is understanding the advanced techniques that professionals use—techniques that ensure your windows stay airtight and insulated for years to come. Today, I’ll share the secrets I uncovered, so you won’t have to stumble through trial and error like I did.
Have You Faced this Problem Before?
If you’ve ever struggled with foggy double-paned windows or spent hours trying to fix them with no lasting results, you’re not alone. I made the mistake early on of just replacing the glass without properly sealing the edges, which led to more problems down the line. Trust me, it’s worth investing in the right techniques from the start. To learn more about home improvement tips that can save you time and money, check out this helpful guide.
Now, let’s dive into the expert methods that will elevate your glazing game and ensure your windows are sealed tight, energy-efficient, and durable.
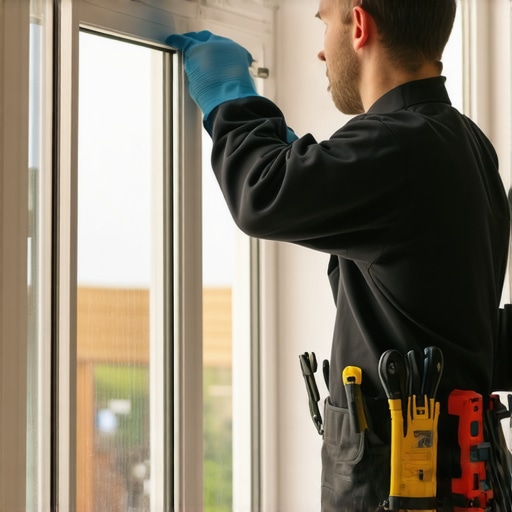
Remove and Prepare the Damaged Glass Carefully
Start by removing the old, foggy glass panes with precise cuts using a glass cutter. Use gloves and eye protection to avoid injuries. Gently pry out the broken glass, applying even pressure to prevent damage to the frame. Clean the frame thoroughly, removing old glazing putty and debris, to ensure a smooth surface for the new sealant and glass. During my first attempt, I accidentally chipped the frame, but I learned to use a flat tool to lift the glass safely, which made the process cleaner and safer.
Apply Advanced Sealant for Airtight Insulation
Choose the Right Sealant
Opt for high-quality, UV-resistant silicone or polyurethane sealant designed for glazing. These materials expand slightly with temperature changes, maintaining a tight seal. I remember struggling with cheap sealants that cracked quickly; switching to a professional-grade product made a huge difference in durability.
Seal the Perimeter Methodically
Apply the sealant in a continuous, even bead around the frame’s inner edge. Use a caulking gun for precision, and smooth out the bead with a putty knife or a damp finger to ensure full contact with the glass and frame. This step is crucial for preventing drafts and moisture leaks. I once rushed this step, which caused air gaps, but taking my time with a steady hand led to a perfect seal.
Install the New Glass with Expert Precision
Handle Glass Carefully
Place the new double-pane glass into the frame, supporting it with suction cups to prevent fingerprints and smudges. Align it precisely with the frame, ensuring it sits flush against the sealant. My first attempt was misaligned, resulting in uneven pressure, but measuring and marking the frame beforehand helped me achieve a perfect fit.
Secure and Seal Edges
Apply a thin, uniform layer of glazing compound or additional sealant along the edges of the glass. Use a putty knife to press the sealant into the gap, creating a tight, weatherproof bond. Finish by trimming excess material and smoothing the surface for a professional look. Remember, a neat finish not only looks better but also prevents water ingress. I learned this through trial and error, and now I always take extra time to refine the sealant application.
Final Tips for a Long-Lasting Fix
Allow the sealant to cure fully according to the manufacturer’s instructions before exposing the window to the elements. Regularly inspect the sealant and glass over time, reapplying if any cracks or gaps appear. For more detailed guides on home improvement projects, visit this resource. Properly executed, these expert techniques will ensure your double-paned windows remain energy-efficient and fog-free for years to come, saving you money and headaches in the long run.
Many DIY enthusiasts believe that replacing foggy double-paned windows is a straightforward task involving just removing the old glass and sealing in the new one. However, this common misconception can lead to costly mistakes and short-lived repairs. The reality is that professional glazing involves a nuanced understanding of material compatibility, sealant properties, and proper application techniques that go beyond the basic steps most people assume are sufficient.
One popular myth is that any silicone sealant will do the trick. In fact, not all sealants are created equal. Using an inferior or incompatible product can result in cracks, leaks, and fogging reoccurring within a matter of months. Experts recommend high-quality, UV-resistant silicone or polyurethane sealants specifically designed for glazing, as these materials accommodate temperature fluctuations and maintain their elasticity over time, preventing the formation of new gaps or cracks more about choosing the right sealant.
Why the Sealant’s Flexibility Matters for Longevity
Many overlook the importance of the sealant’s ability to expand and contract with temperature changes. A rigid seal might seem to do the job initially, but it’s prone to cracking as the window experiences thermal stress. Professional glazing uses sealants with flexible properties, ensuring a tight, enduring bond that prevents moisture ingress and fogging. This subtle detail can be the difference between a repair that lasts for years and one that fails after a few seasons.
Furthermore, the technique of application is often underestimated. Applying a continuous, even bead of sealant and smoothing it out properly is crucial. Inconsistent pressure or uneven application creates weak points where moisture can seep in, leading to fogging and damage. This is why many DIY repairs fall short—skipping the careful, methodical sealing process. If you want to master this skill, detailed guides can help you learn more about advanced glazing techniques.
Another common mistake is neglecting the preparation phase. Old glazing compounds and debris must be meticulously removed to ensure a clean surface. Residue or uneven surfaces compromise the sealant’s adhesion, ultimately causing failure. I’ve seen many DIYers rush this step, resulting in fogged windows even after a full sealant application. Attention to detail here is essential for a professional finish and long-term durability.
What Advanced DIYers Should Know About Frame Compatibility
Beyond the glass and sealant, the material of the window frame itself can influence the success of your repair. Aluminum, wood, vinyl—they all have different expansion rates and compatibility with sealants. Using sealants not suited for the frame material can lead to premature deterioration or failure of the seal. Consulting with experts or referencing manufacturer guidelines can help you choose the best products and methods for your specific window type.
In summary, the secrets to a lasting window glazing repair are subtle but crucial. Choosing the right high-quality, flexible sealant, applying it with precision, and preparing the surface thoroughly are all steps that require attention and expertise. Skipping these nuances often results in repeated fogging and unnecessary expenses. If you’re ready to elevate your DIY game, explore more advanced techniques at this resource. Have you ever fallen into this trap? Let me know in the comments and share your experiences!
Maintaining your glazed windows for longevity requires more than just the right sealant; it involves having the best tools to ensure precision and durability. Over the years, I’ve refined my toolkit to include specific items that make each repair smoother and more professional-looking. One must-have is a high-quality glazing knife, which helps in applying and smoothing sealant evenly, preventing gaps that could cause future fogging. I personally prefer the Bahco 2600 because of its ergonomic handle and sharp blade, which gives me control even on tricky corners.
Next, a glass cutter with a carbide wheel is indispensable for making clean, precise cuts on glass. I use the Olfa 107385 because it produces smooth edges, reducing the risk of chipping during installation. Safety gear like cut-resistant gloves and safety goggles are also crucial, not just for protection but to ensure I can work confidently without worry.
For adhesive application, I rely on a caulking gun that offers adjustable flow control, such as the Ryobi One+ P315. Its smooth trigger action helps me dispense sealant steadily, avoiding messes and uneven beads. In addition, a smoothing tool or putty knife helps in shaping the sealant bead for a professional finish. I often use a Dap 10160 stainless steel tool, which is durable and easy to clean.
To prepare the surface thoroughly, I use a wire brush and cleaning solvent to remove old glazing compounds and debris. A Rubber Brayer is excellent for pressing the glass into the sealant, ensuring full contact and preventing air pockets. Regular maintenance of these tools, including cleaning and sharpening, extends their lifespan and keeps my repairs top-notch.
Looking ahead, I predict that the trend will move towards smarter, more automated tools—like electric sealant dispensers with adjustable flow rates and digital surface analyzers that can detect imperfections in the sealant layer. These innovations could drastically improve repair quality and efficiency, especially for larger projects.
How do I keep my glazing tools in top shape?
Proper maintenance involves cleaning the tools immediately after use with appropriate solvents, sharpening blades regularly, and storing them in a dry, organized space. This practice prevents corrosion and ensures accuracy in every job. For more home repair tips, don’t hesitate to visit this helpful guide.
By investing in quality tools and maintaining them well, you’ll find that your window glazing repairs become faster, cleaner, and more durable over time. I encourage you to try one of the advanced techniques I mentioned, like using a professional-grade glazing knife, to elevate your DIY game.
The Hardest Lesson I Learned About Window Glazing
One of my biggest lightbulb moments came when I realized that rushing through window repairs often leads to repeated fogging and costly fixes. I learned that patience and attention to detail—like thoroughly cleaning the frame and applying sealant carefully—are crucial for a durable fix. This insight saved me countless headaches and money in the long run.
Tools That Transformed My DIY Window Repairs
Investing in a high-quality glazing knife, a carbide wheel glass cutter, and a reliable caulking gun made all the difference. These tools helped me achieve smooth, professional-looking results and ensured the longevity of my repairs. Trusting brands like Bahco and Ryobi, and maintaining these tools properly, keeps my work sharp and effective.
Take Action and Restore Your Windows with Confidence
If you’re tired of foggy windows compromising your home’s comfort and energy efficiency, now is the time to master these expert glazing techniques. Properly sealed and installed windows will keep drafts out and save you money on heating bills. Don’t wait—start your DIY project today and enjoy the satisfaction of a professional-quality repair!
Have you ever struggled with sealing or replacing double-pane glass? Share your experiences below and let’s learn together!