Mastering the Art of Veneer Repair: Transform Your Furniture with Confidence
Veneer damage—whether from scratches, chips, or peeling edges—can quickly mar the elegant surface of your cherished furniture. Yet, repairing veneer like a pro isn’t reserved for seasoned carpenters; with the right techniques, tools, and patience, any DIY enthusiast can restore that flawless finish. This guide dives deep into professional-grade veneer repair methods, empowering you to salvage and beautify your wooden surfaces while avoiding common pitfalls that lead to subpar fixes.
Unveiling the Secrets: Essential Tools and Materials for Professional Veneer Repair
Before embarking on your veneer repair journey, assembling the right toolkit is crucial. Experts recommend having wood glue with a thin nozzle for precise application, a veneer scraper or putty knife for smoothing, clamps or heavy weights to secure the veneer during drying, fine-grit sandpaper, matching wood filler, and touch-up markers or stains to blend repairs seamlessly. Selecting adhesives specifically formulated for veneer ensures optimal bonding strength without causing warping or discoloration—qualities highlighted by the Woodworking Network’s comprehensive guide on veneer maintenance and repair (Woodworking Network).
Step-by-Step DIY Veneer Repair: From Surface Inspection to Finish Touches
How do professionals approach veneer repair to achieve durable and invisible fixes?
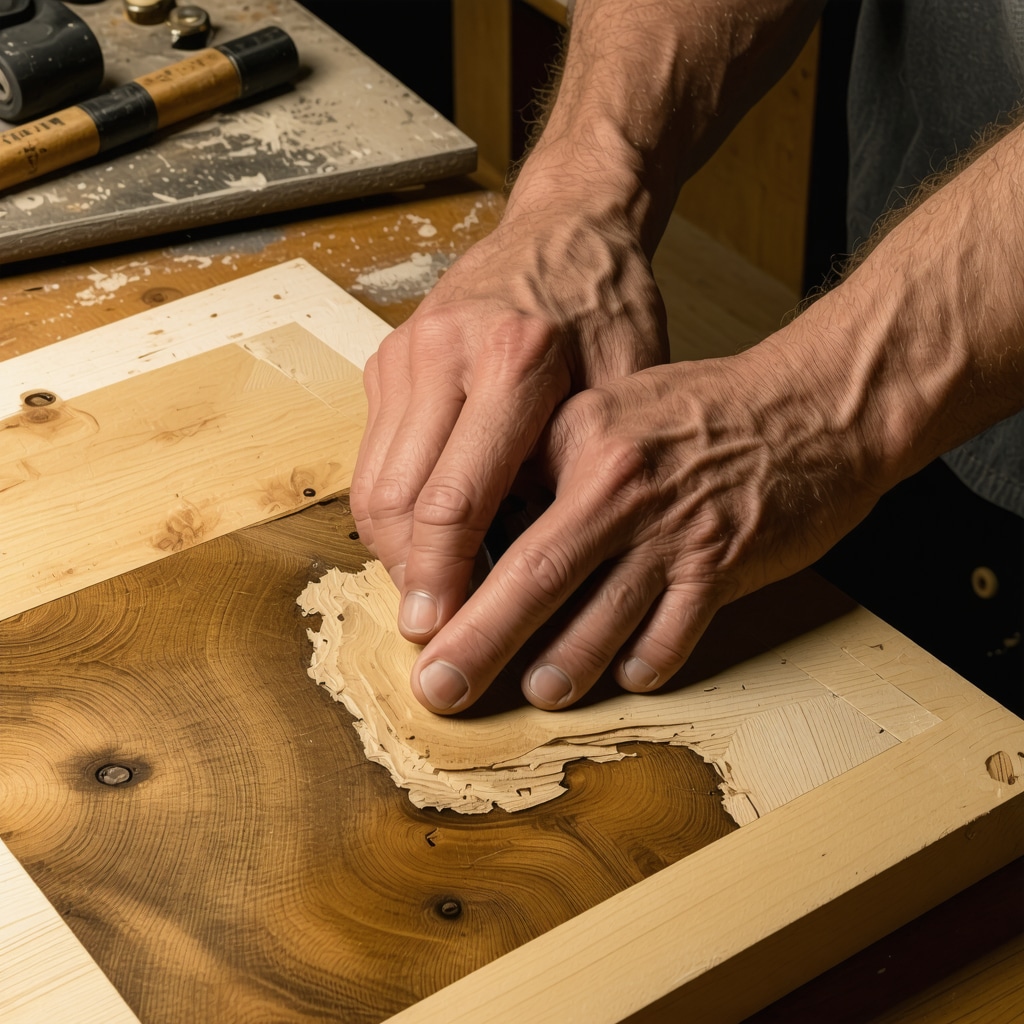
First, carefully inspect the damaged area to determine if the veneer is loose, chipped, or missing. For peeling veneer, gently lift the edge and apply wood glue underneath using a fine applicator; then press firmly and clamp for at least 24 hours. Should you encounter chips or missing pieces, fill the void with a tinted wood filler matching your veneer’s tone. After drying, lightly sand the area to achieve a smooth transition. Finally, apply a matching stain or marker to blend the repair with the surrounding surface. This meticulous layering and drying process ensures longevity and a professional appearance.
Beyond Repair: Preventing Future Veneer Damage with Smart Care Tips
Experienced woodworkers emphasize that prevention is just as vital as repair. Avoid placing heavy or wet objects directly on veneer surfaces and maintain consistent indoor humidity to prevent warping. Using coasters, protective pads, and gentle cleaning agents can significantly extend the veneer’s lifespan. These habits complement your repair efforts, preserving your handiwork and your furniture’s beauty.
Engage with Fellow DIY Enthusiasts and Elevate Your Home Projects
Have you tried repairing veneer surfaces before? Share your tips or questions in the comments below to join a community passionate about expert DIY furniture restoration. For more detailed step-by-step guides that cover a broad spectrum of home improvement and creative projects, explore resources like DIY Kutak’s comprehensive tutorials to elevate your skill set and tackle projects with confidence.
Innovative Techniques: Integrating Modern Materials for Enhanced Veneer Durability
While traditional wood glue and fillers form the backbone of veneer repair, recent advancements have introduced new materials that can elevate the durability and finish quality of your projects. For example, using cyanoacrylate adhesives (super glue) combined with activated charcoal powder for hairline cracks can create an almost invisible repair that is both strong and quick-drying. Additionally, flexible wood fillers infused with resin polymers provide better resistance against future cracking and shrinkage, especially in environments with fluctuating humidity.
Experimenting with these modern compounds requires an understanding of their chemical interactions with your veneer type. Always test a small, inconspicuous area first to ensure compatibility and avoid discoloration. These materials, when applied precisely, can extend the life of your veneer furniture beyond what traditional methods achieve.
Mastering Color Matching: The Role of Custom Blending for Seamless Repairs
One of the trickiest aspects of veneer repair is achieving a seamless color match, particularly on antique or exotic wood veneers. Off-the-shelf stains and markers often fall short in replicating the subtle grain and hue variations. Experts recommend custom blending stains by mixing different tones and diluting with mineral spirits to replicate the original finish meticulously.
For intricate grain patterns, layering translucent glazes can mimic depth and texture. Investing time in color mixing not only enhances the aesthetic appeal but also increases the perceived value of your restoration work. This nuanced approach distinguishes a professional repair from a DIY patch.
How can environmental factors influence the success of veneer repairs and what strategies mitigate these effects?
Environmental conditions like temperature, humidity, and light exposure significantly impact veneer repairs. Excess moisture can cause veneer to swell or peel, while dry air leads to shrinking and cracking. UV light fades stains and finishes, which complicates matching repairs over time.
To mitigate these effects, control your workspace environment by maintaining stable humidity levels between 40-60% and temperatures around 70°F (21°C). Use UV-protective finishes on repaired surfaces and advise clients or household members about proper care routines. Incorporating these strategies ensures your repairs endure both aesthetically and structurally.
Expert Resources: Leveraging Industry Knowledge for Superior Outcomes
For those seeking authoritative guidance, the Woodworking Network remains an invaluable resource, offering expert articles on veneer technology, repair innovations, and finishing techniques. Their insights into material science and craftsmanship are essential for DIYers aiming to refine their skills to professional standards.
Expand Your DIY Horizons: Engage, Share, and Discover More
Have you experimented with modern adhesives or custom stain blending in your veneer repairs? Share your experiences and questions in the comments to foster a robust exchange of knowledge. To broaden your DIY repertoire, explore smart DIY innovative solutions for modern living and discover how integrating technology and craftsmanship can elevate your home projects.
Decoding Complex Veneer Damage: Strategies for Tackling Deep Cracks and Extensive Peeling
When veneer damage surpasses superficial scratches and minor chips, the restoration challenge escalates significantly. Deep cracks that penetrate the veneer layer often demand more than simple filling; they require a nuanced approach that considers both structural integrity and visual harmony. The initial step involves assessing whether the underlying substrate has been compromised, which can affect the adhesion and durability of repairs.
For extensive peeling, where large sections of veneer lift or detach, a delicate yet firm reglueing process is essential. This typically involves carefully lifting the affected veneer without causing further splintering, applying a high-viscosity polyurethane adhesive that offers superior gap-filling properties, and then clamping with uniform pressure to avoid air pockets. Experts caution against rushing this step, emphasizing a curing period of 48 hours or more to attain optimal bond strength. Supplementary techniques, such as injecting adhesive beneath the veneer using thin syringes, allow for precise application in hard-to-reach areas.
What advanced methods can be employed to restore veneer surfaces with multi-layered finishes and intricate grain patterns?
Restoring veneers with multi-layered finishes requires an in-depth understanding of finish chemistry and layering effects. Professionals often begin with microscopic examination to identify the original finish components—be it shellac, lacquer, or polyurethane—and their interaction with stains and dyes. Matching the surface sheen involves meticulous sanding between layers and applying custom-mixed transparent glazes that replicate the original depth and luster.
Addressing intricate grain patterns may necessitate the use of grain filler compounds, which accentuate texture while smoothing uneven patches. Additionally, micro-scalpeling techniques—precise, shallow cuts made with specialized scalpels—can be employed to mimic natural grain breaks and restore continuity visually. These advanced interventions, while time-intensive, ensure that repairs remain imperceptible even under close inspection.
Durability Engineering: Enhancing Veneer Longevity through Protective Coatings and Environmental Controls
Beyond repair, the application of protective coatings plays a pivotal role in extending veneer lifespan. High-performance finishes, such as catalyzed conversion varnishes and UV-resistant polyurethane, provide robust barriers against moisture ingress, abrasion, and ultraviolet degradation. When selecting coatings, it’s critical to align the finish’s chemical properties with the existing surface to avoid incompatibility issues like bubbling or peeling.
Environmental engineering within interior spaces complements these coatings. Installing humidifiers or dehumidifiers regulated by smart sensors can maintain stable moisture levels crucial for veneer health. Moreover, deploying low-UV emitting LED lighting reduces photodegradation risks over time. Such integrated strategies are increasingly adopted in museum-grade furniture preservation, underscoring their efficacy.
Leveraging Technology: Digital Tools and Spectrophotometry for Precision Color Matching
One frontier in veneer repair is the use of digital color-matching tools, especially spectrophotometers, which objectively quantify wood color and grain characteristics. These devices enable restorers to create custom stain blends with unparalleled accuracy, reducing guesswork and trial-and-error from traditional methods.
By scanning both damaged and intact veneer areas, spectrophotometers generate precise color profiles that guide the selection and mixing of pigments. This technology is particularly invaluable when matching rare or exotic woods, where natural color variability can be substantial. Integration with computer software further allows simulation of different finish options before application, optimizing aesthetic results.
According to the University of California Davis Wood Science Department, such scientific approaches to wood coloration are revolutionizing restoration practices by combining art with empirical data.
Join the Expert Conversation: Share Your Cutting-Edge Veneer Repair Experiences
Have you utilized advanced adhesives, micro-scalpeling, or digital spectrophotometry in your veneer repairs? Engage with fellow experts and enthusiasts by sharing your insights and challenges in the comments below. For those eager to deepen their mastery, explore our upcoming series on innovative wood finishing techniques and environmental conditioning to transform your restoration projects into enduring masterpieces.
Precision in Practice: The Science Behind Veneer Adhesion and Repair Longevity
Understanding the molecular interactions between adhesives and wood veneers is fundamental to achieving repairs that withstand the test of time. Modern polymer science has enabled the development of adhesives with tailored viscosity and curing profiles, ensuring optimal penetration without compromising veneer integrity. These advances not only enhance bond strength but also mitigate common issues such as adhesive creep and discoloration. Integrating scientific principles into your repair methodology elevates craftsmanship from artisanal to engineered excellence.
Augmenting Repairs with Nanotechnology: The Future of Veneer Protection
Emerging nanocoatings imbued with hydrophobic and antimicrobial properties are transforming veneer maintenance. Nanoparticles create ultra-thin, invisible barriers that repel moisture and inhibit microbial growth, thereby reducing delamination and fungal degradation. These coatings preserve the veneer’s natural aesthetics while imparting enhanced durability. Early adopters within conservation circles report significantly extended intervals between restorations, highlighting the practical benefits of integrating nanotechnology into veneer care protocols.
What are the best practices for integrating nanocoatings without altering veneer appearance or finish?
Applying nanocoatings requires meticulous surface preparation to ensure adhesion without compromising existing finishes. Professionals recommend gentle cleaning with non-abrasive agents followed by controlled application using airbrush or electrostatic sprayers. Post-application curing under UV light can enhance nanoparticle bonding and performance. Crucially, compatibility tests on inconspicuous veneer sections prevent adverse reactions such as gloss changes or surface tension alterations. Adhering to manufacturer guidelines and leveraging expert advice ensures that nanocoatings augment, rather than detract from, the veneer’s visual and tactile qualities.
Data-Driven Color Matching: Utilizing Machine Learning for Custom Stain Formulations
Advancements in artificial intelligence have introduced machine learning algorithms capable of analyzing extensive databases of wood grain patterns and color profiles to generate bespoke stain recipes. This technology transcends traditional trial-and-error approaches by predicting optimal pigment combinations and application techniques tailored to specific veneer characteristics. By integrating spectrophotometric data and historical repair records, these systems empower restorers to achieve near-perfect color matches with enhanced efficiency and reproducibility.
For practitioners interested in leveraging such technology, resources like the Woodworking Network’s AI Color Matching Report provide comprehensive insights into current capabilities and implementation strategies.
Expert Collaboration: Engaging with Material Scientists and Restoration Technologists
Collaborative efforts between woodworkers, material scientists, and restoration technologists are redefining veneer repair paradigms. Interdisciplinary workshops and symposiums facilitate knowledge exchange on adhesive chemistry, finish compatibility, and environmental conditioning, fostering innovation. Engaging with professional networks and attending specialized conferences can expose practitioners to cutting-edge materials and methodologies, further refining repair outcomes.
Tap Into the Next Generation of Veneer Restoration Mastery
Embrace these advanced insights and technologies to propel your veneer repair projects beyond conventional boundaries. Share your pioneering experiences or seek expert counsel in the comments below to join a vibrant community dedicated to elevating furniture restoration into a precise and durable art form.
Frequently Asked Questions (FAQ)
What type of adhesive works best for different veneer damages?
For most veneer repairs, high-quality wood glue with a thin nozzle ensures precise application and strong bonds. For hairline cracks, cyanoacrylate (super glue) combined with activated charcoal powder provides quick, durable fixes. Large peeling areas benefit from high-viscosity polyurethane adhesives due to their gap-filling properties and superior bonding strength. Always select adhesives compatible with your veneer type and finish to avoid discoloration or warping.
How can I achieve a seamless color match on antique or exotic wood veneers?
Custom stain blending is key. Mix different stain tones and dilute with mineral spirits to replicate the original hue. Layering translucent glazes mimics the depth and texture of complex grain patterns. Using spectrophotometry or AI-assisted color matching tools can enhance accuracy for intricate or rare veneers. Patience and multiple test applications are essential to achieve professional-level blending.
What environmental conditions should I control during and after veneer repair?
Maintain stable humidity levels between 40-60% and temperatures around 70°F (21°C) to prevent veneer swelling or shrinking. Limit UV light exposure by using UV-protective finishes and low-UV lighting to reduce fading and degradation. Proper environmental control ensures adhesive curing integrity and prolongs the repaired veneer’s lifespan.
Are nanocoatings safe to use on finished veneer surfaces?
Yes, when applied correctly. Surface preparation with gentle cleaning is critical. Use controlled application methods such as airbrushing or electrostatic spraying, followed by UV curing to enhance bonding. Always test nanocoatings on inconspicuous areas to prevent gloss changes or finish alterations. Following manufacturer instructions and expert recommendations ensures the veneer’s appearance remains unaltered while gaining enhanced durability.
Can machine learning realistically improve veneer stain matching?
Absolutely. Machine learning algorithms analyze extensive wood grain and color data to generate precise custom stain formulas. This reduces guesswork and enhances reproducibility, especially for challenging or rare veneers. Integration with spectrophotometric data allows restorers to predict optimal pigment combinations and application methods, elevating accuracy and efficiency in color matching.
What advanced repair techniques help restore multi-layered finishes?
Microscopic finish analysis identifies original finish components, guiding the application of compatible layers. Grain filler compounds accentuate texture, while micro-scalpeling restores continuity in intricate grain patterns. Meticulous sanding between layers and custom transparent glazes replicate original depth and sheen, ensuring an imperceptible and durable repair.
How can I prevent future veneer damage after repair?
Use coasters and protective pads to minimize surface wear. Maintain consistent indoor humidity and temperature. Avoid heavy or wet objects on veneer surfaces. Employ gentle cleaning agents and UV-protective finishes. These practices preserve the veneer’s structural integrity and aesthetic appeal, complementing your repair efforts for lasting results.
What role does collaboration with scientists and technologists play in veneer repair?
Interdisciplinary collaboration integrates advanced adhesive chemistry, finish compatibility research, and environmental conditioning techniques. This fusion of knowledge drives innovation and improves repair outcomes. Participation in specialized workshops and professional networks exposes restorers to cutting-edge materials and methodologies, advancing veneer restoration craftsmanship.
How long should clamping and curing take for large veneer repairs?
For extensive peeling or large veneer lifts, clamping with uniform pressure should last at least 48 hours to ensure optimal adhesive curing and bond strength. Rushing this process risks weak adhesion and future delamination. Patience during curing is essential for durable, high-quality repairs.
Can digital tools replace traditional veneer repair skills?
Digital tools like spectrophotometers and AI algorithms augment but do not replace foundational craftsmanship. They provide objective data and precision, reducing trial-and-error in color matching and material selection. However, successful veneer repair still requires skilled manual techniques, material knowledge, and aesthetic judgment to achieve superior results.
Trusted External Sources
- Woodworking Network – A leading authority offering in-depth articles on veneer technology, adhesive science, and finishing innovations, invaluable for both DIY enthusiasts and professionals seeking advanced repair methodologies.
- University of California Davis, Wood Science Department – Provides scientific research on wood coloration and finishing technology, including the application of spectrophotometry in restoration, essential for precise color matching.
- Woodworking Network’s AI Color Matching Report – A specialized publication detailing the integration of artificial intelligence in wood finish formulation, highlighting cutting-edge developments that enhance efficiency and accuracy in veneer repair.
- Journal of Cultural Heritage – Features peer-reviewed studies on conservation materials and nanotechnology applications in wood preservation, offering insights into emerging protective coatings and their practical implementation.
- International Woodworking Fair (IWF) – Industry events and workshops that foster collaboration between woodworkers, material scientists, and restoration technologists, promoting knowledge exchange of the latest materials and repair techniques.
Conclusion
Mastering veneer repair transcends simple patchwork; it is a meticulous blend of scientific understanding, artisanal skill, and innovative technology. From selecting precise adhesives and mastering color matching with both traditional blending and digital spectrophotometry, to controlling environmental factors and integrating nanotechnology, expert veneer restoration demands a holistic, data-driven approach. Embracing advanced materials and collaborating with interdisciplinary experts elevates the durability and aesthetics of your repairs, ensuring your furniture’s beauty endures for generations. Whether you’re a seasoned professional or a dedicated DIYer, applying these comprehensive insights empowers you to transform damaged veneers into flawless showcases of craftsmanship. Share your experiences, ask questions, and explore related expert content to continue refining your veneer restoration expertise and contribute to this evolving art form.
I’ve recently taken on a couple of veneer repair projects at home, and I can definitely attest to how crucial it is to have the right tools and materials before starting. The guide’s emphasis on using wood glue with a thin nozzle and clamps for securing the veneer really resonates with my experience. I found that leaving the clamps on for a full 24 hours made all the difference in the durability of the bond.
One challenge I faced was matching the stain after filling chips with wood filler. The post’s advice about custom blending stains and layering glazes to mimic grain patterns is something I wish I’d known earlier—it would have saved a lot of trial and error. Also, controlling the environment helped me avoid unexpected warping, especially maintaining humidity levels since I’m based in Brisbane where it can get quite humid.
I’m curious to hear from others how they balance patience with the repair process, especially when working on large peeling areas that need longer curing times. Have you found that rushing the clamping or staining stages ever led to issues down the track? Would love to know different approaches to managing that waiting period without losing momentum on a project.
Lucas, your point about patience in veneer repair resonated deeply with me. I’ve also tackled large peeling veneer spots and found that the temptation to speed up clamping or staining can lead to visible edges lifting or mismatched finishes down the line. One thing that helped me was using the downtime between clamp removal and final staining to focus on meticulous sanding and custom stain tests on scraps, which kept me engaged without rushing the crucial curing stage.
Additionally, controlling the environment—especially humidity—proved vital, just as the post recommends. Living in Melbourne, I struggled with fluctuating indoor conditions, so investing in a humidifier with a built-in hygrometer was a game-changer for keeping repairs stable.
I’m curious if others have experimented with modern adhesives like high-viscosity polyurethanes for extensive peeling? The article’s mention of slow curing times and precise application techniques like adhesive injection intrigued me, but I haven’t yet tried them. Has anyone combined these advanced materials with traditional clamping methods to improve bonding without compromising finish aesthetics? Would love to hear about real-world results or challenges from this community’s experiences.
Reflecting on the comprehensive guide to veneer repair, I’m really impressed by how crucial the environment is to successful restoration. Living in Brisbane, similar to Lucas’s experience, I’ve found humidity control to be quite the challenge, especially during wet seasons. Investing in a digital hygrometer helped me keep the workspace environment within the ideal 40-60% range, which I believe significantly reduced issues like swelling or warping after repairs.
On the topic of lacquer and stain matching, I’ve always struggled with off-the-shelf options as well. This post’s emphasis on custom blending stains by mixing tones and diluting with mineral spirits really resonates. I incorporate multiple thin glaze layers too, which adds that depth and helps with blending intricate grain patterns. It’s a step that can’t be rushed, but the payoff is a much more natural restoration.
Regarding the question from Emily about combining high-viscosity polyurethane adhesives with traditional clamping, I’ve had positive results using a syringe to inject the adhesive beneath large peeled veneer areas, followed by clamping for about 48 hours. Patience here is key—the extended curing time helps avoid bubbling and ensures a stronger bond.
For those balancing pressing timelines, I’m curious: how do you keep motivated during long curing phases? Do you engage in preparatory work for other projects, or have you found any other strategies that help maintain momentum without compromising the quality of your veneer repair?
It’s fascinating how much veneer repair blends precision with patience—something this post and the earlier comments really hammer home. I’ve tackled a few small veneer repairs myself and completely agree that rushing the clamping or staining steps almost always leads to a noticeable compromise in durability or finish quality. What’s struck me lately is the value of creating a dedicated workspace where I control temperature and humidity. Even here in Sydney, where our climate is relatively temperate, stabilising these factors seems to prevent surprises like peeling or warping once repairs are complete.
Regarding the integration of newer materials like high-viscosity polyurethane adhesives, my experience mirrors what’s been mentioned about using syringes for applying glue precisely under larger peeled areas—this approach definitely minimizes air pockets. However, I did run into a learning curve balancing clamp pressure to avoid crushing fragile veneer edges while still ensuring a tight bond.
On colour matching, I’ve relied heavily on layering translucent glazes after carefully custom-mixing stains—a slow process but well worth it. I haven’t tried digital spectrophotometry yet, but it sounds promising for tricky or antique veneers where the grain and colour variations are hard to replicate.
I wonder how others keep themselves motivated during those long curing phases? Do you use the time to prep materials for upcoming repairs or switch to entirely different DIY projects? Would love to hear how people juggle quality with efficiency in their restoration workflows!
Lucas — great question and totally relatable. I’ve found rushing clamps or staining almost always shows up later as lifting or uneven sheen, so I treat the curing phase as a scheduled part of the job rather than downtime. A few practical approaches that help me keep momentum without compromising the repair:
– Break the job into micro-tasks: while a repair cures, prep colour swatches, custom-blend stains and label them, or sand and finish a different small piece. That keeps progress visible.
– Use a caul (a flat padded board) under clamps or soft weights wrapped in cloth for fragile edges so you can apply firm, even pressure without crushing veneer.
– Create a small test panel for all adhesives/finish combos and keep it next to your bench — quick reference avoids trial-and-error later.
– Control the workspace (hygrometer, small humidifier/dehumidifier) and take time-lapse photos to spot any changes early.
Has anyone else built a ‘curing checklist’ or favourite mini-tasks to stay productive between clamp removals? Would love to hear practical routines that keep projects moving.
This post offers some really helpful insights into the importance of proper environmental control during veneer repair. Living in Hobart, I’ve come to appreciate how fluctuations in humidity can seriously affect the longevity of repairs. The tip about maintaining stable conditions with a dehumidifier is spot on, as I’ve seen many projects falter due to neglecting this aspect.
One point I’d add is the benefit of using a wood veneer sealer before applying glue or filler, especially on porous or antique surfaces. It helps improve adhesion and prevents staining issues later. I’m curious how others have integrated environmental monitoring into their workflow—do you rely solely on hygrometers, or do you have more advanced setups?
Also, regarding color matching, I’ve found that creating a ‘palette’ of mixed stains on a scrap piece helps greatly to achieve seamless blends. Does anyone experiment with digital tools like spectrophotometers to fine-tune their colour matching, or do you prefer traditional methods?
Would love to hear your thoughts or experiences on elevating the environmental and colour-matching aspects of veneer repair.
This guide really highlights the importance of not only having the right tools but also the patience and environment control needed for a successful veneer repair. I’ve personally found that taking the time to carefully match the stain and apply thin layers with translucent glaze makes a huge difference. Testing your colour blends on scraps first can save a lot of headache later, especially when dealing with exotic woods or antiques.
I’m intrigued by the mention of nanocoatings and digital spectrophotometry—has anyone here tried applying nanocoatings for enhanced durability without affecting the appearance? Also, how do others balance traditional hands-on techniques with innovative tech tools like spectrophotometers?
From my experience, maintaining a stable environment during repair is crucial. Do you use basic hygrometers, or have you invested in advanced climate control systems? What’s your go-to method to ensure your repair lasts and the finish stays true over time? Would love to exchange tips and tricks with fellow restorers.
I’ve been fascinated by the detailed science and artistry involved in veneer repair described here, especially the blend of traditional techniques with modern materials like polyurethane adhesives and nanocoatings. One thing I’ve personally found challenging is managing environmental factors during repair—living in a coastal area with variable humidity, maintaining that ideal 40-60% range can be tricky. Using a dehumidifier helped, but I still worry about long-term effects on the adhesion and finish durability.
On the topic of adhesive curing time, I’ve noticed that patience really makes a difference. While 24-48 hours of clamping might seem long, it prevents issues like future peeling or bubbling. I’ve also experimented cautiously with super glue and activated charcoal powder for hairline cracks, and it yielded seamless results faster than traditional glues, though it’s more suited for small fixes.
The post’s mention of custom stain blending struck a chord—I once tried simple off-the-shelf stains and ended up with mismatched patches that looked obvious. Taking the time to mix stains and apply translucent layers really elevates the outcome.
I’m curious if others have tried combining digital spectrophotometry with hands-on finishing? How do you balance technology with the tactile side of veneer restoration to achieve both precision and natural aesthetics? Would love to hear how this integration impacts your workflow and results.
Reading through the detailed approaches to veneer repair, I’ve realised how critical the balance between patience and precision truly is. I once attempted a quick fix on a peeling veneer patch, hastening the clamping and staining stages, only to end up with an uneven finish and future peeling issues. Since then, I’ve followed a more methodical process: allowing extended curing times and using the interim to refine my sanding and test stain blends on scrap pieces. This strategy not only enhances the durability but keeps me engaged during the waiting periods.
What’s fascinated me most from the article is the evolution of adhesives, especially the injection techniques for high-viscosity polyurethane glue. I recently experimented with this method for a sizable peel and found that using a thin syringe to insert the adhesive ensured a more thorough bond without bubbling. Coupled with consistent clamping for 48 hours, the repair has held up remarkably well.
Regarding colour matching, custom blending stains with mineral spirits to mimic the grain depth has transformed my restorations. However, I haven’t yet tried digital spectrophotometry. I’m curious how experienced DIYers balance the tactile artistry of wood finishing with the precision allowed by these digital tools. Does reliance on technology risk losing some of the natural subtlety, or is it generally seen as an invaluable aid?
I really appreciate the detailed breakdown of essential tools and the emphasis on patience during the veneer repair process shared in this guide. From personal experience, one overlooked aspect is ensuring proper surface preparation before any adhesive or filler application—the tiniest dust particle or unevenness can undermine the repair’s durability. Also, the integration of modern materials like polyurethane adhesives and nanocoatings intrigues me. I’ve recently used a flexible wood filler with resin polymers, and it did seem to handle minor shrinkage better in my somewhat fluctuating indoor climate here in Hobart.
Regarding the environmental controls during and after repair, maintaining stable humidity is a challenge, especially in variable weather regions. Besides investing in humidifiers, I’ve found that sealing workspaces temporarily with plastic sheeting can help create a microclimate conducive to curing.
I’m curious if others have experimented with combining traditional stain blending techniques with digital spectrophotometry tools for complex grain patterns? Does the use of digital tools streamline the color matching process enough to justify the learning curve for most DIYers? Or does it sometimes remove that artistic intuition that crafts a truly seamless repair? Would be great to hear different approaches to bridging technology and hands-on craftsmanship in veneer restoration.
I’ve always admired the finesse involved in veneer repair, and this guide really highlights how patience and precision are indispensable. What struck me recently is how surface preparation truly sets the stage for a successful repair. Even a tiny speck of dust or an uneven edge can compromise the adhesive bond, leading to frustrating setbacks. I’ve started dedicating extra time to clean and smooth the damaged area meticulously before any glue or filler goes on.
Also, the mention of using clamps or heavy weights resonates with my experience. I once underestimated the clamping duration for a peeling veneer piece, and it peeled again within months—that taught me to respect that curing time fully, even if it means slowing down the project.
I’m intrigued by the discussion of nanocoatings for protection after repair. Has anyone tried these yet? Specifically, I’m curious about how they behave in terms of maintaining the natural look and feel of the veneer. Do they add any noticeable gloss or texture, or are they effectively invisible? Knowing more about their long-term durability would be great for those of us wanting to future-proof our restorations.
Would love to hear about your experiences or any tips on balancing thorough prep work with efficiency in DIY veneer projects.