Mastering the Art of Veneer Repair: Your DIY Journey Begins
Veneer furniture, with its elegant wood finish, can suffer from chips, cracks, or peeling over time. Instead of discarding cherished pieces, learning how to repair veneer like a pro empowers you to restore beauty and extend the life of your wood surfaces. This step-by-step DIY guide delves deep into professional techniques tailored for enthusiasts eager to achieve flawless results without costly expert intervention.
Understanding Veneer Damage: Types and Causes
Before embarking on repairs, recognizing the nature of veneer damage is crucial. Common issues include peeling edges caused by humidity fluctuations, chips from impact, and surface scratches from daily use. Each type demands a specific approach — for instance, peeling veneer requires re-gluing and clamping, whereas chips might need wood filler or patch veneers. This nuanced understanding helps tailor your repair strategy for a seamless finish.
Essential Tools and Materials for Professional-Grade Veneer Repair
Equipping yourself with the right tools is half the battle won. Prepare quality wood glue designed for veneer adhesion, veneer repair filler or colored wood putty, fine-grit sandpaper (220 to 400 grit), clamps, a sharp utility knife, and finish matching stains or varnishes. Selecting materials compatible with your veneer type ensures durable and visually consistent repairs.
Step-by-Step Veneer Repair: From Preparation to Finishing Touches
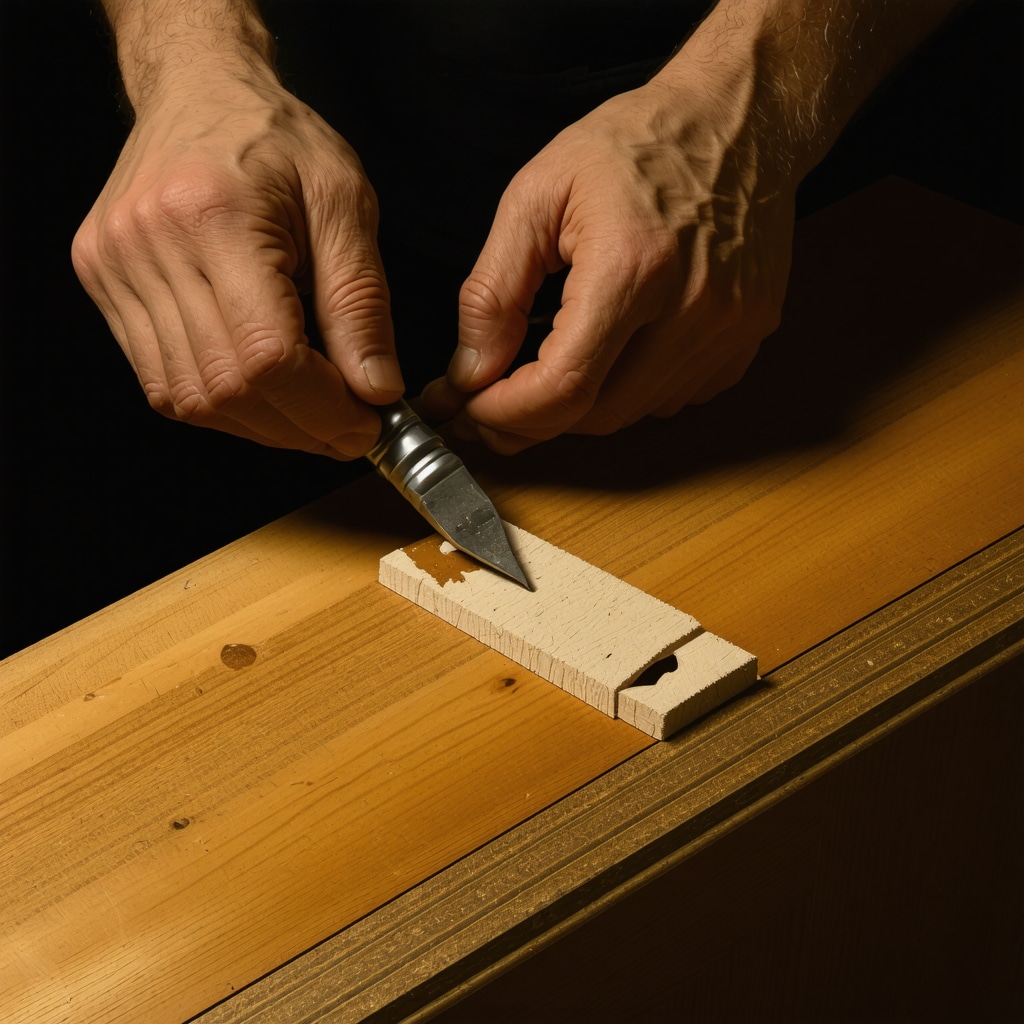
Begin by gently cleaning the damaged area to remove dirt and old glue residues. For peeling veneer, carefully lift the loose section and apply a thin layer of wood glue underneath. Use wax paper to prevent excess glue from sticking to clamps, then clamp firmly and allow drying for 24 hours. For chips, fill small gaps with colored wood putty, matching your veneer’s hue to maintain aesthetic integrity.
Once dry, sand the repaired area with fine-grit sandpaper to achieve a smooth surface. Apply a matching stain or varnish to blend repairs seamlessly. Patience during drying stages and attention to color matching are key to professional results.
What Are the Best Techniques to Blend Veneer Repairs Invisibly?
Achieving an invisible repair hinges on meticulous color matching and finish consistency. Using tinted wood fillers or mixing stain dyes allows repair spots to mimic natural wood grain and tone. Additionally, layering thin varnish coats with light sanding between applications creates depth and eliminates repair outlines. Experts often recommend testing stain combinations on scrap veneer before final application to perfect the blend.
Pro Tips: Avoiding Common Pitfalls in DIY Veneer Repairs
Avoid excessive glue application which can cause bubbling or staining. Always remove excess glue promptly before it dries. When clamping, distribute pressure evenly to prevent veneer warping. Moreover, refrain from rushing drying times; curing glue and finishes fully is essential for a lasting repair. These expert insights minimize rework and enhance the durability of your restoration.
For those interested in expanding their home improvement skills, exploring additional smart DIY ideas for everyday problems offers creative solutions beyond veneer repair.
Trustworthy Resources for Deepening Your Woodworking Expertise
For comprehensive information on wood veneer types, adhesives, and finishing techniques, the Wood Magazine’s veneer guide stands as an authoritative resource. It provides detailed insights validated by woodworking professionals, supporting your journey to master veneer repair with confidence and precision.
Have you tried repairing veneer before? Share your experiences or questions below to join our community of passionate DIYers and woodwork aficionados!
Learning From My Most Challenging Veneer Repair
One of the most memorable veneer repair projects I tackled was an antique side table with peeling veneer on all edges. Initially, I underestimated the delicate nature of the thin veneer pieces, but after some trial and error, I discovered the importance of patience and precision. Using wax paper between the clamps and veneer prevented unwanted glue stains, and carefully sanding after drying preserved the table’s elegant grain. This experience taught me that even the most fragile veneer can be restored beautifully with the right approach.
How to Handle Complex Veneer Cracks and Large Chips
Sometimes, veneer damage isn’t limited to small chips or peeling edges. I once faced a large crack that ran diagonally across a cabinet door. Instead of immediately replacing the veneer, I experimented with custom-cut veneer patches. Matching the grain direction and staining the patch before application made the repair virtually invisible. If you’re interested in learning about precise cutting and fitting techniques, exploring step-by-step veneer repair guides can offer valuable visual support.
Can Using Heat Help in Veneer Repair?
Heat is sometimes recommended for reactivating old glue or smoothing veneer edges. In my experience, applying gentle heat with an iron (covered by a damp cloth) can soften stubborn glue bonds, making it easier to reposition veneer. However, caution is key — excessive heat risks warping or discoloring the veneer. According to woodworking experts, controlled heat can be a helpful tool but should always be tested on a hidden area first (Wood Magazine highlights this technique in their adhesive tips section). Always prioritize gentle methods before resorting to heat.
Finishing Touches: Achieving a Professional Gloss and Texture
After sanding and staining, the final finish determines how well the repair blends with the surrounding wood. My go-to is layering thin coats of clear varnish or polyurethane, lightly sanding between each to create a smooth, durable surface. This approach builds depth and replicates the original sheen. If you want to enhance your finishing skills, check out home decor ideas that focus on finishing techniques to give your projects that polished look.
Avoiding Mistakes That Can Ruin Your Veneer Repair
One pitfall I encountered was over-sanding, which thinned the veneer and revealed the substrate beneath. To prevent this, I recommend using very fine grit sandpaper and minimal pressure. Also, when applying stains or fillers, test colors in natural light to avoid mismatched hues. Patience during drying times cannot be overstated — hurrying this step often leads to blemishes or adhesive failure.
If you’re inspired to take on your own veneer repair project, I’d love to hear about your experiences or any challenges you’ve faced. Sharing stories not only builds community but also provides insights we might not find in manuals. Feel free to leave a comment below or explore more creative solutions like unique DIY crafts to enhance your woodworking journey.
Innovative Approaches to Complex Veneer Crack Restoration: Precision and Patience
When veneer damage escalates beyond minor chips to encompass large cracks or missing sections, standard repair methods fall short. One advanced technique involves creating custom veneer patches that not only match the wood species but also the grain orientation and pore structure. This approach requires meticulous measurement and cutting, often using a veneer saw or scalpel for precision. Prior to adhesion, staining the patch to replicate the original finish ensures an almost imperceptible blend.
Additionally, the substrate beneath the veneer must be carefully prepared — any irregularities can cause the patch to lift or appear uneven. Applying a thin, even layer of high-quality wood glue designed for veneer adhesion maximizes bond strength. Clamping with specialized veneer clamps or vacuum press systems ensures uniform pressure, avoiding bubbles or warping. These techniques transform what could be a glaring flaw into a restored masterpiece.
How Can Vacuum Press Technology Revolutionize Veneer Repair Quality?
Vacuum pressing, a method often reserved for professional woodworking shops, offers unparalleled control in veneer repair. By applying consistent pressure across the entire repair surface, it reduces the risk of glue squeeze-out, air bubbles, and misalignment. The technology creates an even bond between the patch and substrate, which is particularly beneficial for large or irregular repairs where traditional clamps might fail to provide uniform pressure. While investment in vacuum press equipment can be significant, even small-scale DIY vacuum pressing kits are becoming accessible, democratizing this advanced technique.
According to Wood Magazine’s detailed veneer repair guide, vacuum pressing enhances adhesive penetration and produces a finish-ready surface with minimal sanding. It represents a leap forward in achieving professional-grade veneer repairs at home.
Expert-Level Finish Blending: Beyond Stains and Fillers
Achieving a seamless finish post-repair demands more than just color matching. Advanced artisans employ layering techniques using translucent dyes combined with micro-pigments to replicate the depth and texture of natural wood grain. This involves applying multiple thin coats of dye and varnish, allowing each layer to partially cure before sanding lightly to expose subtle wood patterns.
Moreover, using finish products with varying sheens strategically can replicate the luster variances found in aged veneer, which often have uneven gloss levels due to wear and polishing. Employing tools like a magnifying glass during this process helps identify inconsistencies that the naked eye might miss, ensuring an indistinguishable repair.
What Are the Best Practices for Color Matching in Veneer Repair to Mimic Natural Aging?
Natural aging imparts complex color shifts and patina that are difficult to replicate. Expert repairers recommend sampling stain blends on veneer scraps that have been artificially aged using UV light exposure or chemical patination. This pre-aging enables better prediction of how stains will meld with existing patina. Furthermore, layering stains with different undertones—warm, cool, or neutral—can recreate the nuanced color spectrum of aged wood.
Controlling drying environments, such as humidity and temperature, also influences stain absorption, making it essential to perform test applications under conditions similar to the actual repair environment. Such attention to detail is what separates amateur repairs from professional restorations.
Integrating Modern Materials in Veneer Repair: Balancing Authenticity and Durability
While traditional wood glues and fillers remain staples, modern materials like epoxy resins infused with wood dust or colored pigments offer enhanced durability and aesthetic flexibility. Epoxy-based fillers provide superior resistance to moisture and mechanical stress—critical for furniture in high-use areas.
However, integrating these materials requires understanding their curing times, shrinkage properties, and compatibility with existing finishes. Improper use can lead to discoloration or adhesion failure. Consulting datasheets from manufacturers such as West System or System Three Epoxy ensures informed selection and application.
Embracing these innovations alongside classical techniques provides a robust toolkit for tackling even the most challenging veneer repairs.
If you’re ready to elevate your veneer repair skills and explore these advanced methods firsthand, consider subscribing to our expert woodworking newsletter. Gain access to exclusive tutorials, detailed material reviews, and live Q&A sessions with industry professionals to transform your DIY projects into gallery-worthy restorations.
Harnessing Precision Tools for Flawless Veneer Seam Alignment
One of the most subtle yet impactful challenges in veneer repair is achieving perfect seam alignment, especially when working with patch veneers or replacing large sections. Precision tools such as veneer saws with ultra-thin blades, scalpel knives, and digital calipers enable artisans to execute cuts with micron-level accuracy. These tools minimize gaps and ensure the grain flows naturally across repaired areas, which is indispensable for maintaining both structural integrity and aesthetic harmony.
Additionally, employing light sources angled to accentuate grain direction helps in aligning patches before gluing. This meticulous preparation stage is often overlooked but pivotal in producing repairs indistinguishable from original veneer surfaces.
Advanced Adhesive Chemistry: Selecting Glues for Optimal Bond and Longevity
While traditional hide glue remains favored for its reversibility and historical authenticity, modern polyurethane and aliphatic resin glues offer superior moisture resistance and bond strength. Understanding the chemical properties and curing behaviors of these adhesives informs their appropriate application. For example, polyurethane glue expands slightly as it cures, which can be advantageous for filling minor voids but requires careful clamping to avoid veneer lift.
Consulting technical datasheets from specialized adhesive manufacturers such as Titebond 3 Ultimate Wood Glue provides insight into usage parameters, open time, and optimal environmental conditions, enabling professionals to tailor glue selection to specific repair scenarios.
How Does Substrate Preparation Influence Veneer Repair Durability?
Substrate preparation is the foundation upon which veneer repair longevity depends. Removing residual glue, dust, and unevenness is critical to ensure intimate contact between the veneer and substrate. Techniques such as micro-sanding with fine abrasives and solvent wiping remove contaminants without damaging the substrate surface. For porous or damaged substrates, applying a stabilizing sealer can prevent adhesive seepage and improve bond uniformity.
Neglecting substrate conditioning often leads to delamination or bubbling post-repair, underscoring its importance in high-level veneer restoration.
Incorporating Environmental Controls to Enhance Repair Outcomes
Environmental factors like humidity and temperature significantly affect glue curing and finish drying. Establishing a controlled workspace with consistent humidity levels around 45-55% and temperatures between 20-25°C optimizes adhesive performance and minimizes veneer warping. Utilizing dehumidifiers, humidifiers, or temperature-controlled areas during repair and curing phases reduces stress on delicate veneer layers.
Implementing such environmental controls aligns with professional wood restoration standards and elevates DIY repair quality closer to that of expert workshops.
Leveraging Microscopic Inspection for Quality Assurance
Advanced restorers often employ magnification tools—such as jeweler’s loupes or handheld digital microscopes—to scrutinize veneer repairs at a micro level. This examination reveals imperfections invisible to the naked eye, including micro-gaps, finish inconsistencies, or subtle color mismatches. Addressing these issues early allows for corrective refinements like targeted touch-ups or additional finish layering, ensuring impeccable final results.
What Role Do Modern Digital Tools Play in Veneer Repair Planning?
Digital imaging and design software now support veneer repair planning by allowing detailed mapping of damage and simulation of patch placements. High-resolution photography combined with software like Adobe Photoshop or specialized woodworking programs enables artisans to experiment with grain orientation, color matching, and patch sizing virtually before committing to physical cuts. This reduces material waste and enhances precision—especially valuable in complex restorations where veneer availability is limited.
Call to Action: Elevate Your Veneer Repair Mastery Today
By integrating these advanced techniques—from precision tooling and adhesive chemistry to environmental control and digital planning—you can transcend basic veneer repair and achieve restorations with museum-quality finesse. Ready to deepen your expertise and access exclusive content, professional tips, and interactive tutorials? Subscribe to our woodworking masterclass newsletter and join a community dedicated to crafting perfection.
Frequently Asked Questions (FAQ)
What is the best way to repair peeling veneer edges without damaging the original surface?
The optimal method involves gently lifting the peeling veneer, applying a thin layer of high-quality wood glue underneath, then using wax paper and clamps to secure the veneer while it dries for at least 24 hours. Avoid excess glue and ensure even clamping pressure to prevent warping or bubbling. Patience and precision during this process preserve the original surface integrity.
How can I achieve an invisible color match for veneer repairs?
Invisible color matching requires mixing stains and tinted fillers to replicate the original wood’s hue and grain characteristics. Testing stain blends on scrap veneer, preferably pre-aged to simulate patina, helps perfect the match. Applying multiple thin layers of stain and varnish with light sanding in between builds depth and mimics natural wood aging.
Are modern epoxy fillers better than traditional wood fillers for veneer repair?
Epoxy fillers infused with wood dust or pigments offer enhanced durability, moisture resistance, and mechanical strength, making them ideal for high-use furniture. However, they require careful attention to curing times and compatibility with existing finishes. Traditional wood fillers provide easier reversibility and better aesthetic integration in some cases. Selecting the appropriate filler depends on the specific repair context and desired longevity.
Can vacuum pressing be used effectively for DIY veneer repairs?
Yes, vacuum pressing offers uniform pressure across repaired veneer surfaces, reducing air bubbles and glue squeeze-out. While traditionally used in professional shops, small-scale vacuum press kits are increasingly accessible for DIYers. This technology significantly improves bond quality, especially for large or irregular patches, resulting in a more seamless repair.
What tools are essential for precise veneer seam alignment?
Essential tools include ultra-thin blade veneer saws, scalpel knives for detailed cuts, digital calipers for accurate measurements, and angled lighting to highlight grain direction during alignment. These tools enable micron-level precision, ensuring that veneer seams flow naturally and maintain structural and aesthetic harmony.
How does substrate preparation affect veneer repair quality?
Proper substrate preparation is foundational for durable veneer repairs. Removing old glue residues, dust, and uneven spots via fine sanding and solvent cleaning ensures optimal adhesion. For porous or damaged substrates, applying a stabilizing sealer prevents adhesive seepage and promotes uniform bonding. Neglecting this step often leads to delamination or repair failure.
Is heat advisable for reactivating old glue under veneer?
Controlled application of gentle heat using an iron covered with a damp cloth can soften old glue, aiding veneer repositioning. However, excessive heat risks warping or discoloring the veneer. Testing on an inconspicuous area is imperative, and gentle methods should always precede heat application to minimize damage.
How important are environmental conditions during veneer repair?
Maintaining stable humidity (45-55%) and temperature (20-25°C) during glue curing and finish drying is critical. Environmental control prevents veneer warping, improves adhesive performance, and ensures consistent finish absorption, thereby enhancing repair quality and longevity.
What advanced finishing techniques help replicate natural wood texture and sheen?
Advanced finish blending involves layering translucent dyes with micro-pigments, sanding lightly between coats to reveal wood grain depth. Using finishes with varying sheens mimics natural luster variations found in aged veneer. Magnification tools help detect inconsistencies for targeted refinements, achieving indistinguishable repairs.
Are digital tools useful in planning veneer repairs?
Digital imaging and design software allow detailed damage mapping, virtual patch placement, and grain orientation simulation. These tools reduce material waste, enhance precision, and facilitate complex restorations by enabling trial runs before physical execution, making them invaluable for expert-level veneer repair planning.
Trusted External Sources
- Wood Magazine – Veneer Guide: Offers comprehensive, professional insights into wood veneer species, adhesives, and finishing techniques, essential for understanding material properties and repair best practices.
- Titebond Official Technical Datasheets: Provides detailed information on adhesive chemistry, curing behavior, and optimal application methods for wood glues like Titebond 3 Ultimate, informing expert glue selection.
- West System Epoxy Documentation: Delivers authoritative guidance on epoxy resin use, curing profiles, and compatibility with wood substrates, crucial for integrating modern materials into veneer repairs.
- Journal of the American Institute for Conservation (JAIC): Features peer-reviewed research on wood conservation, including advanced veneer restoration methods and environmental control strategies, supporting high-quality repairs.
- Fine Woodworking Magazine: A respected specialization publication providing tutorials, tool reviews, and expert advice on precision woodworking and veneer techniques, enhancing practical skills.
Conclusion
Mastering veneer repair blends art and science, requiring a thorough understanding of damage types, precise tool use, adhesive chemistry, and environmental controls. From repairing peeling edges to expertly blending finishes and employing advanced techniques like vacuum pressing and digital planning, this comprehensive approach elevates DIY veneer restoration to professional standards. Integrating both traditional methods and modern innovations empowers woodworkers to transform damaged veneer into seamless, durable masterpieces. We encourage you to apply these expert insights in your next project, share your experiences, and continue exploring advanced woodworking content to refine your craft further.
This guide has really helped me appreciate how nuanced veneer repair can be. I recently tried fixing some peeling veneer on an old coffee table and initially struggled with the clamping part; too much pressure warped the thin veneer, so that tip about distributing pressure evenly was a game changer. I also learned the hard way that patience is crucial — trying to rush the glue drying only led to bubbling edges. One aspect I found tricky was matching the wood stain exactly, especially since the existing finish had aged unevenly. The suggestion to test stain blends on scrap pieces sounds like the best way to tackle that challenge. Has anyone experimented with layering different stain tones or using tinted fillers to mimic that aged patina? I’d love to hear different approaches, particularly for veneers with intricate grain patterns. Also, anyone here invested in a DIY vacuum press setup? I’d be curious if it truly makes a significant difference for those large or oddly shaped repairs compared to traditional clamping methods.
Elliot, your experience with clamping and stain matching really resonates with me. I also struggled initially with getting an even pressure during the clamping process, and I can’t overemphasize how crucial that balance is to avoid warping delicate veneer. Regarding your question about layering stain tones, I’ve found that mixing warm and cooler stain shades incrementally on scrap veneer can replicate complex aged patinas quite well, especially when paired with tinted wood fillers to fill chips or scratches. The layering helps mimic natural variations in wood tones, particularly beneficial for intricate grain patterns.
On the topic of DIY vacuum presses, I recently invested in a small-scale kit and noticed a marked improvement in the glue bond quality and uniform pressure distribution compared to traditional clamps. For larger or awkward repairs, it really minimizes air pockets and glue squeeze-out, resulting in a smoother finish with less sanding required afterward. Plus, the controlled pressure reduces the risk of veneer lifting or bubbling that can occur with uneven clamp pressure.
I’m curious if anyone else here has taken the plunge with vacuum pressing and what their experiences have been, especially regarding cost-benefit in home setups. Also, how have you balanced the patience needed for drying and finishing with having projects completed in a reasonable timeframe?
Following on from Elliot and Maya’s comments about clamping and stain matching, I’ve found that substrate preparation can make or break the durability of a veneer repair. In one project with a vintage cabinet, I neglected to clean thoroughly and lightly sand the substrate before gluing, which unfortunately led to some bubbling after drying. Since then, I ensure to remove all dust and old adhesive residues, using fine abrasives and a solvent wipe—as emphasized in the guide. This extra step really helps adhesives bond effectively and prevents delamination.
On the topic of vacuum pressing, while I haven’t invested in a kit yet, I’ve read that consistent pressure from vacuum pressing significantly reduces glue squeeze-out and air pockets, especially on larger repairs. I’m curious if others with hands-on experience noticed a notable difference in ease of sanding and finish quality with vacuum pressing versus clamps? Also, how critical do you find controlling environmental conditions like humidity during the curing phase? I’ve struggled a bit with warping when working in less-than-ideal spaces, so any tips to manage that would be appreciated.
I’ve recently dived into repairing veneer on a heirloom dining chair that had a series of small chips along the edges. One challenge I faced, which wasn’t explicitly highlighted in the guide, was handling uneven thickness in the substrate below the veneer. To ensure the patch veneer laid perfectly flat, I had to carefully level the substrate using a light filler before gluing. This step made a substantial difference in preventing the patch from lifting or showing bubbles later on. I also experimented with a layered finish approach — applying multiple thin coats of tinted varnish with sanding between each — which really helped mimic the natural sheen of the original veneer. On managing environmental factors during curing, I found that working in a small room with a consistent temperature and using a portable humidifier helped maintain steady humidity, reducing risk of warping. I’m curious, for those with experience, how do you balance the time for these careful drying stages while keeping momentum in your projects? Does anyone have tips on speeding up curing without sacrificing quality?
It’s truly impressive how much technique goes into repairing veneer so it looks seamless. I recently tackled a cabinet door with a few peeling edges and small chips, and I can’t stress enough how important the substrate preparation was. Cleaning thoroughly and using a stabilizing sealer on the old glue residues really made the glue adhere better, reducing bubbling afterward. One trick I picked up not mentioned here is using a fine artist’s brush to apply the glue under the veneer edges, which helps control the amount precisely and avoids the dreaded glue squeeze-out.
On the finishing side, I experimented with layering very thin coats of tinted varnish and sanding gently between layers. This created a depth and texture that closely matched the natural wood. It also helped mimic the uneven sheen of aged veneer, which I found is vital for making repairs invisible.
I’m curious how others approach matches when working with veneers that have highly intricate grain patterns. Do you lean more on mixing multiple stains, or do tinted fillers carry most of the visual weight for you? How much do you rely on layering finishes versus getting the initial stain spot on? Would love to swap tips!
Reading through this comprehensive guide and the insightful comments, one aspect that stood out to me is the importance of environmental control during the veneer repair process. From my own experience restoring an old Victorian sideboard, I learned that even small fluctuations in humidity caused noticeable warping during glue curing. Setting up a temporary workspace with a humidifier to maintain consistent moisture levels between 45-55% made a huge difference in achieving flat veneer surfaces without bubbles or lifting. Additionally, keeping the temperature steady around 20-22°C seemed to help finishes cure evenly, preventing colour inconsistencies.
Regarding the use of vacuum pressing discussed earlier, I’ve not yet invested in a kit but wonder about its accessibility for casual DIY projects. Considering cost and space, has anyone found smaller vacuum press systems practical for home use? Do such setups significantly reduce the preparation time or sanding compared to traditional clamping methods?
Lastly, while the guide impressively covers colour matching, I find blending the repaired areas under natural light critical to spotting subtle hue mismatches. I’m curious to hear from others how they manage lighting conditions during repairs or if they use any special tools to perfect colour blends on veneers with tricky grain patterns.
This post really highlights the fine details involved in achieving flawless veneer repairs. I’ve worked on a few pieces where substrate leveling made all the difference—failing to do so resulted in bubbles and uneven surfaces. It’s also interesting how environmental factors play such a crucial role; maintaining proper humidity and temperature during the curing process is something I’ve definitely underestimated in the past. I’ve been considering investing in a small vacuum press kit for larger repairs, and your insights have convinced me it might be worth the investment. From experience, I agree that a consistent pressure application produces a much cleaner finish with fewer imperfections.
Regarding colour matching, I’ve found that a layered approach with transparent dyes and light sanding gives the most natural look, especially on aged veneer with complex grain patterns. How do others manage the challenge of matching sheen levels in repairs? Do you prefer multiple thin coats of varnish or a single, well-blended layer? Would love to hear more tips on blending techniques for different veneer types.
Great insights here! I completely agree that substrate preparation is often overlooked but can make or break the success of a veneer repair. I had a similar experience with bubbling on an old sideboard because I failed to clean and level the substrate thoroughly before gluing. Now I always wipe with a solvent and sand lightly, which really helps with adhesion.
The discussion about vacuum pressing caught my interest. I’ve been using a small DIY kit at home and have found that, although it requires a bit of setup, it provides consistent pressure and reduces the risk of air bubbles significantly, especially on larger repairs. It’s more time-efficient once you get the hang of it. For anyone considering it, I’d say the investment pays off in more seamless, durable repairs.
How do others find the best way to match the sheen and colour when dealing with aged veneer? Do you prefer multiple thin coats of varnish or laser-focused stain matching? I’d love to hear more about different finishing techniques, especially for pieces with intricate grain patterns.
Great post! I especially appreciate the detailed focus on substrate preparation. I’ve learned through my own projects that skipping this step often results in poor adhesion and visible bubbles. For tricky areas, I sometimes use a fine-tip brush to carefully apply glue underneath thin veneer pieces before clamping—this helps minimize excess glue and ensures a tighter bond. Also, I’ve started experimenting with layering thin coats of coloured varnish alongside stain to better mimic the natural variation in aged wood. How do others find the balance between stain and finish coats, especially when working with highly figured veneers? I found that patience with drying times and environmental controls, like maintaining consistent humidity, really helps achieve that seamless look. Does anyone have tips on quick-drying techniques or environmental tricks to speed up the process without compromising the repair quality? Would love to hear your tips or experiences.