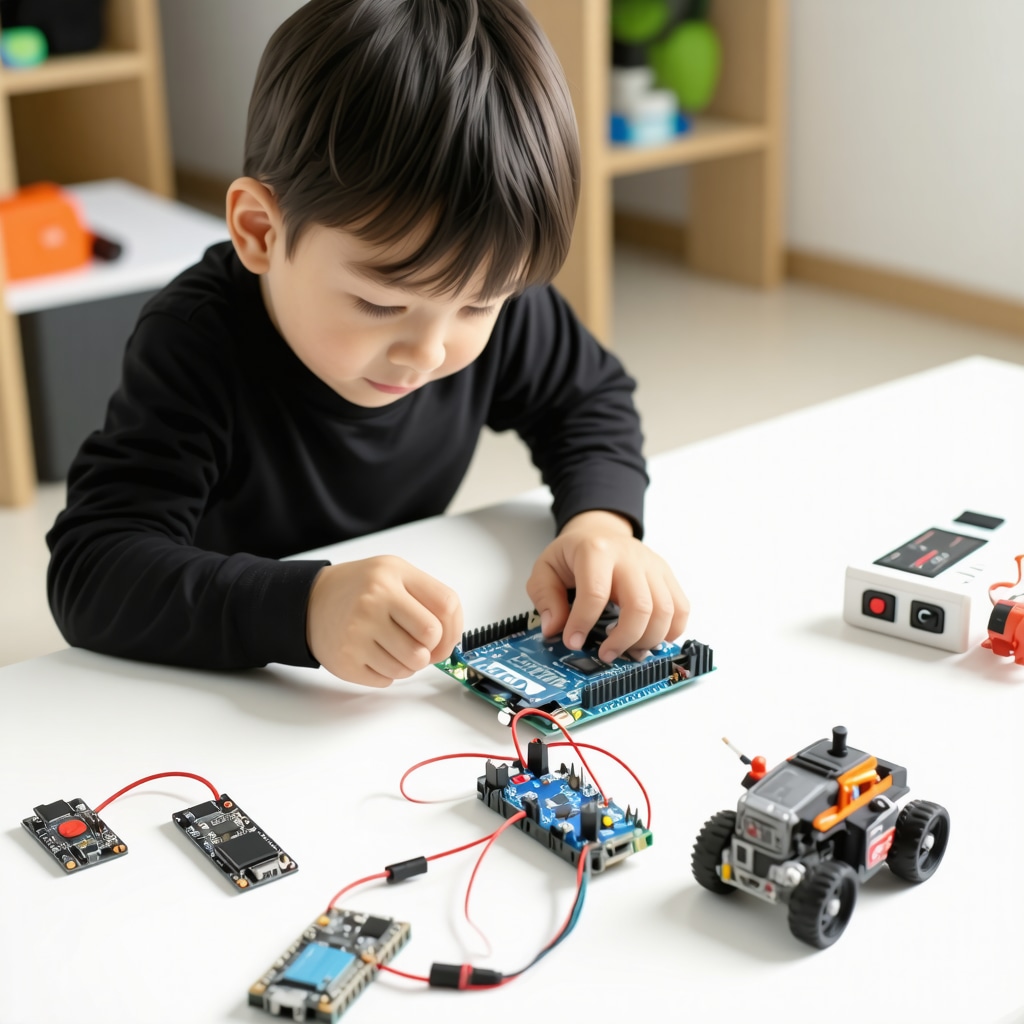
How Arduino Sensor Toys Sparked My Curiosity
I still remember the first time I plugged a tiny sensor into my Arduino board; the excitement was palpable. As someone who loves tinkering with electronics and DIY projects, building Arduino sensor toys became a gateway for me to explore technology while having fun. These projects aren’t just toys; they’re powerful learning tools that challenge you to think creatively and understand the fundamentals of sensors, programming, and electronics.
Discovering the Joy of Interactive Arduino Creations
One of my favorite projects involved creating a simple distance-sensing car that could stop when it detected an obstacle. It felt incredible to see a toy respond to its environment thanks to ultrasonic sensors and Arduino code. This hands-on experience taught me more about sensor calibration and coding logic than any textbook could. If you’re just starting, I recommend exploring interactive Arduino toys tutorials that guide you step-by-step through sensor integration and coding.
What Makes Arduino Sensor Toys Ideal for Learning?
Arduino sensor toys combine hardware and software in ways that encourage problem-solving and experimentation. Sensors like temperature, light, or motion sensors provide real-time data, allowing you to create projects that react dynamically. From my experience, this immediate feedback loop significantly deepens understanding and keeps motivation high. I also found that working on these projects improves patience and attention to detail, skills valuable far beyond electronics.
Practical Tips from My DIY Adventures
When I first started, I struggled with wiring sensors correctly and writing efficient code. My advice? Start with simple projects and gradually increase complexity. Documenting your process and debugging carefully makes a huge difference. Also, don’t hesitate to join forums or communities—Arduino has a vast and supportive user base. The official Arduino website and educational resources offer trustworthy information, which helped me avoid common pitfalls.
For those interested in expanding their DIY skills beyond Arduino, exploring general crafting projects can complement your technical abilities. Check out this collection of engaging DIY projects for all ages that inspire creativity in many forms.
Ready to Build Your Own Arduino Sensor Toy?
If you’ve ever wondered how to get started or what sensor toys you can create, I encourage you to dive in and share your experiences. What challenges have you faced, or which sensors intrigue you most? Feel free to comment below or reach out through my contact page. Remember, each project is a stepping stone toward mastering this fascinating blend of electronics and creativity.
For more comprehensive guides that match your skill level, be sure to explore the step-by-step DIY guides which I found invaluable throughout my learning journey.
Integrating Multiple Sensors for Complex Arduino Toys
Once you master basic Arduino sensor toys, the next exciting step is combining multiple sensors to create more sophisticated interactive devices. For example, integrating ultrasonic distance sensors with infrared motion detectors and light sensors opens the door to toys that not only react to proximity but also adjust behavior based on ambient light or movement patterns. This fusion of sensory data enhances the realism and functionality of your creations, challenging you to implement more advanced programming concepts such as sensor fusion and conditional logic.
During my recent project, I built a robotic pet that responds to touch, detects obstacles, and changes LED colors based on environmental lighting. This required careful wiring, sensor calibration, and writing modular code to manage different data inputs without conflicts. Such projects significantly boost your understanding of microcontroller multitasking and sensor integration.
How Can You Optimize Sensor Accuracy and Responsiveness in Arduino Toys?
Sensor accuracy and responsiveness directly impact the quality of your Arduino sensor toys. Optimizing these parameters involves both hardware and software strategies. On the hardware side, selecting high-quality sensors and ensuring proper wiring and shielding helps reduce noise and interference. Software techniques include implementing filtering algorithms like moving averages or Kalman filters to smooth out sensor readings and avoid erratic behavior.
Moreover, fine-tuning sensor thresholds and response delays is crucial. For instance, ultrasonic sensors may require adjusting pulse timing to avoid false readings caused by signal reflections. Testing and iterative debugging prove invaluable in this optimization process. Resources like the Arduino official forums and tutorials from Arduino’s official site provide expert advice and code samples for sensor calibration best practices.
Leveraging Advanced Programming Techniques for Interactive Toys
Beyond basic conditional statements, incorporating advanced programming paradigms such as state machines, interrupts, and object-oriented design significantly improves your Arduino projects. For example, using interrupts allows your toy to respond immediately to sensor inputs without delay, essential for real-time reactions. State machines help manage complex behaviors by defining clear states and transitions, making code more organized and scalable.
These programming techniques not only enhance toy performance but also prepare you for more ambitious electronics projects. If you want to deepen your programming skills alongside hardware, explore the detailed walkthroughs on step-by-step DIY guides that cover both coding and circuit design for varying expertise levels.
Exploring Sustainable Materials and Power Solutions for Arduino Toys
Incorporating sustainability into your DIY Arduino sensor toys is a rewarding challenge. Using recycled or eco-friendly materials for toy casings, such as reclaimed wood or biodegradable plastics, adds an environmental consciousness layer to your projects. Additionally, experimenting with renewable power sources like small solar panels or rechargeable battery packs can make your toys more self-sufficient and educational regarding energy management.
This approach aligns with modern DIY trends emphasizing eco-friendly crafting and smart home innovations. For ideas on sustainable crafting and smart DIY living, check out smart DIY solutions for modern living to inspire your next project.
Contributing to the DIY Community: Sharing and Learning Together
As your skills grow, sharing your experiences and projects with the DIY community fosters mutual learning and innovation. Platforms like GitHub and Arduino forums allow you to publish your code, troubleshoot collaboratively, and receive feedback. Documenting your builds with clear instructions and photos can also inspire others to embark on their own Arduino sensor toy adventures.
Engaging in community challenges or contributing to open-source sensor libraries further deepens your expertise and helps keep the ecosystem vibrant. I encourage you to join discussions and share your unique approaches. For more creative inspiration beyond Arduino, explore unique DIY crafts to try that expand your creative horizons.
Reflecting on the Intricacies of Sensor Calibration and Environmental Variables
One thing I’ve learned through countless Arduino sensor toy projects is how subtle environmental factors can dramatically influence sensor readings. For example, temperature fluctuations or ambient light changes can throw off sensor accuracy, requiring more than just basic calibration. I remember troubleshooting a motion sensor that sporadically triggered due to sunlight reflections; this pushed me to experiment with sensor placement and software debouncing techniques to minimize false positives.
These challenges have deepened my appreciation for the precision needed when working with sensors in real-world conditions. It’s a reminder that beyond coding and wiring, understanding your environment becomes a vital part of successful project design.
Embracing the Art of Modular Code for Scalable Arduino Toys
As my projects grew more complex, I found that writing modular and reusable code was a game changer. Instead of monolithic sketches, breaking down functionality into classes and functions made debugging and enhancements much smoother. Using object-oriented programming principles enabled me to manage multiple sensors and actuators more elegantly, especially when integrating diverse inputs like ultrasonic distance, temperature, and touch sensors.
If you want to dive deeper into these concepts, Arduino’s official tutorials offer excellent resources on structuring your code effectively, which you can explore on Arduino’s official site. This approach not only improves your current projects but also lays a strong foundation for more ambitious DIY electronics.
How Do You Balance Creativity and Technical Constraints in Arduino Sensor Toys?
Balancing creative ideas with the technical limits of sensors and microcontrollers is an ongoing dance. Sometimes, an exciting concept requires more processing power or sensor precision than your setup can provide. I’ve learned to scale ideas thoughtfully—testing prototypes early and iterating based on what the hardware realistically supports.
I also encourage experimenting with blending simpler sensors creatively, like using light and motion sensors together to simulate complex behaviors, rather than immediately reaching for the most advanced components. This mindset nurtures problem-solving skills and often leads to unexpected, innovative outcomes.
Joining the DIY Community: Sharing Our Journeys and Growing Together
One of the most rewarding parts of my Arduino journey has been connecting with fellow enthusiasts. Sharing project insights, troubleshooting, and even failures helps us all improve. If you haven’t yet, I recommend joining Arduino forums or local maker groups where you can exchange ideas and receive feedback.
Writing detailed build logs or tutorials not only reinforces your own knowledge but also inspires others to embark on similar projects. For those looking to expand their creative horizons, exploring engaging DIY projects for all ages can spark new ideas that merge electronics with broader crafting skills.
Feel free to share your own experiences or questions through my contact page or comment below. Embracing this collaborative spirit truly enriches our learning adventure.
Delving into Sensor Calibration Nuances for Robust Arduino Projects
As I ventured further into crafting increasingly sophisticated Arduino sensor toys, I realized that sensor calibration transcends simple zeroing and scaling. Environmental variables like temperature gradients, humidity, and electromagnetic interference often distort raw sensor outputs, demanding a multi-faceted calibration approach. For example, when integrating temperature sensors with light or motion sensors, their cross-sensitivity to ambient fluctuations required me to implement dynamic compensation algorithms that adjust calibration parameters on the fly.
One particularly enlightening instance involved a capacitive touch sensor whose sensitivity varied with humidity changes. By combining empirical testing with adaptive thresholding in code, I successfully minimized false triggers, enhancing user experience. Such challenges underscore the importance of considering the holistic environment, not just the sensor datasheet specifications.
For those eager to explore these intricate calibration techniques, I highly recommend consulting authoritative sources like the Arduino Analog Input tutorial, which offers practical insights into analog sensor nuances and noise reduction methods.
Embracing Modular Architecture to Elevate Arduino Toy Complexity
Scaling Arduino projects beyond rudimentary prototypes compelled me to adopt a modular architecture both in hardware and software. By compartmentalizing sensor interactions into discrete classes and modules, I could isolate and test individual components independently, drastically simplifying debugging and upgrades. This modular approach proved especially beneficial when orchestrating multiple sensors with overlapping functions, such as combining ultrasonic distance measurements with infrared motion detection.
Moreover, this strategy facilitated code reuse across projects, accelerating development cycles and fostering cleaner, maintainable codebases. Embracing object-oriented programming principles allowed me to encapsulate sensor behaviors and state management, a practice I highly endorse for developers aspiring to build complex, responsive Arduino sensor toys.
How Can One Harmonize Creative Vision with Arduino Hardware Limitations?
Balancing ambitious creative concepts with the inherent limitations of Arduino microcontrollers and sensors is an art that matures with experience. I frequently encounter ideas that outpace available processing power, memory, or sensor precision. To navigate this, I start by defining core functionalities and prioritizing features to distill the essence of the concept. Prototyping with simpler sensor combinations often reveals innovative workarounds that maintain creative integrity while respecting technical constraints.
For instance, replicating nuanced environmental interactions without expensive sensors can be achieved by cleverly fusing data from more common components like photoresistors and PIR sensors. This approach nurtures resourcefulness and often leads to unique project signatures. Iterative testing and embracing limitations as design parameters transform challenges into opportunities for ingenuity.
If you’re intrigued by pushing Arduino projects to their creative and technical limits, I invite you to share your experiences or ask questions through my contact page. Together, we can explore the fascinating interplay between imagination and hardware capabilities.
Things I Wish I Knew Earlier (or You Might Find Surprising)
The Beauty of Embracing Mistakes
Early on, I used to get frustrated when my sensor readings were off or my code didn’t behave as expected. What I’ve since realized is that these hiccups are actually invitations to learn deeper. Each mistake reveals nuances about sensor behavior or coding logic that no tutorial can fully prepare you for. Embracing errors as part of the process transformed my approach from anxiety to curiosity.
Less Is More: The Elegance of Simplicity
When starting out, I often tried to cram too many sensors or features into one toy, hoping to make it impressive. Over time, I found that focusing on a single sensor or interaction creates a clearer, more reliable project. Simple designs often lead to more meaningful learning and less debugging headaches. It’s a refreshing reminder that creativity thrives within constraints.
Environmental Factors Aren’t Just Background Noise
One surprising lesson was how significantly environment impacts sensor performance. Lighting, temperature, or even electromagnetic interference can subtly skew sensor data. I learned to treat these variables as part of the design challenge—experimenting with sensor placement, shielding, and software filtering to create robust toys that perform well beyond the ideal lab conditions.
Community Is a Hidden Sensor in Your Toolkit
Arduino forums and maker groups aren’t just places to seek help—they are treasure troves of ideas, tricks, and inspiration. Early on, I underestimated the power of sharing my struggles and successes. Engaging with the DIY community made me realize that collaboration accelerates growth and often sparks unexpected creative breakthroughs.
Patience Is the Unsung Hero of Sensor Projects
Sensor calibration and debugging often take longer than the actual coding or wiring. Learning to be patient—taking the time to methodically test and adjust parameters—paid off enormously. It’s a practice that builds resilience and sharpens attention to detail, qualities that extend well beyond Arduino projects.
Resources I’ve Come to Trust Over Time
Arduino Official Tutorials and Forum: For anyone diving into sensor integration or coding, the Arduino official tutorials provide clear, reliable guidance. The forums are an incredible resource to troubleshoot specific issues and pick up best practices from seasoned makers.
Interactive Arduino Toys Tutorials on DIY Kutak: The hands-on guides at DIY Kutak helped me bridge theory and practice with step-by-step instructions that suit all skill levels. Their approachable style makes complex concepts feel manageable.
Step-by-Step DIY Guides for All Skill Levels: When I wanted to expand beyond simple projects, the comprehensive DIY guides on DIY Kutak were invaluable. They cover both hardware and programming intricacies, helping me build confidence.
Smart DIY Innovative Solutions for Modern Living: Exploring sustainability and creative power sources became easier thanks to the ideas shared in this resource. It inspired me to think beyond the sensor and microcontroller, toward holistic project design.
Creative DIY Crafts for Broader Inspiration: Sometimes stepping away from electronics to engage with fun, hands-on crafts like those found at DIY Kutak’s crafting section refreshed my creativity and helped me approach Arduino projects with a fresh perspective.
Parting Thoughts from My Perspective
Arduino sensor toys opened a world where creativity meets technology in the most playful way. From my experience, the journey isn’t just about mastering sensors or coding—it’s about cultivating patience, embracing challenges, and continually learning through hands-on exploration. The immediate feedback from sensors makes this learning uniquely rewarding, turning abstract concepts into tangible magic.
Whether you’re a beginner or looking to push your skills further, remember that every project is a step toward understanding both the hardware and yourself as a maker. Don’t hesitate to explore detailed tutorials like those on step-by-step DIY guides to support your growth.
If this resonated with you, I’d love to hear your thoughts or experiences with Arduino sensor toys. Feel free to share your journey or questions through my contact page or drop a comment below. Let’s keep nurturing this vibrant community of curious creators together.
I really connected with your description of the excitement when first plugging a sensor into an Arduino board. I had a similar experience when I built my very first light-sensitive lamp that turned on automatically in dim conditions. What struck me was how these projects are more than toys—they serve as an excellent introduction to real-time data interaction and sensor behaviour. One challenge I encountered early was calibrating the sensors for different lighting in my workshop. Trial and error with sensor placement made a big difference. The immediate feedback loop you mentioned definitely helped me stay motivated, especially when debugging code alongside hardware. I’m curious how others here handle sensor calibration for varying environments? Do you rely more on hardware adjustments like shielding and placement, or software solutions like filtering and threshold tuning? I’ve found a mix works best, but I’m always interested in new approaches from the community!
Lachlan, I really resonated with your points on sensor calibration challenges in different lighting environments. From my experience, a balanced approach often works best. Hardware adjustments like physically shielding sensors from direct light or repositioning them can prevent many false triggers and inconsistencies. However, software techniques, such as implementing smoothing filters or dynamic thresholding, add a much-needed layer of flexibility to account for environmental fluctuations that can’t be fully controlled physically. One project I worked on involved a light-sensitive alarm where sudden shadows or flickering lights caused erratic readings. Applying a moving average filter in code significantly stabilised the response. Also, gradually tuning sensor thresholds based on observed data patterns helped reduce false alarms without sacrificing sensitivity. It’s interesting how Arduino sensor toys are not just an avenue to learn coding and electronics but also teach subtle lessons about environment interaction and data interpretation. Has anyone tried adaptive algorithms like Kalman filters in hobby projects? I’m curious if the added complexity pays off in typical Arduino sensor toy applications.
Lachlan — I loved your light-sensitive lamp story; I’ve tackled similar calibration headaches and found a pragmatic, stepwise mix works best. First, hardware: try simple physical fixes like a small diffuser over a photoresistor, angling sensors away from direct light sources, and adding basic shielding to reduce reflections. For motion or ultrasonic sensors, a little cardboard baffle can cut down spurious triggers.
On the software side, start with low-cost techniques: a short moving-average or median filter to reject spikes, plus hysteresis so the lamp doesn’t chatter near threshold values. I also add a simple “calibration mode” button that samples ambient conditions for a few seconds and sets a rolling baseline—handy when you move a project between workshop and living room. For ultrasonics, discard impossible ranges and average a handful of valid readings.
Kalman filters are powerful but often overkill for simple toys—use them when you have continuous, noisy sensors (IMUs) or you need true sensor fusion. Has anyone here implemented an auto-calibration routine that adapts across day/night cycles? Would love to hear what worked (or didn’t) for you.
Your post really struck a chord with me, especially when you mentioned combining multiple sensors like ultrasonic, infrared, and light sensors. I believe that integrating sensors effectively is where the real magic happens in creating responsive and adaptive Arduino toys. I recently worked on a project where I used ultrasonic sensors for obstacle detection and combined it with light sensors to adjust LED brightness. It was fascinating to see how sensor fusion can enhance the interactivity and realism of such projects.
One challenge I faced was managing conflicting data from different sensors, which sometimes led to inconsistent responses. To address this, I implemented simple software filtering and prioritized certain sensor inputs based on context. I’m curious, how do others here approach managing conflicting sensor data? Do you rely on sophisticated algorithms like sensor fusion or keep it simple with thresholds and filters? Sharing approaches could really help deepen our collective understanding.
Your post really struck a chord with me, especially when you mentioned combining multiple sensors like ultrasonic, infrared, and light sensors. I recently worked on a smart planter project where I used soil moisture sensors along with light sensors to optimise plant care. Managing conflicting data from various sensors was quite a challenge, particularly when readings conflicted under different environmental conditions. I found that implementing simple software filtering techniques, like median filtering and threshold prioritisation based on the context, helped improve responsiveness and reliability. It also made me consider how sensor fusion algorithms—like Kalman filters—could enhance accuracy, especially in noisy environments. But for hobby projects, I think a practical blend of hardware shielding, physical placement, and basic software filtering often suffices. Do you or others here have further experience with adaptive sensor calibration routines, maybe adjusting thresholds based on time of day or specific environmental cues? Would love to hear different strategies for increasing robustness in real-world Arduino projects.
I really enjoyed reading your insights on sensor calibration and the importance of environmental considerations in Arduino projects. I’ve found that using a combination of hardware shielding—like small enclosures or diffusers—and software filtering, such as moving averages, can significantly improve sensor reliability in fluctuating conditions. It’s interesting how some hobbyists swear by advanced algorithms like Kalman filters, but I think for most small projects, a well-implemented simple filter and good sensor positioning do the trick. In one of my recent builds, I faced interference from ambient light when calibrating a light sensor, but adding a small shade and adjusting the threshold made a big difference. Have others experimented with dynamic calibration routines that adapt to changing conditions across different times of day or environments? I’d love to hear how you’ve tackled making sensors more robust in real-world applications.
Your insights really resonated with me, especially about the importance of sensor calibration and environmental factors in Arduino projects. I recall working on a similar obstacle-avoiding robot where I had to carefully calibrate ultrasonic sensors to deal with reflective surfaces and noise, especially outdoors. I found that combining hardware shielding with software filtering, like moving averages, helped make sensor readings more stable. However, in a particularly noisy environment, I experimented with simple sensor fusion techniques to improve reliability, which made a noticeable difference. For hobbyist projects, I agree that simple filtering often suffices, but when building something more critical, exploring algorithms like Kalman filters might be worth the effort. How do others here balance the complexity of advanced algorithms with practical project needs? Do you think investing time in sensor fusion algorithms pays off in typical DIY applications, or is it more suited for professional prototypes? Really interested in hearing your experiences and tips on managing conflicting sensor data in real-world setups.
Reading this post really resonated with me, especially the part about the importance of sensor calibration and environmental considerations. I’ve recently been working on a project involving an ultrasonic obstacle detector combined with light sensors to create an interactive toy that reacts to both proximity and ambient light. One challenge I faced was managing truly conflicting data between different sensors, especially when lighting conditions changed rapidly, like during sunny days or in shaded areas. To mitigate this, I started experimenting with simple filtering techniques such as moving averages and tried assigning priority levels to more critical sensors to improve response consistency. Would anyone here recommend more advanced algorithms like sensor fusion for hobby projects? Or do you think a well-tuned simple filter is enough for reliable performance? I’d love to hear about others’ experiences managing sensor conflicts in real-world environments, especially when multiple inputs are involved in interactive Arduino-based toys.
Reading through your insights really took me back to my early days of tinkering with Arduino sensors. My first project was a simple temperature-activated fan that responded to environmental changes. I found that balancing hardware placement with software filtering—like I saw you using moving averages—was essential to get reliable readings. One trick I used was creating a small shield for the sensor to reduce ambient noise, but I still had to fine-tune thresholds through trial and error. It’s fascinating how these projects teach us patience and precision, isn’t it? I wonder, in environments with lots of environmental fluctuations, do you think more advanced algorithms like Kalman filters are worth the added complexity, or are simple filters enough? I’d love to hear how others manage sensor reliability in more dynamic settings, especially in outdoor or variable lighting conditions. Sharing these experiences helps all of us improve and innovate in our DIY projects.
Reading your post really brought back my early Arduino adventures. I remember when I first connected a light sensor to create a simple night lamp—nothing fancy, but so rewarding to see it respond to ambient light. It made me realise how much patience and trial-and-error are part of the learning curve, especially when calibrating sensors in different environmental conditions. One challenge I faced was ensuring consistent readings outdoors, where fluctuating sunlight could cause false triggers. I found that adding a small physical shade and adjusting sensor thresholds helped, but I still wonder if implementing dynamic calibration routines that adapt throughout the day might be more effective. Has anyone experimented with such adaptive algorithms to improve reliability? Would love to hear your experiences or tips for managing sensor accuracy in varying real-world settings. It’s these small hurdles that push us to refine our projects and deepen our understanding.
Reading your insights really struck a chord with me, especially on the importance of sensor calibration and environmental considerations. I recently worked on a project where I combined ultrasonic obstacle detection with ambient light sensors to make an interactive toy. One challenge I faced was managing conflicting data, such as when sudden changes in light conditions caused erratic sensor responses. To address this, I started experimenting with simple filtering techniques like moving averages, and I even assigned priority levels to different sensors to maintain consistent behaviour. It made me wonder if anyone has tried more advanced algorithms like sensor fusion, such as Kalman filters, for similar projects? Do you think the added complexity is worth it for hobby applications, or are simple filters generally sufficient? I believe that understanding and managing environmental variables is vital for robust sensor performance, especially in real-world settings. Would love to hear about your experiences or tips for maintaining sensor accuracy and responsiveness in variable conditions. Keep up the great work with inspiring projects!
Reading about the excitement of your first Arduino sensor project really resonated with me. I had a similar breakthrough moment when I built a motion-activated night light using a PIR sensor. The immediate feedback loop is definitely a motivating factor—seeing a toy respond dynamically to its environment brings concepts to life in a way textbooks can’t replicate. I also appreciate your practical advice about starting simple and progressing gradually; I found that jumping into complex wiring or advanced code too soon often led to frustration. For me, documenting every step and debugging patiently became essential skills, not just for the project but for building confidence overall. I’ve also noticed how Arduino projects push you to pay attention to nuances, like how sensor placement or wiring quality can affect readings, which ties back to cultivating patience and attention to detail you mentioned. Curious to hear how others balance creative ambition with technical constraints in their Arduino projects? Have you had to simplify your ideas significantly to fit the capabilities of your setup?
I absolutely relate to the exhilaration that comes with hooking up a sensor to an Arduino for the first time. It’s like suddenly you have a little piece of the digital world responding to your commands, which makes it a fantastic gateway into electronics and programming. When I first started, I tried building a simple light-following robot with a photoresistor sensor. What really stood out to me was how crucial sensor calibration was to getting the robot to behave reliably—something that no amount of coding alone can fix.
On the point about tackling the challenge of sensor calibration, I found that starting with straightforward, low-cost sensors gave me a chance to understand their quirks before layering in advanced filtering algorithms. It’s all about that iterative feedback loop mentioned in the post; tweaking wiring, sensor positions, and threshold values gradually built my confidence. I’m curious—how do others balance learning the hardware side versus diving deeper into coding techniques like modular programming for these sensor toys? Has anyone had a breakthrough moment when combining both hardware tweaks and software design that significantly improved their project? Sharing these experiences can really boost the whole community’s learning curve.
Reading through the post, I really connected with the excitement shared about integrating sensors with Arduino—there’s something truly magical about seeing a toy respond to inputs in real-time. I recall my own early project where I built a temperature-sensitive fan that would adjust its speed based on ambient heat. What stood out to me was how each calibration tweak required patience and careful observation, especially considering how environmental variables influenced sensor readings. Interestingly, beyond just the hardware side, delving into coding techniques like modular programming helped me organise the project better, making it easier to adjust individual sensor behaviors without rewriting the entire code. This modularity proved essential as I added more sensors, allowing for smoother debugging and enhancements. I’m curious, for those experienced in moving from simple to multi-sensor systems, have you found any particular strategies for managing the complexity both in wiring and code architecture? Also, how do others strike a balance between embracing simplicity for learning and pushing towards more ambitious, integrated projects? Would love to know which approaches have helped you grow your skills while keeping the projects manageable and fun.