How I Fell in Love with Restoring Antique Wooden Furniture
It all started when I inherited an old oak dresser from my grandmother. The wood was worn, the finish faded, and some joints were loose, but the piece held so much history. I decided to take on the challenge of restoring it myself, which led me down a fascinating path of learning advanced techniques for restoring antique wooden furniture. Each step taught me not only about woodworking but also about patience and respect for craftsmanship.
Discovering the Subtle Art of French Polishing
One of the most transformative techniques I embraced was French polishing. This classic method uses shellac to create a deep, glossy finish that highlights the wood’s natural beauty. It is a labor-intensive process, requiring thin layers and careful rubbing with a pad, but the results are stunning. I found guidance and inspiration from reputable sources like the DIY Kutak French Polishing Guide, which helped me perfect my technique for that authentic antique sheen.
What Are the Key Challenges in Restoring Antique Furniture Wood?
One question I often get is about the challenges in restoring antique wood. For me, the biggest hurdles included dealing with old finishes that had cracked or yellowed, repairing structural damage without compromising authenticity, and matching stains or glazes to the original tones. It’s crucial to test products on hidden areas first and to use reversible methods whenever possible. This ensures that future restorers can undo any changes without harming the original material.
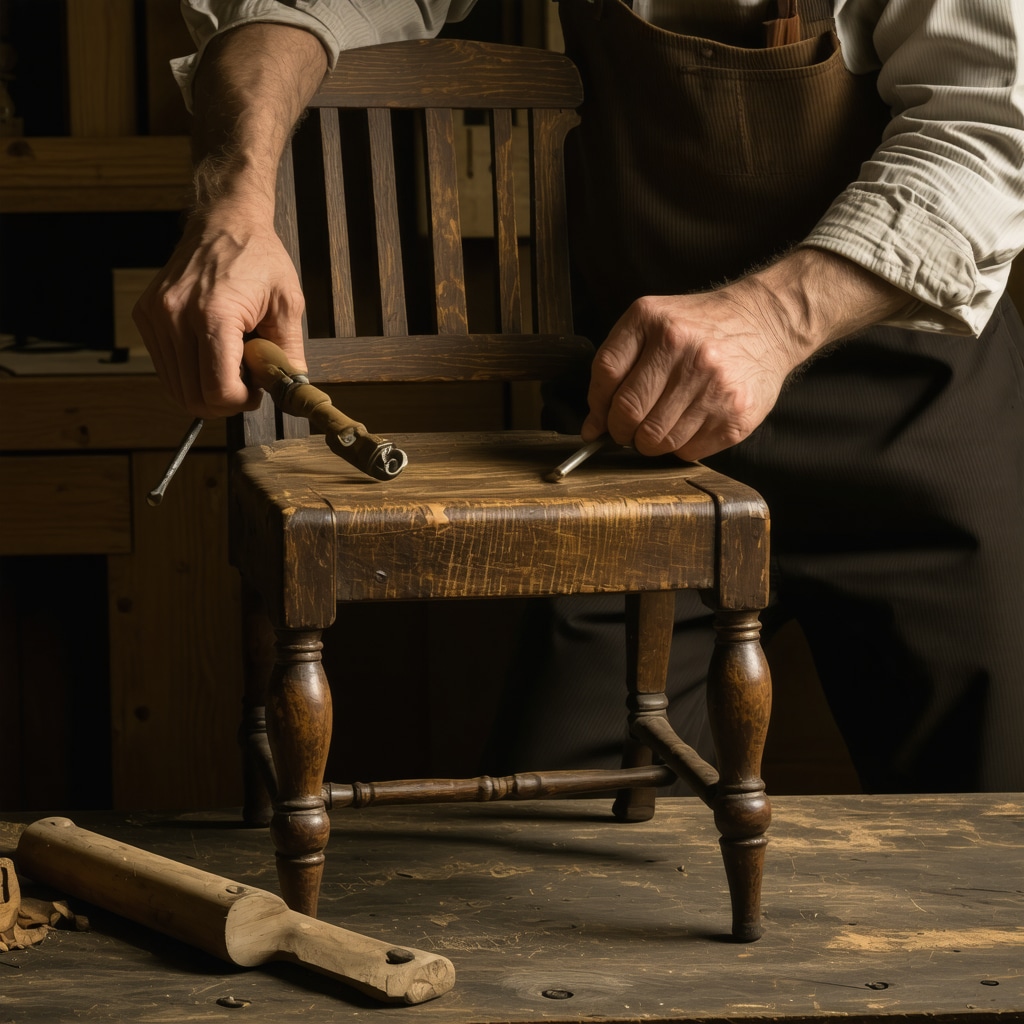
Using Modern Tools to Respect Traditional Craftsmanship
While traditional techniques like French polishing are essential, I also incorporated modern tools such as a detail sander and moisture meters to assess the wood’s condition accurately. These tools helped me avoid over-sanding or damaging fragile sections. Combining old and new methods allowed me to preserve the furniture’s integrity while restoring its functionality.
Why I Recommend Learning Mortise and Tenon Joints for Furniture Repair
Structural repairs often require replacing or reinforcing joints. I took a deep dive into mortise and tenon joint techniques because they’re fundamental to antique furniture strength. Mastering this joint gave me confidence to fix loose frames and broken legs without resorting to screws or nails that could detract from the piece’s authenticity.
Inviting You to Share Your Restoration Stories
If you’ve ever tried restoring an antique piece or are curious about these advanced techniques, I’d love to hear your experiences or questions. Share your stories in the comments below or explore more about smart DIY ideas and home improvement tips at DIY Kutak’s home improvement section. It’s rewarding to connect with fellow enthusiasts who appreciate the art of restoration as much as I do.
Integrating Natural Finishes for Authentic Restoration
Beyond French polishing, I ventured into using natural finishes like beeswax and tung oil to complement the antique aesthetic while enhancing wood protection. These finishes penetrate the wood fibers, preserving the texture and adding a warm glow without the plastic-like appearance of modern varnishes. The key is applying them sparingly and buffing gently to avoid buildup, ensuring the piece breathes and ages gracefully.
How Can Advanced Cleaning Methods Preserve Antique Patinas Without Damage?
Cleaning antique furniture is a delicate balance between removing dirt and preserving the natural patina that tells the story of the piece. I recommend starting with mild, pH-neutral cleaners and soft brushes, avoiding harsh chemicals that can strip away aged finishes. For stubborn grime, a mixture of mineral spirits and linseed oil can be effective, yet must be tested on inconspicuous areas. Controlled use of steam cleaning can also help loosen dirt trapped in carvings but requires expertise to prevent moisture damage.
According to the National Park Service preservation brief on cleaning, conservators emphasize minimal intervention and reversible treatments to maintain historical integrity, a principle I deeply respect in my restoration work.
Embracing Layered Finishing Techniques for Depth and Dimension
One advanced approach I adopted involves layering stains, glazes, and shellac to recreate the nuanced color variations found in original finishes. This method demands patience as each application must dry thoroughly before the next. Using tinted shellacs can add subtle warmth, while applying a glaze enhances the grain’s depth, making the surface visually richer and more tactile.
For those interested, the DIY Kutak guide on advanced staining offers excellent tips that translate well to indoor furniture finishing.
Precision in Repair: When to Use Epoxy versus Traditional Wood Fillers
Repairing cracks and missing wood sections is a frequent challenge. I learned to discern when to use epoxy—ideal for structural repairs needing strength—and when traditional wood fillers suffice for superficial blemishes. Epoxy can be tinted to match surrounding wood but requires skill to avoid overfill and ensure seamless blending. Conversely, wood fillers are easier to sand and shape but less durable. Understanding these materials’ properties has been crucial to maintaining both form and function.
For a comprehensive understanding of epoxy injection techniques, check out the detailed tutorial on epoxy injection for repairs, which, although focused on concrete, shares principles applicable to wood restoration.
Expanding Your Skill Set: Exploring Marquetry and Inlay for Unique Enhancements
To elevate restoration projects, I began experimenting with marquetry and inlay techniques, which allow adding intricate designs or replacing damaged veneer sections with artistic flair. These techniques require precision cutting and careful adhesive application but can transform a restored piece into a statement of craftsmanship. Resources like the DIY Kutak masterclass on marquetry provide step-by-step guidance for beginners and advanced restorers alike.
Join the Restoration Community: Share and Learn Together
Restoring antique wooden furniture is a journey filled with discovery and challenges. I encourage you to share your restoration triumphs or questions in the comments below. Engaging with a community of like-minded enthusiasts not only enriches your skills but also preserves the art of woodworking heritage. For more inspiration and expert advice, explore the wide range of DIY Kutak home improvement tips and smart DIY solutions curated to help you tackle projects with confidence.
Beyond Restoration: The Emotional Connection That Deepens with Each Project
Restoring antique wooden furniture has been more than just a hobby; it’s become a journey of emotional discovery. Each piece carries stories etched into its grain, and as I delicately repair and refinish, I feel a profound connection to the hands that crafted it long ago. This connection challenges me to approach every project with care, not just as a craftsman but as a guardian of history.
How Do You Balance Preservation with Necessary Modern Interventions?
This question often arises among restoration enthusiasts and professionals alike. Maintaining the original character of a piece while ensuring its durability for modern use is a delicate dance. For example, while I cherish traditional joinery like mortise and tenon joints, sometimes subtle reinforcements with modern adhesives or hidden supports become essential to preserve structural integrity without altering appearance. The key lies in reversible and minimally invasive techniques, a principle I’ve embraced after consulting conservation literature such as the National Park Service’s preservation briefs, which emphasize minimal intervention to honor authenticity.
Another challenge is choosing finishes that protect yet respect the original material’s breathability. This is where natural oils and waxes, which I’ve discussed before, become invaluable. They enhance wood’s depth and warmth while allowing it to age gracefully.
Learning from Mistakes: When Restoration Teaches Patience and Humility
There have been moments when over-enthusiasm led to over-sanding or applying too many finish layers, which dulled the wood’s character instead of enhancing it. These experiences humbled me and reinforced the importance of restraint and testing. Every project reminds me that restoration is as much about listening to the wood as it is about applying skill. The wood’s response guides each decision, whether it’s stopping before the perfect sheen or choosing to leave certain imperfections untouched as part of the piece’s story.
Exploring Creative Enhancements While Respecting Tradition
Once comfortable with fundamental techniques, I started experimenting with marquetry and inlay to add personal touches while honoring the original design. These intricate details can breathe new life into damaged veneers or complement the piece’s story without overshadowing it. The balance between restoration and artistic enhancement is subtle but rewarding, pushing me to refine precision and creativity simultaneously.
For those curious about expanding their skills, I recommend starting with simple inlay patterns before progressing to complex marquetry, as detailed in the DIY Kutak masterclass. It’s a fantastic way to deepen your appreciation for fine woodworking and develop a unique restoration signature.
The Role of Community and Continuous Learning in Restoration
What I treasure most about this craft is the community. Sharing experiences, challenges, and solutions with fellow restorers has expanded my horizon beyond what books and tutorials offer. Engaging with diverse perspectives fuels my passion and encourages me to tackle more ambitious projects.
If you’re passionate about restoring antiques or just starting out, I invite you to share your journey in the comments below. Your stories and questions not only enrich this space but also help build a supportive network. For inspiration and practical advice on a variety of home projects, consider browsing through DIY Kutak’s home improvement tips, where restoration is just one exciting facet of creative living.
Delving into the Science Behind Wood Aging and Preservation
As I advanced in my restoration journey, I grew fascinated by the intricate biological and chemical processes that antique wood undergoes over decades, sometimes centuries. Understanding how lignin and cellulose break down, how wood’s cellular structure changes with humidity fluctuations, and the role of microbial activity has refined my approach. This scientific lens helps me choose treatments that stabilize rather than merely cosmetically improve, ensuring longevity without compromising authenticity.
What Are the Best Practices for Preventing Future Deterioration in Antique Wood?
Prevention is as crucial as restoration itself. I emphasize controlling environmental factors such as temperature, humidity, and exposure to light to slow decay. Using moisture meters regularly allows early detection of problematic conditions. Beyond environmental control, applying breathable natural finishes like tung oil—discussed earlier—helps maintain wood’s resilience. Additionally, I have adopted microcrystalline waxes, recommended by the Getty Conservation Institute, for their protective and reversible properties that preserve antique surfaces without sealing them off from necessary air exchange.
Incorporating these preservation strategies has profoundly influenced the way I prepare pieces for display or use, balancing historical integrity with practical durability.
Integrating Historical Context to Guide Restoration Decisions
Each antique piece carries a distinct narrative shaped by its origin, era, and usage. Diving into historical research—be it the stylistic trends of a specific period or the types of finishes and joinery typical of a region—guides my restoration choices. This contextual understanding prevents anachronistic errors and enriches the restoration process with cultural respect. For example, recognizing that a mid-19th-century Victorian dresser would traditionally bear a shellac finish steered me away from modern polyurethane coatings that would look and feel incongruous.
Balancing Structural Integrity with Aesthetic Fidelity Through Advanced Joinery
Revisiting my earlier emphasis on mortise and tenon joints, I have since incorporated complex joint reinforcements such as double tenons and haunched tenons for enhanced strength without visual compromise. These advanced techniques, borrowed from traditional cabinetmaking, allow me to respect the original construction methods while ensuring the piece withstands modern stresses. Moreover, I use hide glue exclusively for its reversibility and compatibility with antique woods.
Exploring the Role of Patina: When to Preserve and When to Restore
Patina is the soul of antique wood, reflecting its life and use. Deciding whether to preserve, enhance, or subtly restore patina is a nuanced art. Sometimes, cleaning and finishing must be restrained to protect this aged surface, while other times, strategic rejuvenation brings out hidden beauty. My approach varies with the piece’s provenance and condition, often guided by conservators’ principles of minimal intervention. Patina, after all, tells a story that restoration should honor rather than erase.
Engage with Me: Share Your Complex Restoration Challenges and Insights
Have you faced dilemmas balancing preservation with necessary repairs, or experimented with advanced joinery and finishes? I invite you to share your stories and questions in the comments—our collective experience enriches this craft. For further inspiration on diverse home projects that complement restoration skills, explore the smart home improvement tips section at DIY Kutak. Together, we deepen our respect for heritage and sharpen our expertise.
Things I Wish I Knew Earlier (or You Might Find Surprising)
Wood Whispers: Listen Before You Act
One of the biggest surprises in my restoration journey was realizing how much the wood itself can guide you. Instead of rushing to sand or strip, I learned to observe the grain, feel the texture, and even smell the wood to understand its condition and history. Sometimes, letting the wood “speak” before intervening helped me avoid mistakes and respect the piece’s character.
The Beauty of Imperfection
Early on, I struggled with the urge to make every surface flawlessly smooth and shiny. Over time, I’ve come to appreciate minor dents, cracks, and unevenness as part of the furniture’s narrative. Embracing these imperfections can add authenticity and warmth, reminding us that antiques carry the marks of lives lived.
Patience Trumps Speed
Restoration is not a race. I once tried to rush a French polishing job by applying thicker layers, only to end up with blotchy, uneven surfaces. Slowing down, applying many thin coats, and allowing plenty of drying time transformed my results. This patience extends to every step, from glue drying to stain curing.
Testing Is Your Best Friend
It can be tempting to jump in with new products or techniques, but always testing on a hidden area saved me from irreversible damage. Whether it’s a cleaner, a stain, or a filler, small trials reveal reactions you can’t predict otherwise. This habit also builds confidence in decision-making.
Balancing Tradition and Innovation
While I cherish traditional joinery and finishes, integrating modern tools like moisture meters or using reversible adhesives has improved both durability and authenticity. Finding this balance is an evolving art—one that keeps restoration both respectful and practical.
Resources I’ve Come to Trust Over Time
DIY Kutak Guides – From French polishing to mortise and tenon joints and marquetry techniques, these step-by-step tutorials have been invaluable for honing my skills with trusted, practical advice.
National Park Service Preservation Briefs – Their cleaning guidelines emphasize minimal intervention and reversibility, principles that deeply influenced how I approach delicate cleaning and treatment.
Getty Conservation Institute Publications – Their research on wood treatments, especially regarding microcrystalline waxes, helped me understand scientific aspects behind preserving antique finishes without compromising breathability.
Epoxy Injection Tutorials – Though focused on concrete, I found the epoxy injection techniques surprisingly applicable for structural wood repairs, offering insights into material handling and precision.
Parting Thoughts from My Perspective
Restoring antique wooden furniture has become a deeply rewarding blend of art, science, and history for me. It’s about much more than fixing wood—it’s about honoring stories embedded in every grain and patina. Advanced techniques like French polishing and mastering mortise and tenon joints empower us to preserve these treasures authentically, while modern tools and materials help ensure their longevity. What truly enriches this craft, however, is the patience, respect, and passion we bring to each project.
If this resonated with you, I’d love to hear your thoughts or restoration stories. Feel free to share your experiences or questions in the comments below, and don’t hesitate to explore more inspiring and practical ideas at DIY Kutak’s home improvement section. Together, we keep the heritage of woodworking alive and vibrant.
I completely resonate with the part about letting the wood ‘speak’ before jumping into heavy sanding or stripping. I’ve had my fair share of restoration projects where a bit of patience and observation made all the difference. For instance, rather than aggressively removing every blemish, I learned to appreciate some imperfections as part of the piece’s unique history. The mention of French polishing in the post caught my attention too; I tried it on a recently inherited side table and was amazed by how the thin layers of shellac truly enhanced the wood grain without overpowering it. However, I did struggle balancing the traditional techniques with modern tools—especially when it came to avoiding over-sanding fragile areas. Has anyone found an effective strategy for integrating modern moisture meters or sanders without compromising the delicate nature of older woods? Moreover, I’m curious how others decide when to preserve patina versus restoring it for a cleaner appearance? It’s such a fine line that varies with each piece’s story.
Liam, I really appreciate your thoughtful points on balancing traditional restoration methods with modern tools. In my experience, when using moisture meters on antique furniture, the key is to opt for non-invasive, pinless models to avoid puncturing fragile wood surfaces. I also find it helpful to take multiple readings over time rather than relying on a single measurement, as this gives a clearer picture of the wood’s moisture fluctuations without disturbing the piece. Regarding sanding, using very fine grit pads on a detail sander, combined with light pressure and frequent checks, helps prevent accidental over-sanding.
On the tricky decision to preserve versus restore patina, I lean towards preserving as much as possible, especially when the patina reflects a rich history or character. However, if the patina masks damage or hinders function, a gentle cleaning and subtle enhancement can be justified. It often depends on the piece’s provenance and intended use—display-only pieces benefit from preservation, whereas functional furniture may require more restoration.
Has anyone else developed a personal “rule of thumb” when deciding what to retain or refresh in restoration projects? I’m fascinated by the diverse philosophies that govern these choices.
I completely agree with the thoughtful balance the author strikes between respecting traditional craftsmanship and leveraging modern tools. In my early restoration projects, I underestimated the importance of using reversible and minimally invasive techniques. For example, I once rushed structural repairs with modern adhesives without considering their long-term effects, which I later had to rectify. Embracing mortise and tenon joints as a primary method for strengthening pieces really changed my approach, allowing me to keep the authenticity intact.
Regarding the integration of moisture meters and sanders, I’ve had success using low-impact, pinless moisture meters to continuously monitor wood condition without intrusion. When sanding, I always adopt a conservative approach—light pressure, fine grit, and regular pauses to assess the wood’s surface. This careful rhythm ensures I don’t compromise fragile sections.
About patina, I try to let the piece’s story dictate whether to preserve or gently restore it. If a patina holds historical significance, I lean towards preservation, but if it masks deterioration, subtle enhancement can be justified. I’m curious to know how others in this community interpret and honour the intangible ‘character’ in their restoration, particularly balancing visual appeal with historical integrity?
What a compelling journey into the art of antique furniture restoration! I resonate deeply with the idea that patience and careful observation are key—I’ve found that rushing often leads to irreversible damage. My experience with French polishing has been similar; those delicate shellac layers really do bring out the warmth and character of the wood when applied correctly. I’ve experimented with interleaving traditional techniques and modern tools, such as rotary tools with gentle speed settings, to access hard-to-reach areas without the risk of over-sanding or damaging the surface. As for patina, I believe it serves as a narrative of the piece’s history—preserving it often enhances the authenticity, whereas restoring for a cleaner look can sometimes strip away its soul. How do others decide whether to retain the natural wear or to clean it up for a more uniform appearance? I’d be interested to hear your methods for balancing these aspects while respecting the piece’s story.
I really enjoyed reading about the blend of traditional techniques and modern tools in furniture restoration. One aspect I find fascinating is how effective natural finishes like tung oil or beeswax can be in maintaining the authenticity of antique pieces while providing the necessary protection. I’ve personally found that patience is essential, especially when layering finishes or pigments—waiting for each layer to dry thoroughly before adding the next makes a huge difference in achieving those depth and dimension effects. Regarding patina preservation, I tend to lean towards minimal intervention unless structural stability is at risk. I’m curious, how do others approach cleaning the surface without removing the natural aging marks that give each piece its unique character? Also, has anyone experimented with inlay or marquetry to creatively restore or enhance damaged sections? Would love to hear your tips and experiences!
This post really resonated with me, especially the emphasis on patience and respecting the wood’s story. I recently restored a family heirloom dining table and found that over-sanding the surface really diminished its character. Your advice on listening to the wood and testing products beforehand is so true; I’ve learned that tiny, careful steps often yield the best results. I’ve also started incorporating natural finishes like tung oil and beeswax, which seem to breathe better and age gracefully over time. It makes me wonder, how do other restorers balance the aesthetic goal of a ‘like-new’ finish with preserving the authentic patina? Sometimes, I struggle with whether to clean thoroughly or leave some of the aging marks intact—what’s everyone’s approach for that? It’s such a delicate balance, and each piece tells a different story. I’d love to hear more about how you decide when to restore versus preserve the natural aging process.
This post really resonates with the journey many of us experience when restoring antique furniture. I’ve always believed that understanding a piece’s history, including its patina, is crucial before deciding on any intervention. The balance between preservation and restoration can be very delicate; I tend to preserve the layer of patina unless it’s obscuring structural integrity or hiding significant damage. I’ve found that gentle cleaning with pH-neutral solutions often does more to highlight existing character than aggressive stripping or sanding. Also, I agree wholeheartedly about using natural finishes like beeswax or tung oil—these allow the wood to breathe and age naturally, which I think respects the piece more. When it comes to modern tools, I mainly use moisture meters to inform my approach, being careful not to overreact to readings. How do others decide when a patina should be gently enhanced versus fully restored? Would love to hear your thoughts or experiences on working with distinctive aged surfaces.