When the Drip Became My Unexpected DIY Challenge
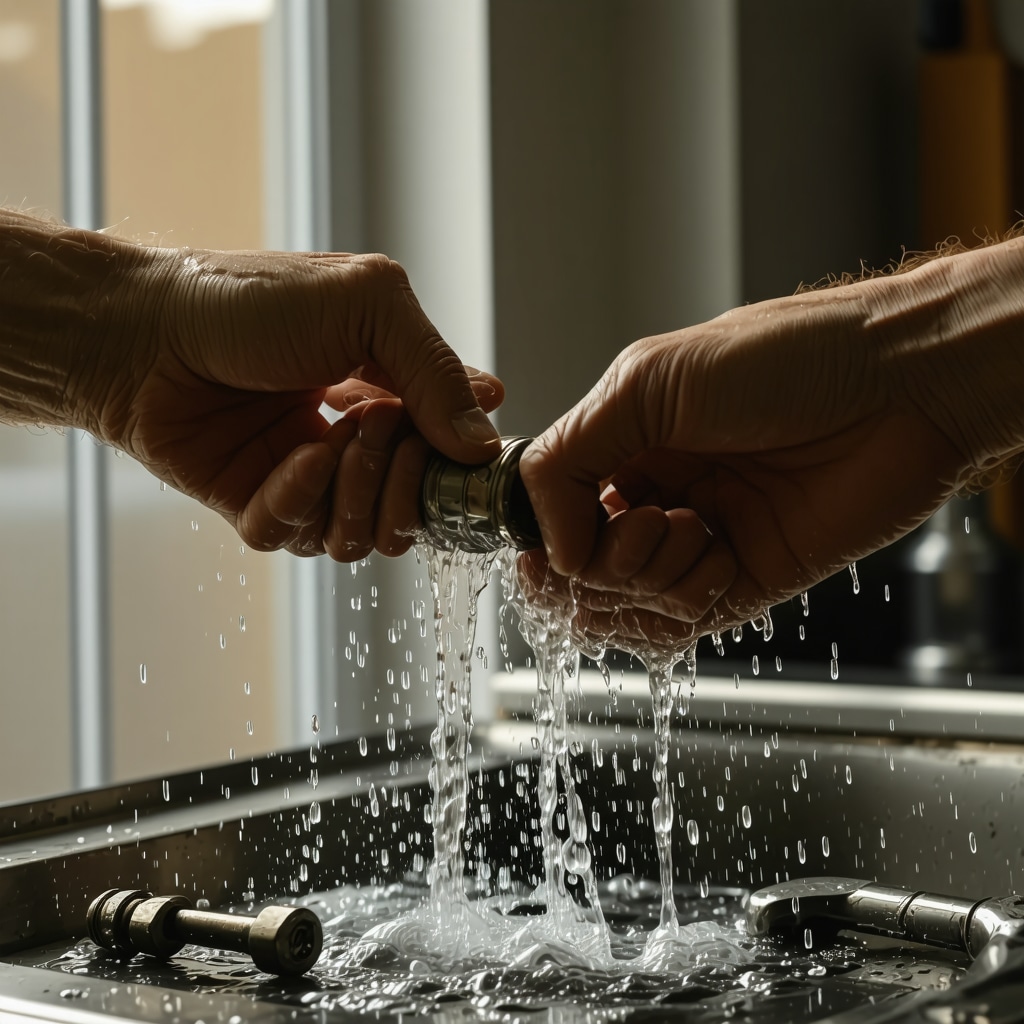
I still remember the first time I noticed that annoying drip from my kitchen faucet. It was subtle at first, but over days it became a persistent reminder of something amiss in my plumbing. Instead of calling a plumber right away, I decided to dive into the world of advanced fault diagnosis for dripping faucets. This hands-on experience led me to closely examine the two main culprits: cartridge and washer-based faucets.
Why I Chose to Explore Cartridge vs Washer Faucets
My curiosity was piqued because I’d heard that knowing the difference between cartridge and washer systems could save time, money, and frustration. Cartridge faucets, with their single moving part cartridge, promised smoother operation and fewer leaks, while washers—those tiny rubber rings—were infamous for wearing out and causing drips. I wanted to understand these mechanisms on a deeper level to perform precise repairs rather than guessing blindly.
How Do Cartridge and Washer Faucets Differ in Causing Drips?
From my experience, drips in washer faucets often stem from a worn or hardened rubber washer that fails to seal properly against the valve seat. This is usually easier to spot during disassembly, as the washer shows visible signs of wear or cracking. Cartridge faucets, however, can develop leaks due to mineral buildup or cartridge wear, which requires a more nuanced diagnostic approach, sometimes involving cleaning or replacing the entire cartridge unit.
This aligns well with insights I gathered from authoritative plumbing resources like the Family Handyman guide, which highlights the importance of identifying the faucet type before attempting repairs.
My Diagnostic Process: Tools and Techniques That Worked
Armed with basic tools and a bit of patience, I started by shutting off the water supply, then carefully removing the faucet handle to inspect the internal components. For washer faucets, I examined the condition of the rubber washer and valve seat, using fine sandpaper to smooth any rough edges. For cartridge faucets, I soaked the cartridge in vinegar to dissolve mineral deposits and checked for cracks or damage before deciding on replacement.
One interesting revelation was how sometimes the drip wasn’t due to the washer or cartridge alone but stemmed from the valve seat’s condition—a detail often overlooked. I found that addressing this required a delicate touch and a clear understanding of the faucet’s anatomy.
Why Understanding This Matters Beyond Just Fixing a Leak
Getting to grips with advanced fault diagnosis for dripping faucets saved me from repeated repairs and unnecessary part replacements. It also gave me confidence in tackling other home improvement challenges, a journey I’ve documented extensively in my smart DIY tips for everyday problems. The experience reinforced how investing time in understanding the root cause is always worth it.
If you’re experiencing a stubborn drip, I encourage you to share your own faucet repair stories or questions below. Sometimes, pooling our experiences can uncover solutions that manuals and videos might miss!
Delving Deeper: The Role of Valve Seats and Mineral Deposits in Faucet Drips
While worn washers and faulty cartridges are often the headline causes for faucet drips, an expert-level diagnosis must also consider the valve seat’s integrity. The valve seat acts as the sealing surface for the washer, and even slight corrosion or pitting can prevent a watertight seal. In many cases, this degradation results from mineral deposits accumulating over time, especially in areas with hard water. Addressing these deposits with specialized tools and treatments can significantly extend the life of your faucet components.
For instance, employing a valve seat grinder or a fine emery cloth to carefully smooth out the valve seat can restore functionality without needing costly replacements. This nuanced approach requires patience and precision but pays dividends in long-term faucet performance. For those interested in detailed methodologies, the Smart DIY Ideas for Everyday Problems resource offers comprehensive guides on similar home improvement techniques.
How Can Understanding Water Composition Influence Faucet Repair Strategies?
Water quality plays a pivotal role in faucet longevity and maintenance strategies. Hard water, rich in calcium and magnesium ions, accelerates mineral buildup inside faucets, cartridges, and valve seats, leading to premature wear and persistent leaks. Recognizing this, experts often recommend installing water softeners or using vinegar soaks and descaling agents to mitigate these effects during routine maintenance.
Moreover, a nuanced knowledge of your local water composition can guide the frequency of inspections and cleanings. In regions with notably hard water, proactive maintenance might include quarterly cartridge cleanings or valve seat inspections to prevent the onset of drips. This proactive approach aligns with the findings of the Family Handyman guide, which emphasizes preventative care tailored to water conditions.
Integrating Advanced Diagnostics with Practical DIY Repairs
Bringing these insights together, advanced fault diagnosis transcends simple part replacement. It involves a holistic examination of all components, understanding environmental factors such as water hardness, and applying targeted maintenance techniques. For example, when encountering a persistent drip in a cartridge faucet, you might first perform a mineral deposit removal soak, inspect the cartridge for micro-cracks under bright light, and then assess the valve seat condition before opting for a full cartridge replacement.
For those eager to expand their DIY repertoire, exploring detailed step-by-step guides like Step-by-Step DIY Guides for All Skill Levels can provide structured learning paths. Additionally, engaging with community forums can offer practical tips that complement official manuals and professional advice.
Have you encountered a faucet drip that defied simple fixes? Share your diagnostic approach or challenges in the comments below. Your experiences could illuminate solutions for fellow DIY enthusiasts and deepen our collective plumbing expertise!
Refining My Approach: How Patience and Observation Unveil Hidden Faucet Faults
One of the most valuable lessons I learned during my faucet repair journey was the power of patience combined with keen observation. Initially, I rushed through disassembly, eager to replace parts I assumed were faulty. But over time, I realized that taking a slower, more deliberate approach—carefully noting subtle differences in sound, drip speed, and even odor—often revealed less obvious problems like micro-cracks in cartridges or slight misalignments in valve seats.
This mindfulness approach mirrors expert advice found in detailed plumbing manuals and resources, such as the comprehensive Family Handyman guide, which emphasizes that not every drip is caused by the most visible part. Sometimes, the underlying cause is subtle and requires a nuanced eye.
Advanced Tools That Made a Difference in My Repairs
While basic tools suffice for many DIY faucet fixes, I found that investing in a few specialized instruments elevated my diagnostic accuracy significantly. For example, a magnifying glass with built-in LED light helped me detect tiny cracks or wear in cartridges that were invisible to the naked eye. A valve seat wrench and a precision file allowed me to restore valve seat surfaces delicately without over-grinding.
These tools transformed my repairs from guesswork to precise interventions, reducing the frequency of repeat repairs. Readers looking to deepen their DIY skills might explore detailed tutorials like Step-by-Step DIY Guides for All Skill Levels, which provide structured insights into tool use and maintenance techniques.
How Do Subtle Environmental Factors Influence Faucet Longevity?
Beyond mechanical wear, I came to appreciate how environmental nuances—such as temperature fluctuations, humidity levels, and even the quality of the water supply—play roles in faucet health. For instance, in colder climates, repeated freeze-thaw cycles can exacerbate microfractures in faucet cartridges or cause seals to become brittle. In more humid environments, corrosion may accelerate on metal components.
Understanding these factors helped me tailor maintenance schedules and choose appropriate materials or lubricants. It’s a level of detail that goes beyond standard repairs but makes a lasting difference. For those interested, integrating such environmental awareness with smart DIY practices is well-covered in resources like Smart DIY Ideas for Everyday Problems.
From Faucet Drips to Broader DIY Confidence: My Ongoing Journey
Each faucet drip I tackled not only solved a practical issue but also expanded my confidence in diagnosing complex home challenges. This evolving expertise encouraged me to explore other creative projects, such as easy crafts to brighten up your home decor and even DIY projects for beginners. The common thread is patience, observation, and a willingness to learn from each experience.
I’d love to hear if any of you have faced faucet drips that required deeper diagnosis or unusual fixes. Sharing your stories can open avenues for all of us to learn and refine our techniques. Feel free to drop a comment below or explore more on how to develop these skills further in my collection of home improvement tips and smart DIY solutions.
Unveiling the Hidden Complexities Behind Persistent Faucet Drips
As I delved deeper into my faucet repair adventures, it became clear that diagnosing the root causes of persistent drips requires far more than just swapping out worn washers or cartridges. The interplay of microscopic imperfections, water quality, and even installation quirks demands a sophisticated approach. For instance, I discovered that subtle misalignments in faucet assembly can introduce uneven pressure on valve seats, subtly compromising seals even when components appear pristine.
Exploring these intricacies transformed my outlook from reactive fixes to preemptive precision. I began to appreciate how each faucet’s unique design nuances influence which parts are prone to failure, emphasizing the importance of tailored diagnostic strategies rather than one-size-fits-all solutions.
What Advanced Techniques Help Detect Micro-Cracks and Material Fatigue?
One of the challenges I encountered was spotting micro-cracks and early material fatigue in cartridges and valve components — defects nearly invisible without enhanced tools and techniques. Utilizing a magnifying glass with LED illumination was a game-changer, but I also experimented with UV light inspection, which revealed stress fractures through fluorescence in certain polymer materials. This method, often employed in professional plumbing diagnostics, allowed me to detect weaknesses before they escalated into leaks.
Additionally, I learned the value of acoustic analysis by carefully listening to the drip’s rhythm and comparing it to normal valve operation sounds. These subtle auditory cues can pinpoint the fault’s precise location, helping avoid unnecessary disassembly and part replacement.
Leveraging Material Science Insights for Prolonged Faucet Longevity
Understanding the materials involved in faucet construction—such as brass, stainless steel, and various polymers—helped me tailor maintenance approaches. For example, brass valve seats are prone to dezincification in aggressive water conditions, weakening their sealing capability. Recognizing this, I adopted the practice of applying food-grade silicone-based lubricants to metal-to-rubber interfaces, reducing friction and wear without compromising material integrity.
Moreover, I incorporated routine descaling with citric acid or commercial products tailored for mineral deposits, as suggested by the authoritative Family Handyman guide. This proactive maintenance preserved the smooth operation of cartridge mechanisms and valve seats alike, significantly extending faucet lifespan.
Integrating Environmental Awareness into My Diagnostic and Repair Workflow
Recognizing the subtle effects of environmental factors such as local water chemistry, ambient temperature fluctuations, and even household usage patterns became a cornerstone of my advanced diagnostic process. I started mapping water hardness levels in my area and adjusting maintenance intervals accordingly — more frequent inspections and vinegar soaks in harder water zones, for example.
Additionally, I factored in seasonal temperature swings, which can alter seal elasticity and exacerbate micro-leaks. This comprehensive environmental awareness enabled me to anticipate potential failures and implement preventive measures rather than merely responding to symptoms.
How Can Community Knowledge Sharing Enhance Advanced DIY Plumbing Skills?
Throughout this journey, engaging with DIY communities and expert forums has been invaluable. Sharing nuanced diagnostic experiences and repair success stories fosters collective learning, often surfacing unconventional solutions that official manuals overlook. I encourage fellow enthusiasts to contribute their insights and challenges; such dialogue deepens our collective expertise and can inspire innovative techniques.
For those eager to expand their skill set, exploring detailed resources like step-by-step DIY guides can provide structured learning, while community forums offer real-world troubleshooting wisdom.
Expanding Horizons: From Faucet Drips to Multifaceted Home Improvement Mastery
Embracing this advanced diagnostic mindset has naturally led me to broaden my DIY repertoire. Whether it’s intricate crafts to enhance home aesthetics or tackling beginner-friendly projects with creative solutions, the principles of patience, observation, and continuous learning apply universally. If you’re interested, my collections on easy crafts that brighten your home and beginner-friendly DIY projects might spark your inspiration.
Have you encountered faucet drips or other home challenges that defied straightforward fixes? I invite you to share your stories or questions below. Together, we can unlock the subtle secrets of home repair mastery and elevate our DIY journeys to new heights.
Things I Wish I Knew Earlier (or You Might Find Surprising)
The Subtlety of a Drip Speaks Volumes
Early on, I underestimated how much information a simple faucet drip can convey. Listening closely to the rhythm and sound of the drip often pointed me toward the root cause—whether it was a worn washer, a cracked cartridge, or an uneven valve seat. This mindfulness saved me countless hours of guesswork.
Not All Faucets Age the Same Way
I discovered that environmental factors like water hardness, temperature swings, and even household usage patterns dramatically influence faucet wear. Knowing this helped me tailor my repair and maintenance strategies instead of applying one-size-fits-all fixes.
Patience Outranks Speed in Repairs
Rushing to replace parts without thorough inspection almost always led to repeated drips and wasted money. Taking time to observe, clean, and cautiously repair made each fix more durable and satisfying.
Investing in Specialized Tools Pays Off
A magnifying glass with LED lighting and a valve seat wrench transformed my approach from guesswork to precision. These tools helped me detect micro-cracks and restore worn surfaces that I would have otherwise overlooked.
Community Wisdom Is a Hidden Treasure
Engaging with DIY forums and sharing experiences brought fresh perspectives and unconventional tips that official manuals often miss. It’s a reminder that home repair is as much about shared knowledge as it is about individual effort.
Resources I’ve Come to Trust Over Time
Family Handyman Guide on Fixing Dripping Faucets: This resource was my go-to for clear, practical advice and helped me understand why identifying your faucet type matters before diving into repairs.
Smart DIY Ideas for Everyday Problems: A treasure trove of detailed home improvement tutorials that broadened my understanding of maintenance beyond just faucet repairs.
Step-by-Step DIY Guides for All Skill Levels: These guides helped me develop structured learning paths and master the use of advanced tools effectively.
DIYKutak’s Easy Crafts to Brighten Up Your Home Decor: While not plumbing-focused, this collection inspired me to blend creativity with functionality in my home projects.
Parting Thoughts from My Perspective
Advanced fault diagnosis for dripping faucets taught me that the key to lasting home repairs lies in curiosity, patience, and a willingness to look beyond the obvious. Each drip is like a nuanced puzzle waiting to be solved with care rather than quick fixes. This journey not only stopped the leaks but also enriched my confidence in tackling diverse DIY challenges. If this resonated with you, I’d love to hear your thoughts or stories about faucet repairs or other tricky home projects. Feel free to drop your experiences or questions in the comments below, and let’s keep learning together.
This post really resonated with me, especially the point about how patience and observation can reveal those sneaky causes of faucet drips that aren’t immediately obvious. I remember tackling a dripping kitchen tap last year and initially thought it was just a worn washer. After a careful inspection—my first real attempt beyond replacing parts at random—I found that mineral buildup around the valve seat was actually the culprit. Soaking the affected parts in vinegar and smoothing the valve seat made all the difference, much like your experience. I also appreciate the tip about considering the impact of water hardness on faucet longevity; being in Brisbane, our water can be pretty hard at times, so I’ve started doing more frequent maintenance. Has anyone else found local water conditions significantly affect their faucet repairs? I’d love to hear how others tailor their maintenance routines based on where they live or water quality.
Jared, your experience with mineral buildup on the valve seat really hits home. Living in Sydney, I’ve noticed that despite not having extremely hard water, mineral deposits still sneak into the faucet internals over time, especially where water heaters are involved. I’ve found that routine vinegar soaks combined with gentle valve seat smoothing can postpone more extensive repairs significantly. What fascinates me is how cartridge faucets demand a more nuanced approach—sometimes the cartridge seems fine on a casual glance, yet those micro-cracks or subtle wear signs only show under LED magnification or after a thorough soak. This article nailed how patience and thoroughness prevent unnecessary part swapping, which can become costly and frustrating. Have you tried using any specialized inspection tools like a magnifying LED glass or UV light to catch early signs of cartridge faults before the drip worsens? I’m curious if others here have leveraged such tools in their own repair routines and how that has altered their maintenance schedules, especially in areas with different water compositions.
I really found this post enlightening, especially regarding the differences between cartridge and washer faucets and how each can uniquely lead to persistent drips. My own experience aligns with the notion that washer faucets are somewhat more straightforward to diagnose because the rubber washers often show clear signs of wear. However, cartridge faucets have always felt like a bit of a mystery, particularly when mineral buildup camouflages the cause. I’ve learned the hard way that just swapping parts without a careful diagnosis often leads to repeated dripping and wasted money. One thing I’m curious about is the mention of valve seat grinding and smoothing. While I’ve heard of this technique, I’ve always been hesitant to try it myself, fearing that over-grinding could cause more harm than good. Has anyone found reliable ways or tools to safely smooth valve seats at home without risking damage? Also, I wonder how often valve seat condition gets overlooked in DIY repairs compared to the more obvious culprit parts? I’d love to hear from others who have successfully incorporated valve seat maintenance into their routine and what tips or tools made the process manageable.
Reading this detailed exploration of faucet fault diagnosis really resonated with my own DIY experiences. A while ago, I faced a stubborn drip that seemed straightforward at first—just a worn washer, right? Well, turns out, a closer inspection revealed mineral deposits and micro-cracks in the cartridge that I’d never have spotted without a magnifying LED light. It made me realise how critical patience and the right tools are in truly understanding the problem rather than rushing into part swaps. I particularly appreciated the mention of environmental factors, like water hardness, which can accelerate wear. In my case, I live in an area with quite hard water, so I’ve started incorporating quarterly vinegar soaks and valve seat inspections into my routine. Has anyone else noticed significant differences in repair success or longevity when adjusting maintenance based on local water quality? I’d love to hear how others are tailoring their DIY strategies for their specific water conditions and whether they’ve found particular tools indispensable for early detection of issues.
Reading through this detailed account really underscores how important patience and precise diagnosis are in DIY plumbing. I’ve had my fair share of faucet issues, and I agree that rushing into part replacements often just leads to more frustration and expenses. I’ve found that inspecting the valve seat for corrosion or mineral buildup using a small mirror or even a smartphone camera can make a big difference before deciding on repairs. Additionally, for those dealing with hard water, installing a water softener has helped reduce mineral deposits, extending the life of both washers and cartridges. I’m curious, does anyone have tips on how best to clean mineral deposits from delicate components without risking damage? Sometimes, the deposits are stubborn, and I worry about over-using abrasive methods. Also, I’ve been experimenting with UV light inspection, which might be a game-changer for early detection of micro-cracks. Would love to hear others’ experiences with these tools or approaches—any advice on what works best for subtle issues that aren’t immediately obvious?
This post really opened my eyes to the importance of detailed diagnosis before rushing into repairs. I remember battling a persistent drip last year in my bathroom sink, which I initially thought was just a worn washer. However, after inspecting more closely with a magnifying LED light, I noticed tiny micro-cracks in the cartridge that were invisible to the naked eye. This made me realise that a lot of leaks could be caused by small, often overlooked issues that only proper inspection can reveal. The emphasis on understanding environmental factors like water hardness is also crucial; in my area, hard water definitely accelerated mineral buildup in my fixtures. I’ve started using vinegar soaks more regularly, which seems to help. Has anyone else experimented with UV light or acoustic analysis to detect micro-cracks early? I would love to learn about more advanced, yet accessible tools that can help homeowners prevent leaks before they become bigger problems.
This post really underscores how much patience and proper diagnosis can make a big difference in fixing faucet leaks effectively. I especially agree with the detailed approach to inspecting valve seats and cartridges rather than just replacing parts blindly. During my own DIY repairs, I found that using a combination of a small mirror and an LED flashlight helped me spot tiny cracks or mineral buildup that I would’ve missed otherwise. It’s fascinating how environmental factors like water hardness can accelerate wear—down here in Melbourne, our hard water has caused similar issues over time. I’ve started incorporating routine vinegar soaks and even installed a water softener recently, which has definitely extended the lifespan of my fixtures. Has anyone else noticed a real improvement in repair quality or durability when actively adjusting maintenance based on their local water conditions? I’d love to hear what tools or techniques have worked well for others, especially for detecting subtle problems early on. It’s reassuring to see how continuous learning and patience can truly save time, money, and frustration in DIY plumbing.