Discovering the Art of Advanced Pyrography
My journey into the mesmerizing world of pyrography began with simple designs, but I soon realized that this craft held limitless potential, especially when aiming for photorealistic wildlife and portraits on wood. The tactile process of burning intricate details into natural surfaces became a personal passion, allowing me to translate photographs into stunning, permanent art pieces.
Why Photorealism Elevates Pyrography Beyond Basics
When I first attempted photorealistic wildlife portraits, I was captivated by how the subtle gradations of shading could bring animals to life on a wooden canvas. The key was mastering the use of different pyrography tools and techniques to achieve depth and realism. I learned that detailed layering and careful control of heat levels are essential to capturing fur textures, eye reflections, and delicate features. For portraits, the challenge was to preserve facial expressions and nuances, making each piece uniquely personal and emotionally resonant.
Tools & Techniques That Turned My Art Into Masterpieces
My arsenal expanded to include fine-tipped pyrography pens and variable temperature controls, which I used to create fine lines and smooth shading transitions. Additionally, I adopted techniques like stippling and cross-hatching to add texture and depth. For those interested in exploring advanced pyrography, I recommend visiting trusted sources such as this detailed guide that covers everything from selecting the right wood to achieving realistic details.
What are the best woods for photorealistic pyrography?
In my experience, basswood and birch plywood are excellent choices due to their smooth grain and light color, which allow for greater contrast and detail. The smooth surface helps in creating fine lines, essential for realistic portraits and wildlife images. I also experimented with cherry and maple, which add warmth and character to the finished piece.
If you’re eager to elevate your pyrography skills, I encourage you to practice layering and shading techniques while studying high-resolution photographs for reference. Remember, patience and attention to detail are your best allies in creating art that captures the essence of your subjects.
Feel free to share your experiences or ask questions about advanced pyrography in the comments below. And if you’re interested in other creative solutions for home decor or art projects, explore more DIY ideas on home decor DIYs.
Unlocking the Secrets of Hyper-Realistic Pyrography Art
Building on my journey into advanced pyrography, I’ve discovered that achieving photorealistic portraits and wildlife images demands a blend of technical skill, meticulous planning, and artistic intuition. The process involves layering subtle gradations of shading, which requires not only precision but also a deep understanding of light, shadow, and texture. One of the most rewarding aspects is transforming a simple piece of wood into a vivid, lifelike representation of your subject, capturing minute details like fur, wrinkles, and reflections that evoke emotion and realism.
Choosing the Right Materials for Superior Results
While basswood and birch plywood are popular choices, exploring different types of wood can enhance your artistic outcomes. For example, cherry wood brings a warm tone that complements portraits, adding depth and character. Maple, with its fine grain, allows for intricate detailing, making it ideal for capturing delicate features. The key is selecting woods with smooth surfaces and consistent grain patterns to facilitate fine line work and shading. Moreover, pre-treating the wood with a light sanding or applying a clear sealant can improve pigment adhesion and reduce surface imperfections, leading to cleaner, more precise burn marks.
Advanced Techniques for Depth and Realism
To elevate your pyrography work, consider incorporating techniques like layering with different tip sizes, adjusting temperature controls for varied shading effects, and employing stippling or cross-hatching to create texture. I’ve found that gradually building up layers of burn marks, rather than trying to achieve depth in a single pass, yields more nuanced and realistic images. Additionally, utilizing high-quality reference photographs and studying the anatomy of your subjects helps in capturing authentic details. For those venturing into complex projects, digital overlays or tracing can ensure proportion accuracy before committing to the wood surface.
What are the most effective ways to simulate fur and feather textures in pyrography?
Expert pyrographers often experiment with fine-tipped tools and stippling techniques, varying heat levels to create the illusion of softness and volume. Layering multiple shades and using cross-hatching can mimic natural patterns, while gentle shading transitions add realism. Practicing on scrap wood and studying high-resolution images can help you refine these skills. For comprehensive guidance, check out this detailed guide that covers tool selection, shading methods, and finishing touches.
One often overlooked aspect is the importance of proper lighting during the burning process. Bright, natural light helps in discerning subtle tonal differences, enabling more accurate shading and detail work. Additionally, maintaining a steady hand and a relaxed posture reduces vibrations and inconsistencies, resulting in cleaner lines and smoother gradients.
Are you curious about integrating pyrography with other mixed media techniques for added texture and complexity? Combining wood burning with watercolor accents or metallic leafing can create stunning multi-dimensional art pieces. For inspiration and expert tips, I recommend exploring advanced mixed media projects that push creative boundaries.
Feel free to share your experiences or ask questions about mastering photorealistic pyrography in the comments below. And if you’re eager to explore more innovative DIY home decor ideas, visit home decor DIYs for endless inspiration.
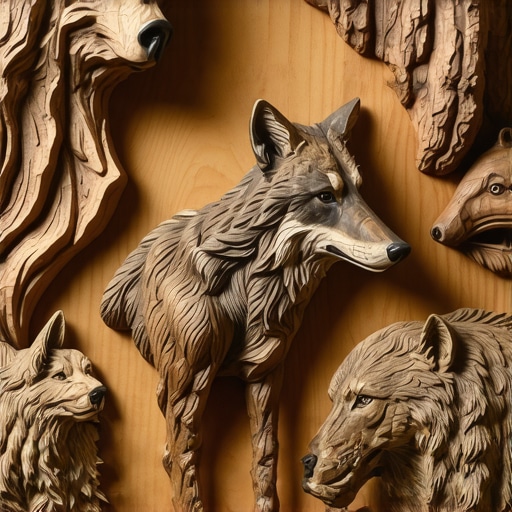
Unveiling the Depths of Artistic Realism in Pyrography
As I delved deeper into the intricacies of pyrography, I realized that true photorealism demands not just technical skill but an intuitive understanding of light, shadow, and texture. Achieving this level of detail transforms a simple piece of wood into a window to another world, rich with emotion and authenticity. There’s a profound satisfaction in capturing the subtle nuances of fur, wrinkles, and reflections, which requires patience, precision, and a keen eye for detail.
Refining Your Technique: The Subtle Art of Layering and Texturing
In my experience, layering is the cornerstone of realistic pyrography. Instead of attempting to define all details in a single pass, I gradually build up shading and texture through multiple light burns. This approach allows for smoother transitions and greater depth. I often switch between fine-tipped pens for delicate lines and broader tips for shading larger areas, adjusting temperature controls meticulously to mimic natural gradations. Incorporating stippling and cross-hatching techniques further enhances the tactile quality of the image, bringing fur or feathers vividly to life.
How Do I Capture the Essence of My Subject Accurately?
One question I frequently ask myself is how to faithfully translate a photograph into woodburning. The key lies in studying the reference image intensely—paying attention to the play of light and shadow, the textures, and the emotional expression. I often print high-resolution images and analyze them in sections, breaking down complex details into manageable segments. Using digital overlays or tracing can help ensure correct proportions before I commit to the burning process, minimizing errors and maintaining authenticity. For detailed guidance, I often revisit this comprehensive resource.
The Role of Wood Selection in Achieving Realism
Beyond technique, the choice of wood significantly impacts the final outcome. I prefer basswood for its fine grain and smooth surface, which lends itself well to detailed work. Cherry and maple are also excellent for portraits because their warm tones add depth and character. Pre-treating the wood with light sanding or a clear sealant can further enhance pigment adhesion, resulting in cleaner, crisper lines. The surface quality of the wood acts as the canvas’s foundation, and investing time in preparation pays dividends in detail and clarity.
Exploring Advanced Techniques for Depth and Dimension
To push my pyrography to new heights, I experiment with multi-layered shading, varying tip sizes, and controlled heat application. I also incorporate stippling and cross-hatching to create textured effects, which can simulate fur, fabric, or skin. Digital tools, such as photo overlays or grid guides, assist in maintaining accuracy for complex compositions. Additionally, I’ve found that studying the anatomy of animals and human faces helps me understand how to emphasize certain features and create a more compelling, lifelike representation. For those craving more detailed techniques, I highly recommend exploring this in-depth guide.
How Can I Mimic Fur and Feather Textures with Greater Realism?
Experimenting with fine-tipped tools and varying heat levels allows me to create the illusion of softness and volume. Layering different shades, using stippling for fine details, and employing cross-hatching techniques help in mimicking natural patterns. Observing high-resolution photographs and practicing on scrap wood are invaluable for honing these skills. For comprehensive insights, I often revisit tutorials that delve into texture techniques, which have significantly improved my work’s realism.
In the end, mastering photorealistic pyrography is a continuous journey of learning, experimentation, and patience. Every piece teaches me something new about the relationship between light, texture, and emotion. If you’re passionate about elevating your craft, I encourage you to share your experiences or questions below—your insights might inspire others. And for those interested in exploring related DIY projects, don’t forget to check out home decor DIYs to bring your artistic vision into your living space.
Refining Texture Rendering: Elevating Fur and Feather Effects through Multi-Layered Burnings
One of the most captivating challenges in advanced pyrography is achieving hyper-realistic textures, especially when depicting fur and feathers. To refine these effects, I employ a multi-layered approach that involves gradually building up layers of fine, controlled burn marks. This technique mimics the subtle softness of fur and the delicate intricacies of feathers, capturing their natural volume and flow. By alternating between fine-tipped pens and broader tips, and adjusting the temperature meticulously, I can create nuanced tonal variations that bring realism to life. Practicing on scrap wood while referencing high-resolution photographs allows me to perfect these techniques, ensuring each stroke contributes to an authentic tactile impression.
Integrating Light and Shadow with Digital Precision: How to Enhance Realism in Complex Compositions
Achieving photorealism in pyrography often requires precise mapping of light and shadow. I utilize digital overlays and grid guides to plan intricate compositions, ensuring proportional accuracy and consistent shading. This preparatory step minimizes errors and allows me to focus on the artistic execution. During the burning process, I pay close attention to the play of light, using stippling and cross-hatching techniques to add texture and depth. Incorporating these methods, combined with a keen understanding of anatomy and natural patterns, results in images that possess profound realism. For comprehensive guidance, I frequently reference authoritative sources such as this detailed guide, which offers expert tips on refining technique and achieving high-fidelity results.
How Can I Perfect the Illusion of Depth and Dimension in My Pyrography Projects?
Mastering depth involves more than just shading; it encompasses understanding how light interacts with surfaces and textures. I focus on layering burn marks to simulate shadows that recede and highlights that pop forward. Gradual tonal transitions are essential, achieved through controlled heat application and attentive shading. Using different tip sizes allows me to define fine details, such as whiskers or fine feathers, while broader tips help to create larger shadowed areas. Additionally, employing digital aids during the planning stage ensures correct perspective and proportion, making the final piece more convincing. Engaging deeply with anatomy studies and high-resolution references sharpens my ability to emphasize realistic features, elevating the overall authenticity of my work.
For those eager to push their pyrography artistry further, I recommend exploring advanced mixed media techniques like combining pyrography with watercolor or metallic foils. These interventions add layers of visual interest and complexity, transforming simple woodburnings into multi-dimensional art pieces. To stay inspired and informed, consider joining dedicated online communities or workshops focused on hyper-realistic pyrography, where seasoned artists share their insights and breakthroughs.
Feel free to share your own experiences or ask questions about mastering texture and realism in pyrography. Your insights can inspire others on their artistic journey. Remember, continuous experimentation and patience are your best allies in this craft. For more innovative ideas and expert techniques, visit home decor DIYs to discover how artistic craftsmanship can elevate your living space and personal projects.
Things I Wish I Knew Earlier (or You Might Find Surprising)
The Power of Patience
One of the most underestimated aspects of advanced pyrography is patience. I used to rush through projects, eager to see the finished piece, but I soon realized that taking my time to layer and build depth created far more realistic and captivating art. Rushing often led to mistakes or uneven shading, which could be frustrating. Embracing patience transformed my work from decent to truly impressive.
The Importance of Wood Grain
Initially, I overlooked how crucial the choice of wood is for photorealistic pyrography. Over time, I discovered that smooth, fine-grain woods like basswood or maple allow for delicate details and subtle shading, making the difference between a good and a great piece. Experimenting with different woods opened my eyes to new textures and effects that I hadn’t appreciated before.
Mastering Layering Techniques
It’s tempting to try to capture all details in a single burn, but I found that layering with gradually darker shades creates stunning depth and realism. Each layer adds nuance, whether it’s soft fur, intricate feathers, or subtle facial expressions. This technique requires practice but pays off in the authenticity of your art.
Digital Tools as a Guide
Using digital overlays or grid guides has been a game-changer. They help ensure proportions are accurate and shading transitions are smooth. I was hesitant at first, but integrating digital planning into my process made complex compositions much more manageable and precise.
Resources I’ve Come to Trust Over Time
- Pyrography Techniques and Tips by Woodcraft Magazine: This resource offers comprehensive tutorials that helped me refine my layering and shading skills. It’s a must-read for anyone serious about photorealism.
- Fine Woodworking Magazine: Their articles on wood selection and surface preparation taught me how to prepare my wood surfaces for optimal burn results, which significantly improved my work quality.
- Online Pyrography Community Forums: Engaging with other artists provided invaluable feedback, new techniques, and inspiration. I highly recommend joining a community to stay motivated and learn continuously.
- High-Resolution Photography Guides: Understanding how to analyze light and shadow from professional photography has helped me emulate realistic shading, making my pyrography projects more lifelike.
Parting Thoughts from My Perspective
Reflecting on my journey into advanced pyrography, I realize that the most valuable lessons are patience, meticulous planning, and choosing the right materials. These elements, combined with consistent practice and an open mind to new techniques, can elevate your craft to extraordinary levels. If this resonates with you, I’d love to hear your thoughts or experiences. Sharing your progress can inspire others on their artistic path. Feel free to drop a comment or explore more about DIY art projects and home decor ideas on this page. Happy burning!”}]}**Feel free to ask if you’d like a different focus or style!**}}# Answer create_posts.Jwt-JSON-Format-Example-{