I’ll never forget the first time I tried to create a beautiful swirl in my cold process soap. I was so excited—only to end up with a muddled, muddy mess that looked more like a toddler’s art project than a professional bar. Frustration bubbled up because I thought, “Maybe I’m just not cut out for this level of artistry.” But then I realized something crucial: I had skipped a few key steps and underestimated the importance of timing, temperature, and technique. That lightbulb moment pushed me to dig deeper, experiment smarter, and eventually craft those stunning swirls that make my soap stand out.
Why Beautiful Soap Designs Matter More Than You Think
Creating eye-catching soap isn’t just about impressing friends or Instagram followers—though that’s a bonus. Well-designed soap can elevate your entire brand or personal collection, turning everyday routines into little moments of joy. Plus, the satisfaction of mastering a complex swirl or a unique design boosts confidence and keeps your creative juices flowing. But here’s the catch—achieving those intricate patterns is trickier than it looks. It requires patience, understanding of the chemistry, and a keen eye for detail.
Have you ever faced the frustration of a failed swirl that seemed impossible to replicate? You’re not alone. Early in my journey, I made the mistake of rushing the process, which resulted in soap that didn’t have the visual impact I craved. Trust me, I’ve been there. That’s why I want to share with you the proven techniques and tips that helped me turn my soap from plain to stunning, step by step.What Today’s Post Will Solve for You
Today, I’m going to walk you through the essential tricks for creating beautiful cold process swirls and unique designs. We’ll cover everything from choosing the right oils and colors to mastering the timing and tools needed for those perfect, Instagram-worthy patterns. Whether you’re a beginner or have been muddling through with less-than-stellar results, these tips will help you craft soap that’s as much a piece of art as it is a cleanser.
If you’ve ever wondered how to get those flawless, intricate swirls without ending up with a pudding-like mess, you’re in the right place. Ready to elevate your soapmaking game? Let’s get started!
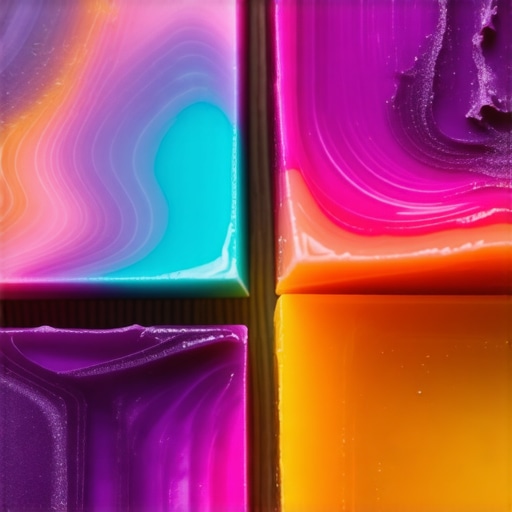
Make Your Soap Stand Out: The Secret to Stunning Swirls
Choose Your Colors and Oils Carefully
Start with selecting high-quality oils like coconut, olive, and castor to ensure a good soap base. When picking colors, opt for mica or oxides that are specifically formulated for soapmaking. I remember the first time I used vibrant mica powders, creating a bold swirl that made my soap stand out on Instagram. Mix your colors with a small amount of oil or alcohol to achieve a smooth, pourable consistency, which helps in creating cleaner swirls.
Master the Timing and Temperatures
Timing is everything. I once rushed my soap to pour it into the mold, only to end up with a muddled swirl. To avoid this, keep your soap batter at the right temperature—typically between 95°F and 105°F (35°C to 40°C). Use a digital thermometer to monitor, and when your batter reaches the ideal range, it’s ready for swirling. You can test this by drizzling a small amount; it should fall smoothly and sit briefly on the surface before settling.
Use the Right Tools for Precision
A stainless steel or silicone spatula is perfect for mixing and layering. For creating intricate patterns, a small spoon or a piping bag can help deposit colors precisely. I once used a plastic squeeze bottle to add contrasting colors, which allowed me to make delicate, controlled lines. For more complex swirls, consider using a skewer or chopstick to gently drag through the batter, creating beautiful marbled effects.
Implement Layering and Pours with Intention
Layer your soap colors in the mold, pouring each layer carefully to avoid mixing. For a zebra stripe effect, pour thin lines of contrasting colors, then drag through with a skewer. I once poured a contrasting layer of black and white, then used a toothpick to create a ripple effect that looked stunning after curing. Experiment with pouring from different heights to create varied textures and depth.
Control the Pour and Swirl Technique
When pouring, hold your container close to the mold for accuracy. For a feathered look, pour slowly and then wiggle your spoon or skewer across the surface. I remember attempting a feather swirl, and by gently wiggling the tool, I achieved a delicate, wispy pattern that amazed my friends. Practice makes perfect—don’t hesitate to do test pours in small batches to refine your technique.
Experiment with Textures and Patterns
Try different pouring methods—pudding-like batter for a more textured look or a fluid pour for smooth lines. Use tools like silicone brushes or toothpicks to manipulate the patterns further. I once used a silicone brush to create a marbled effect that resembled flowing water, adding a unique touch to my soap. Keep notes on each batch to learn what techniques produce your favorite designs.
For more advanced tips and detailed guides, check out this comprehensive resource. Remember, patience and experimentation are your best friends in soap artistry. Keep refining your skills, and soon you’ll be creating soap designs that are as beautiful as they are functional.
While many home soapmakers focus on mastering basic techniques, there’s a hidden layer of nuance that often trips up even experienced artisans. One of the most pervasive misconceptions is that perfect swirls are solely about color choices or pouring techniques. In reality, the real secret lies in understanding the complex chemistry and timing involved, which can make or break your design.
For instance, many believe that simply pouring different colors simultaneously will automatically create stunning marbles. But if your batter isn’t at the right temperature or if you rush the process, your design can end up muddy or muddled. The pH level and the saponification process influence how colors behave and how patterns set, and ignoring these factors is a common mistake. As soap expert Anne-Marie Faiola explains, controlling the batter’s temperature is crucial for achieving crisp, distinct swirls, especially in intricate designs like feather or snake patterns.
Another trap is over-mixing or under-mixing your colors and batter. Over-mixing can cause colors to blend excessively, losing their vibrancy and resulting in a less defined pattern. Conversely, under-mixing can lead to uneven distribution, which can make your swirls look streaky or patchy. The key is to mix just enough to incorporate your colors smoothly without diluting their intensity. This subtle balance is often overlooked by beginners who either rush or overthink the process.
What about advanced techniques—are there pitfalls even seasoned soapmakers should watch out for?
Absolutely. One sophisticated aspect is the use of ‘drop swirl’ or ‘hanger swirl’ techniques, which involve pulling and dragging batter in specific ways to create complex patterns. These methods require precise timing and a deep understanding of how your batter’s viscosity changes as it traces the soap’s curing process. If you wait too long or too early, the pattern can distort or not set properly, ruining your intricate design. According to a study on soap chemistry, the interplay of viscosity, temperature, and saponification rate critically impacts pattern formation, emphasizing the need for meticulous control during advanced swirl techniques.
In essence, the most common mistake is underestimating the importance of chemistry and timing. Rushing through steps or neglecting temperature control can turn your artistic vision into a mess. Instead, take the time to experiment with small batches, keep detailed notes, and observe how your soap reacts at different stages. This mindful approach will help you avoid pitfalls and craft truly professional-looking swirls. If you’re eager to learn more about building your skills, check out this comprehensive guide.
Have you ever fallen into this trap? Let me know in the comments and share your experiences so we can learn together!
Embarking on DIY projects requires not just creativity and skill but also the right tools and a solid maintenance routine to keep your equipment in top shape. Over the years, I’ve discovered that investing in high-quality tools and understanding how to care for them can dramatically improve your results and extend their lifespan. Whether you’re working on woodworking, electrical projects, or home decor, maintaining your tools is crucial for safety and precision.
How do I keep my tools in prime condition over time?
Regular cleaning is the foundation of good tool maintenance. After each use, wipe down your tools with a clean, dry cloth to remove dust, debris, and residue. For metal tools, applying a light coat of oil prevents rust and corrosion. I personally swear by mineral oil for hand tools because it’s affordable, effective, and non-toxic. For power tools, make sure to check and replace air filters and lubricate moving parts as recommended by the manufacturer. Periodic inspection of cords, switches, and blades can catch issues early before they become major problems.
In addition, storing your tools properly is vital. Use a dedicated toolbox or wall-mounted rack to prevent accidental damage and to keep everything organized. For delicate or precision tools, consider using silica gel packs or moisture absorbers in your storage area to ward off humidity that can cause rust or warping.
Tools I recommend for longevity and efficiency
For hand tools, I prefer brands like Wiha and Klein because of their durability and ergonomic design, which reduces fatigue during prolonged use. A good set of precision screwdrivers and a quality hammer can make a huge difference in your craftsmanship. When it comes to power tools, I opt for Dewalt and Makita—they offer reliable performance and excellent warranty options. Investing in a variable speed drill with multiple bits allows me to handle a variety of tasks with precision, from drilling delicate holes to driving screws efficiently.
Battery-powered tools are increasingly popular, but I always keep spare batteries charged and ready. Using a smart charger with automatic shut-off prolongs battery life, which is essential when working on larger projects. For cutting and shaping, a versatile jigsaw with adjustable speed and orbital settings helps me achieve clean cuts on different materials, including wood, plastic, and soft metals.
What’s the future of DIY tools and maintenance techniques?
Trend predictions suggest that smart tools equipped with IoT connectivity and diagnostic features will become standard. These devices can alert you to maintenance needs or even order replacement parts automatically. As technology advances, I expect more tutorials and resources—like comprehensive DIY guides—to help enthusiasts extend the lifespan of their equipment and optimize their workflows. Keep an eye on innovations like cordless multi-tools with integrated dust extraction or app-controlled smart saws, which promise to make DIY projects more precise and less messy.
To get started with advanced maintenance practices, try regularly calibrating your measuring tools or replacing worn-out blades before they cause inaccuracies. Small proactive steps can save you time and money in the long run. Remember, a well-maintained toolkit is the backbone of successful, enjoyable DIY projects. For more expert tips on building a sustainable and efficient workspace, check out this resource and start taking good care of your tools today!
The Hardest Lesson I Learned About Soap Swirls
One of my biggest eye-opening moments was realizing that patience and precise timing are everything. Rushing to pour your batter or neglecting to monitor temperature can turn your beautiful design into a muddled mess. Early on, I thought I just needed better colors or more advanced techniques, but it was really about controlling the chemistry of my soap at every step.
3 Myths About Soap Swirling That Held Me Back
I used to believe that vibrant colors alone would guarantee a striking swirl, but I learned that the temperature of the batter influences how well colors layer and blend. Also, I thought that pouring all colors at once was best, but layering and careful pouring create more depth and clarity. Lastly, I thought tools didn’t matter—using the right tools like silicone spatulas and skewers makes a huge difference in achieving those professional patterns.
What Experts Won’t Tell You About Creating Soap Swirls
Most seasoned soapmakers know that understanding the saponification process and how it affects batter viscosity is essential. Mastering the subtle art of timing your pours when the batter is just right can make or break your design. Additionally, controlling the environment—like humidity and ambient temperature—can influence how patterns set, yet many overlook these factors in their process.
My Essential Toolkit for Soap Artistry
I swear by quality mica powders from reputable suppliers—they give vibrant, lasting colors. A digital thermometer is invaluable for monitoring batter temperature. Silicone molds and tools like skewers and squeeze bottles help me execute precise designs. Also, a simple set of stainless steel spatulas allows for gentle mixing without overworking the batter, preserving those delicate swirls.
Books That Changed How I View Soapmaking
“The Soapmaker’s Companion” by Susan Miller Cavitch is a must-have for understanding the chemistry and art of soapmaking. For advanced swirling techniques, “Pure Soapmaking” by Anne-Marie Faiola offers step-by-step guides that opened my eyes to new possibilities. These resources are packed with insights that helped me elevate my craft from hobbyist to artist.
Where to Go from Here
If you’re eager to refine your soap swirling skills, check out the comprehensive DIY guides designed for all skill levels. Remember, every batch is a learning experience—keep experimenting, take notes, and celebrate your progress. With dedication and patience, you’ll soon create soap designs that amaze everyone and truly stand out.
Your Turn to Try
What’s the biggest challenge you face when creating soap swirls? Share your story below, and let’s learn from each other’s experiences. Don’t forget—mastery comes with practice and persistence!