Ever been elbow-deep in a pile of metal scraps, feeling frustrated because your tiny steam engine just won’t come to life? I remember the moment I thought I could wing it with some makeshift tools and a dash of hope. Spoiler alert: that approach only led to bent wires, misplaced parts, and a lot of swear words. But then I discovered a systematic, step-by-step method that transformed my chaos into a functioning miniature marvel. And today, I want to share that journey with you.
Why Building a Tiny Steam Engine Matters More Than You Think
Creating a miniature steam engine is more than just a hobby. It’s a gateway to understanding engineering principles, honing your craftsmanship, and even sparking a lifelong passion for mechanical innovation. Plus, there’s a certain satisfaction in turning raw metal into a working piece of art that actually moves. If you’re tired of cluttered workbenches and half-finished projects, know that with patience and the right guidance, you can master this craft.
Have You Faced the Frustration of Wasted Materials?
If you’ve ever cut a piece of metal only to realize it’s the wrong size, or assembled a part only to find it doesn’t fit, you’re not alone. I made the mistake early on of rushing through measurements and skipping detailed plans. That mistake cost me time, money, and a lot of discouragement. But I learned that patience, precision, and following a proven process are the keys to success. For more tips on avoiding common DIY pitfalls, check out home improvement tips.
Luckily, building a mini steam engine isn’t as intimidating as it sounds. It requires some basic tools, a handful of metal pieces, and most importantly, a clear set of instructions. That’s exactly what I’ll guide you through in the upcoming sections. We’ll break down each step, from selecting the right materials to assembling the tiny parts that will make your engine run. Ready to turn your scrap metal dreams into reality? Let’s get started.
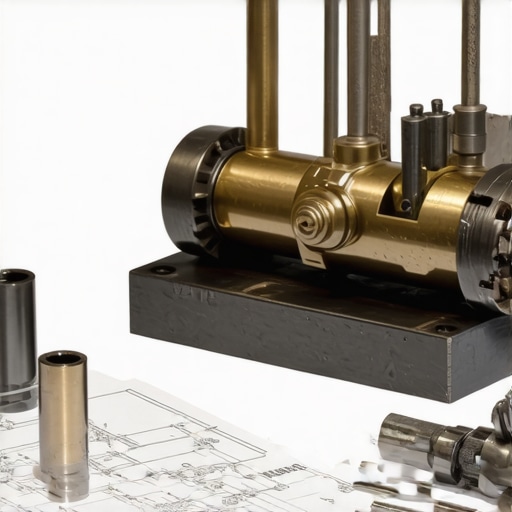
Gather Your Materials and Tools
Start by collecting high-quality metal stock such as brass, steel, or copper sheets and rods. You’ll also need basic tools like a hacksaw, files, drill press, soldering iron, and clamps. Remember, precision is key—using the right materials and tools sets a solid foundation for your project.
Design Your Engine Before Cutting
Sketch out a detailed plan or use CAD software for accuracy. Think of this as creating a blueprint for your miniature masterpiece. I once made a mistake by jumping straight into cutting without a plan, which resulted in mismatched parts. A clear design helps you visualize each component and avoid costly errors later.
Cut and Shape Metal Components
Follow your design to cut out parts like the cylinder, piston, crankshaft, and boiler. Use a hacksaw or a rotary tool with metal-cutting bits. During my first attempt, I accidentally cut a cylinder slightly too big, which I fixed by carefully filing down the edges—patience here saves waste.
Drill Precise Holes
Mark drilling points accurately using a punch or scribe. Use a drill press for consistency. I once drilled a hole off-center and had to start over; using a drill press ensures straight, accurate holes, critical for smooth assembly and operation.
Assemble the Core Components
Begin by fitting the piston into the cylinder and attaching the crankshaft. Use clamps to hold parts steady. Solder or screw parts together, depending on your design. I remember struggling with alignment at first, but gently adjusting and securing parts step-by-step made the process manageable.
Build the Boiler and Fuel System
Form the boiler from a metal sheet, ensuring it’s sealed tightly to contain steam. Attach a fuel chamber and chimney. Always test for leaks with a small amount of water before running your engine. Early on, I overlooked sealing a joint properly, which caused steam leaks—learning to test early prevents bigger issues.
Attach Moving Parts and Lubricate
Install the piston, connecting rods, and flywheel. Lubricate all moving joints with a suitable oil to reduce friction. I once forgot to lubricate, and the engine ran rough—regular lubrication is a simple step that prolongs your engine’s lifespan and smoothness.
Test and Fine-Tune the Engine
Fill the boiler with water, light a small fuel source, and observe. Adjust the alignment of the piston and crankshaft if needed. I had to tweak the piston fit several times before achieving smooth movement. Patience and small adjustments are the secrets to a working miniature engine.
Building a miniature steam engine is intricate but rewarding. Take it slow, double-check measurements, and enjoy the process of turning raw metal into a tiny working marvel. For more insights into DIY projects, explore step-by-step DIY guides.
Many enthusiasts jump into building tiny steam engines with misconceptions that can hinder their progress. As someone who has spent years refining this craft, I want to shed light on the most widespread misunderstandings and share insights that can save you time and frustration.
Why Do People Believe Larger Is Better?
One common myth is that bigger models are easier or more reliable. In reality, larger engines require more materials, space, and often more complex assembly, which can introduce additional points of failure. Small-scale engines, when designed properly, are often simpler to troubleshoot and maintain, making them an excellent starting point for beginners. Overlooking this can lead to unnecessary complications and discouragement.
Misconception: Precision Isn’t Critical
Many think that rough measurements won’t affect the engine’s performance. This is a dangerous trap. Tiny tolerances are crucial in steam engine construction; even a small misalignment can cause uneven wear, leaks, or complete failure. Using a precision drill press and meticulously measuring each part can be the difference between a working engine and a pile of scrap metal. Remember, following a proven blueprint and double-checking your measurements is essential.
Advanced Question: How Can I Ensure My Seals Are Perfect to Prevent Steam Leaks?
Sealing is often overlooked by hobbyists eager to assemble quickly. But leaks are the number one cause of engine failure. To achieve a perfect seal, use high-quality soldering techniques and test joints with a small amount of water before running the engine. Applying a layer of graphite or a specialized gasket material can also improve sealing. Even slight imperfections can cause steam to escape, reducing efficiency and risking damage. For detailed sealing techniques, explore advanced DIY tips.
Another hidden nuance is the importance of lubrication. Many beginners overlook this step, leading to increased friction and early wear. Regularly applying a suitable oil to moving parts ensures smooth operation and extends your engine’s lifespan. Remember, mastery involves attention to these small details that many novices neglect.
Building a miniature steam engine is as much about precision and patience as it is about enthusiasm. Don’t fall for the myth that shortcuts or rough work will suffice; they won’t. Instead, focus on meticulous craftsmanship, testing, and learning from each step. If you’re interested in more advanced solutions for your DIY projects, check out creative DIY ideas.
Have you ever fallen into this trap? Let me know in the comments!
Keeping your miniature steam engine running smoothly over time requires more than just initial assembly skills; it demands the right tools and a disciplined maintenance routine. Investing in quality equipment ensures your engine operates efficiently and lasts for years. For instance, I personally favor a digital caliper for measuring tiny gaps—its precision to 0.01mm helps avoid misalignments that can cause leaks or uneven wear. Additionally, a rotary tool with metal-cutting and polishing bits is invaluable for fine-tuning parts and removing burrs without damaging delicate components.
Regular lubrication is another cornerstone of long-term performance. I recommend using a high-grade synthetic oil designed for small mechanical parts, such as Mobil 1 Synthetic Motor Oil, which resists evaporation and build-up. Applying a tiny drop to the piston, crankshaft, and pivot points every few runs prevents friction buildup and reduces wear. Remember, consistency is key—skipping lubrication can lead to overheating and premature failure.
To keep your engine in top shape, schedule routine inspections. Check for corrosion, loose fittings, and steam leaks. A visual check combined with a simple pressure test—using a soap-water solution on joints—can reveal leaks early. If you detect corrosion, gently clean metal surfaces with a fine abrasive pad and reapply protective coatings or solder joints as needed. This proactive approach minimizes downtime and costly repairs.
As the trend towards DIY sustainability grows, incorporating eco-friendly maintenance products is becoming popular. For example, I now use a homemade graphite lubricant made from powdered graphite mixed with a small amount of mineral oil, which is non-toxic and effective. Not only does this reduce chemical waste, but it also keeps my engine running quietly and smoothly.
Looking ahead, I believe the future of tiny steam engines will involve smart monitoring systems. Sensors connected to microcontrollers could alert you to steam pressure drops or temperature spikes, enabling preemptive maintenance. This integration of technology will make DIY projects more reliable and accessible for enthusiasts of all skill levels.
How do I maintain my miniature steam engine over time?
Developing a consistent maintenance routine is essential. Clean components after each use, lubricate regularly, and perform visual inspections for corrosion or leaks. Using precise tools like digital calipers and quality lubricants, as I do, ensures your engine remains in optimal condition. Remember, patience and attention to detail are your best allies in this craft.
If you’re eager to elevate your DIY skills, try implementing one of the advanced tips discussed here, such as creating your own graphite lubricant or integrating simple sensors for early fault detection. For more inspirational ideas on craft and maintenance, visit creative DIY projects or contact us directly through our contact page.
The Hardest Lesson I Learned About Building Tiny Steam Engines
One of the most valuable lessons I discovered was that rushing through measurements and assembly often leads to frustration and wasted materials. Patience and precision are your best allies. I once tried to speed up the process by skipping detailed planning, only to realize that small misalignments caused major setbacks. Now, I always double-check my measurements and follow a step-by-step plan, which saves time and reduces errors.
3 Myths About Miniature Steam Engines That Held Me Back
Many beginners believe that bigger engines are easier or that high-end tools are necessary from the start. In reality, smaller engines are simpler to troubleshoot and maintain, making them perfect for newcomers. Also, investing in a quality drill press and digital caliper early on can significantly improve your results. Dispelling these myths helped me approach my projects with confidence rather than frustration.
What Experts Won’t Tell You About Sealing and Lubrication
Achieving perfect seals is often overlooked but crucial. I learned that using high-quality soldering techniques and testing joints with water before steam is essential. Additionally, regular lubrication with a suitable synthetic oil prevents friction and wear. These small details, often dismissed, make the difference between a successful build and constant leaks or breakdowns.
Curated Tools and Resources That Changed My Approach
- Digital Calipers: Precise measurements are vital. I trust my digital calipers for their accuracy, helping me avoid costly mistakes.
- CAD Software: Designing my engine parts digitally allowed me to plan with accuracy and visualize the assembly before cutting.
- High-Quality Soldering Kit: Reliable joints ensure steam-tight seals. Investing in a good soldering iron saved me hours of rework.
- Online DIY Guides and Forums: Communities like DIYKutak provide step-by-step tutorials and troubleshooting tips that are invaluable for both beginners and experienced builders.
Your Turn to Experiment and Create
Building a miniature steam engine is a rewarding challenge that sharpens your craftsmanship and deepens your understanding of mechanics. Remember, patience, attention to detail, and the right resources will set you on the path to success. Don’t be afraid to start small and learn as you go. If you’re eager to explore more advanced techniques or find inspiration for your next project, visit this collection of creative DIY crafts to broaden your horizons. Now, tell me—what part of building a tiny steam engine excites you the most? Share your thoughts below!