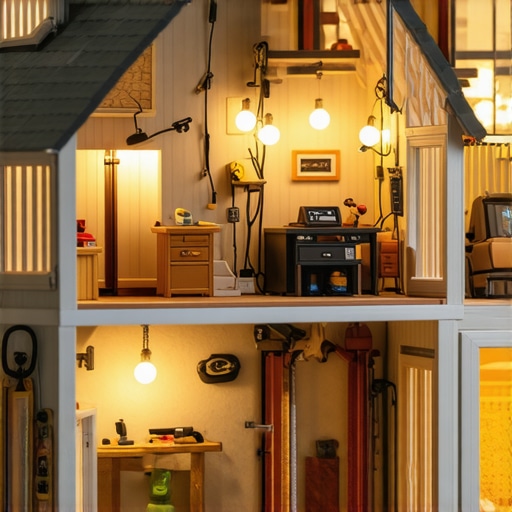
My Journey into Building a Realistic Dollhouse: A Personal Tale
Ever since I was a child, I was fascinated by tiny details and miniature worlds. My latest project, a meticulous dollhouse with functional electrical wiring and miniature lighting, became a rewarding challenge that pushed my DIY skills to new heights. I remember spending countless evenings soldering tiny wires and carefully installing tiny bulbs, feeling a deep sense of accomplishment with each step.
Why I Chose to Incorporate Electrical Wiring in My Dollhouse
Creating a dollhouse that not only looks authentic but also lights up like a real home added an extra layer of realism. I wanted my miniature rooms to glow warmly at night, highlighting the intricate furnishings and architectural details. Integrating electrical wiring required patience and precision, but the end result was well worth it. I learned that proper planning, like drawing detailed wiring diagrams, simplifies the process—a tip I highly recommend for beginners.
Getting Started: Planning Your Wiring and Lighting Setup
Before diving into wiring, I mapped out the entire layout, considering where each light fixture would go. I used thin gauge wire, which is flexible and easy to hide behind walls and furniture. Connecting tiny LED lights to a low-voltage power source ensures safety and longevity. For detailed guidance, I referenced authoritative sources like DIYKutak’s electrical wiring tips, which helped me avoid common pitfalls.
My Personal Tips for Wiring Miniature Lights Successfully
One key insight I gained was the importance of soldering carefully and insulating connections to prevent shorts. Using a breadboard during the planning phase allowed me to test circuits before permanent installation. Additionally, I chose warm white LED bulbs for a cozy ambiance, but colored LEDs can add fun accents. I also learned that organizing wires with cable ties keeps everything neat and accessible.
How to Achieve a Seamless Lighting Effect in Your Dollhouse
Lighting can dramatically transform the appearance of your miniature world. I installed tiny switches for easy control, creating a realistic feel. Concealing wires within walls and furniture helps maintain visual harmony. For a professional finish, I painted over wire access points and secured everything with tiny clips. The magic of a well-lit dollhouse is truly breathtaking—trust me, it’s worth every meticulous moment.
What deeper insights can I share about wiring small-scale electrical projects?
Understanding basic electrical principles, like circuit continuity and voltage regulation, can make a significant difference. If you’re new to electrical wiring, consider starting with simple projects to build confidence. For detailed tutorials, check out DIYKutak’s beginner guides. Remember, safety first—use appropriate tools and always work in a dry environment.
If you’re inspired to try your hand at creating illuminated miniature worlds, I encourage you to share your progress or ask questions in the comments below. Exploring this craft combines creativity with technical skills, leading to truly satisfying results.
Unlocking the Secrets of Miniature Electrical Wiring for Your DIY Dollhouse
Delving into electrical wiring for dollhouses can seem daunting at first, but with a strategic approach, it becomes an engaging and rewarding project. As an experienced hobbyist, I’ve learned that meticulous planning and understanding fundamental electrical principles are key to achieving a professional-looking, illuminated miniature home. Whether you’re adding tiny chandeliers or wall sconces, mastering this craft elevates your project to a new level of realism.
Why Precision and Planning Are Critical in Miniature Wiring
Before starting, create a detailed wiring diagram tailored to your dollhouse’s layout. This blueprint helps you visualize the circuit flow and identify the optimal placement for each light fixture. Using flexible, thin gauge wire ensures discreet routing behind walls and furniture, maintaining the aesthetic integrity of your miniature scene. Remember, safety is paramount—always work in a dry environment and use insulated tools to prevent electrical mishaps.
Choosing the Right Components for Small-Scale Electrical Projects
For miniature lighting, low-voltage LED lights are ideal due to their energy efficiency and low heat emission. Warm white LEDs mimic the cozy glow of real lamps, but colored LEDs can add creative accents for themed displays. Power supplies should match your circuit’s voltage and current requirements, a detail I always double-check before soldering connections. For more advanced projects, consider incorporating dimmers or remote controls to enhance functionality.
Expert Techniques for Seamless Wiring and Hidden Installations
One of the most satisfying aspects of miniature wiring is concealing all components for a clean finish. Run wires through drilled holes and behind structural elements, securing them with tiny clips or adhesive. Painting over access points and wiring channels helps camouflage the wiring routes, creating a seamless appearance. During installation, test each circuit segment to ensure consistent illumination and troubleshoot any shorts or loose connections early on. For detailed guidance, I recommend consulting DIYKutak’s expert wiring tips.
How Can You Elevate Your Miniature Lighting to a Professional Level?
Lighting design impacts the overall realism and ambiance of your dollhouse. Incorporate tiny switches for easy control, and plan wire routes to avoid visible clutter. Using warm white LEDs and installing tiny lenses or diffusers can give your lights a natural glow, mimicking real lamps. Concealed wiring within walls or furniture maintains aesthetic harmony, while strategic placement of fixtures enhances the architectural details. For inspiration, explore home improvement ideas applied at miniature scales.
What practical advice can I provide for troubleshooting and refining small-scale electrical systems?
Understanding basic electrical concepts like circuit continuity and voltage drop is invaluable. Use a multimeter to test connections and identify potential faults before finalizing your setup. Organizing wires with cable ties or miniature clips prevents tangles and makes future adjustments easier. Patience during soldering and connection insulation ensures longevity and safety. If you encounter persistent issues, revisiting your wiring diagram or consulting expert resources can reveal overlooked problems. For detailed troubleshooting, see DIYKutak’s troubleshooting techniques.
Are you ready to illuminate your miniature masterpiece with expert wiring techniques? Share your projects, ask questions, or suggest new ideas in the comments below. Remember, mastering these skills not only enhances your current project but also broadens your DIY horizons with endless creative possibilities.
Deepening the Craft: Embracing the Nuances of Miniature Electrical Wiring
As I delved further into my dollhouse lighting projects, I realized that mastering the basics was just the beginning. The true artistry lies in understanding the subtle nuances—like managing voltage drops over long wire runs or ensuring that each miniature fixture receives consistent power without flickering. These challenges require a delicate balance of technical knowledge and creative problem-solving. For instance, I learned that using thicker gauge wire in critical sections helps maintain voltage integrity, especially when powering multiple lights from a single source. Exploring advanced techniques, such as creating custom wiring harnesses or integrating dimming controls, can elevate the realism and functionality of your miniature home. Expert insights emphasize that precise wiring practices are essential for professional results. Sharing your experiences and questions can inspire others to refine their skills—so don’t hesitate to comment below with your projects or challenges.
The Art of Concealed Wiring: Achieving Seamless Illumination
One of the most rewarding aspects of advanced wiring is the ability to hide all traces of the electrical system, maintaining the aesthetic integrity of your miniature environment. I discovered that drilling tiny holes at strategic points allows wires to pass behind walls or through furniture, seamlessly integrating the lighting system. Painting over access points and using tiny clips or adhesive channels ensures wires stay out of sight, preserving the illusion of a real home. The challenge is in balancing accessibility with invisibility, especially when future adjustments are needed. Incorporating miniature switches and remote controls adds a layer of sophistication, offering realistic control options. The satisfaction comes from seeing the glow of carefully concealed wiring, transforming the scene into a believable, cozy home. If you’re interested in detailed techniques, explore advanced wiring tutorials at home improvement tips.
Refining Your Skills: Troubleshooting and Optimization
Even with meticulous planning, electrical issues can arise. Over time, I learned the importance of thorough testing—using a multimeter to check voltage levels and continuity at every connection point. Organizing wires with tiny cable ties or clips prevents tangling and makes troubleshooting more manageable. When I encountered flickering lights or inconsistent brightness, it was usually due to loose solder joints or insufficient insulation. Re-soldering connections and insulating exposed wires significantly improved stability. Additionally, I started experimenting with advanced components like low-voltage dimmers and smart switches, which added new layers of control and realism. Remember, patience and attention to detail are your best allies in this process. For comprehensive troubleshooting techniques, I recommend exploring expert wiring tips. Engaging with fellow hobbyists through online forums or local clubs can also provide valuable insights and encouragement.
What are the most sophisticated challenges you’ve faced in miniature wiring, and how did you overcome them?
Understanding the deeper electrical principles, like managing circuit load and preventing voltage drops, has been crucial. For example, I found that splitting circuits into smaller segments and using multiple power sources can prevent overloads and ensure consistent lighting. Learning to design circuits that are both functional and visually discreet is a continuous journey, requiring experimentation and adaptation. If you’re eager to push your skills further, consider exploring more advanced DIY projects that challenge your wiring and design capabilities. Sharing your progress and questions fosters a community of growth—so I invite you to comment or reach out. Ultimately, the mastery of miniature electrical wiring is about transforming technical precision into artistic expression, creating scenes that captivate and inspire.
Refining Voltage Management for Consistent Miniature Lighting
As my expertise deepened, I realized that managing voltage drops across extensive wiring runs is crucial for maintaining uniform illumination. In miniature projects, even a slight voltage fluctuation can cause flickering or dimming, undermining realism. I adopted strategies like segmenting circuits into smaller loops and incorporating thicker gauge wire in critical pathways, which significantly improved voltage stability. Consulting comprehensive resources such as DIYKutak’s advanced wiring techniques provided invaluable insights into sophisticated circuit design. This meticulous attention to electrical nuances ensures that every tiny light shines with consistent warmth, elevating the overall ambiance of the dollhouse.
The Intricacies of Custom Wiring Harnesses for Seamless Power Delivery
One of the more advanced skills I developed was creating custom wiring harnesses tailored to specific miniature fixtures. This approach streamlines installation, reduces clutter, and enhances reliability. I learned to solder multiple wires into compact connector assemblies, which could be easily integrated into the dollhouse’s architecture. Proper insulation and strain relief are paramount to prevent future failures. These harnesses enable me to distribute power efficiently while keeping wiring discreet behind walls. For detailed guidance, exploring expert tutorials has been instrumental. Mastering this technique allows for cleaner aesthetics and easier troubleshooting down the line.
Enhancing Realism with Dimming Controls and Smart Switches
Integrating dimming controls and smart switches into miniature lighting systems introduces a new layer of realism and interactivity. I experimented with low-voltage dimmers compatible with tiny LED circuits, which enabled me to adjust lighting intensity seamlessly. Installing miniature remote-controlled switches further allowed for dynamic lighting scenes, mimicking real-world home automation. Achieving this required understanding the electrical characteristics of dimmers and ensuring compatibility with your power supply. For those interested, advanced guides at home improvement tips can demystify these components. These innovations not only amplify the aesthetic quality of the dollhouse but also deepen the immersive experience for viewers or inhabitants.
What are the most sophisticated challenges you’ve faced when integrating control systems into miniature lighting setups?
Balancing technical complexity with aesthetic subtlety has been a rewarding challenge. Managing multiple control points without cluttering the miniature environment requires meticulous planning and often custom solutions. For instance, I designed miniature control panels hidden within furniture pieces, allowing manual operation without disrupting the scene’s harmony. Incorporating remote control modules or even miniature smart home devices demands a thorough understanding of low-voltage electronics and wireless protocols. Exploring creative control solutions has broadened my capabilities. Sharing these insights with fellow hobbyists fosters a community of innovation, inspiring new ways to bring miniature worlds to life with sophisticated electrical finesse.
Conclusion
Mastering these advanced wiring techniques transforms a simple dollhouse into a miniature masterpiece teeming with realism and functionality. The process demands patience, precision, and a willingness to delve into electrical intricacies, but the results are profoundly rewarding. I encourage you to experiment with custom wiring harnesses, control systems, and voltage management to elevate your projects. Engaging with expert resources and community forums can provide ongoing inspiration and support. Whether you’re creating a cozy cottage or a bustling urban scene, these techniques pave the way for professional-quality miniature lighting that captivates and delights. Dive deeper into these topics and share your experiences—your journey into sophisticated miniature wiring can inspire others to master this intricate art form.
Things I Wish I Knew Earlier (or You Might Find Surprising)
The Power of Planning
One of the most eye-opening lessons I learned was how crucial detailed planning is. Initially, I jumped right into wiring my dollhouse without a clear map, leading to unnecessary confusion and redo. Drawing a comprehensive wiring diagram beforehand saved me countless headaches and made the entire process smoother and more enjoyable.
Choosing the Right Components
Investing in high-quality, miniature-specific electrical components made a huge difference. Cheap LEDs or power supplies can cause flickering or inconsistent lighting, which detracts from the realism. I wish I had known earlier that good components not only enhance appearance but also improve safety and longevity.
The Subtle Art of Concealed Wiring
Concealing wires behind walls or within furniture isn’t just about aesthetics; it’s about creating a believable miniature world. I found that drilling tiny holes and using adhesive channels kept everything tidy and invisible, transforming my project from amateur to professional-looking. It’s a detail I underestimated at first but now swear by.
Testing and Troubleshooting
Early testing of each circuit segment, ideally with a multimeter, can prevent future failures. I learned the hard way that a flickering light often signals a loose connection or insufficient insulation. Developing a systematic approach to troubleshooting has made my wiring more reliable and less stressful.
Advanced Techniques Are Worth the Effort
Once you grasp the basics, exploring advanced wiring techniques like custom harnesses or dimming controls adds a new level of realism. These upgrades can make your miniature scene come alive with subtle lighting effects, elevating your craft from simple illumination to art. I wish I had started exploring these sooner!
Reading about your detailed journey into miniature wiring really resonated with me, especially the part about meticulous planning and drawing wiring diagrams upfront. I’ve found that in my own projects, investing time in proper planning prevents a lot of headaches later. Your tip about using fine gauge wire for discreet routing is also spot on; I once used thicker wire by mistake, making it much harder to hide behind walls. One challenge I’ve faced is balancing ease of access for future tweaks with maintaining a clean look. Have you found any clever tricks for making future adjustments easier without sacrificing aesthetics? Your tips on concealing wiring with paint and tiny clips are very helpful, and I plan to incorporate some of those. I’d love to hear more about how you troubleshoot wiring issues once everything is installed—any particular tools or methods you rely on? Thanks for sharing such an insightful experience; it’s incredibly motivating for those of us wanting to up our game in miniature lighting!
Reading about your extensive experience with miniature wiring really struck a chord with me, especially your emphasis on thorough planning and the importance of detailed wiring diagrams. I completely agree that skipping this step can lead to chaos later on—I once tried to skip this part and ended up rerouting wires multiple times! Your tip about using flexible, thin gauge wire for discreet routing is something I’ll definitely adopt; I’ve also found that securing wires with mini clip fasteners not only keeps things tidy but also makes troubleshooting much easier. On the subject of troubleshooting, I typically use a multimeter for testing continuity and voltage, which helps pinpoint issues quickly before they become big problems. I’m curious—have you experimented with smart switches or remote controls in your wiring setup? I think they could add an exciting level of control, especially for larger projects. Overall, your insights inspire me to refine my methods further. Thanks for sharing your detailed process—it’s motivating for hobbyists like me to elevate our miniature lighting craftsmanship.
I loved reading about your journey into wiring such a detailed dollhouse! It really highlights how patience and careful planning can turn a challenging project into an incredibly rewarding one. I totally agree that drawing wiring diagrams beforehand makes a huge difference; I’ve made the mistake before of jumping straight into wiring without a plan and then spending hours troubleshooting. Your tip about using thin gauge wire for discreet routing is something I’ll keep in mind for my next project — it’s definitely essential for maintaining that realistic look. I’ve found that organizing wires with miniature cable ties not only keeps everything neat but also makes future tweaks much easier. Out of curiosity, have you experimented with different types of switches, like touch-sensitive or remote-controlled ones? I think they could add a whole new level of interactivity and realism. Thanks for sharing your insights — it’s inspiring for DIY hobbyists like me to see how much detail and care you put into every step!
Wow, your detailed walkthrough truly captures the dedication needed for such a meticulous project. I completely agree that planning every step with wiring diagrams is crucial — I once jumped into a project without proper schematics and wasted so much time troubleshooting. Your tip about using thin gauge wire is a game-changer; I’ve used thicker wire before and struggled to hide it behind miniature walls. One challenge I faced was finding the right balance between making the wiring accessible for future tweaks and keeping it out of sight. I’ve started using tiny access panels with magnetic closure, which makes future adjustments much simpler without compromising the aesthetic. Also, I’ve found that color-coding wires during installation helps troubleshoot issues down the line. Have you considered integrating remote-controlled switches or smart lighting systems? They could add another layer of realism and convenience. Thanks for sharing your experience — it’s inspiring and has me eager to improve my own miniature wiring skills.