How I Fell in Love with Arduino and Interactive Toys
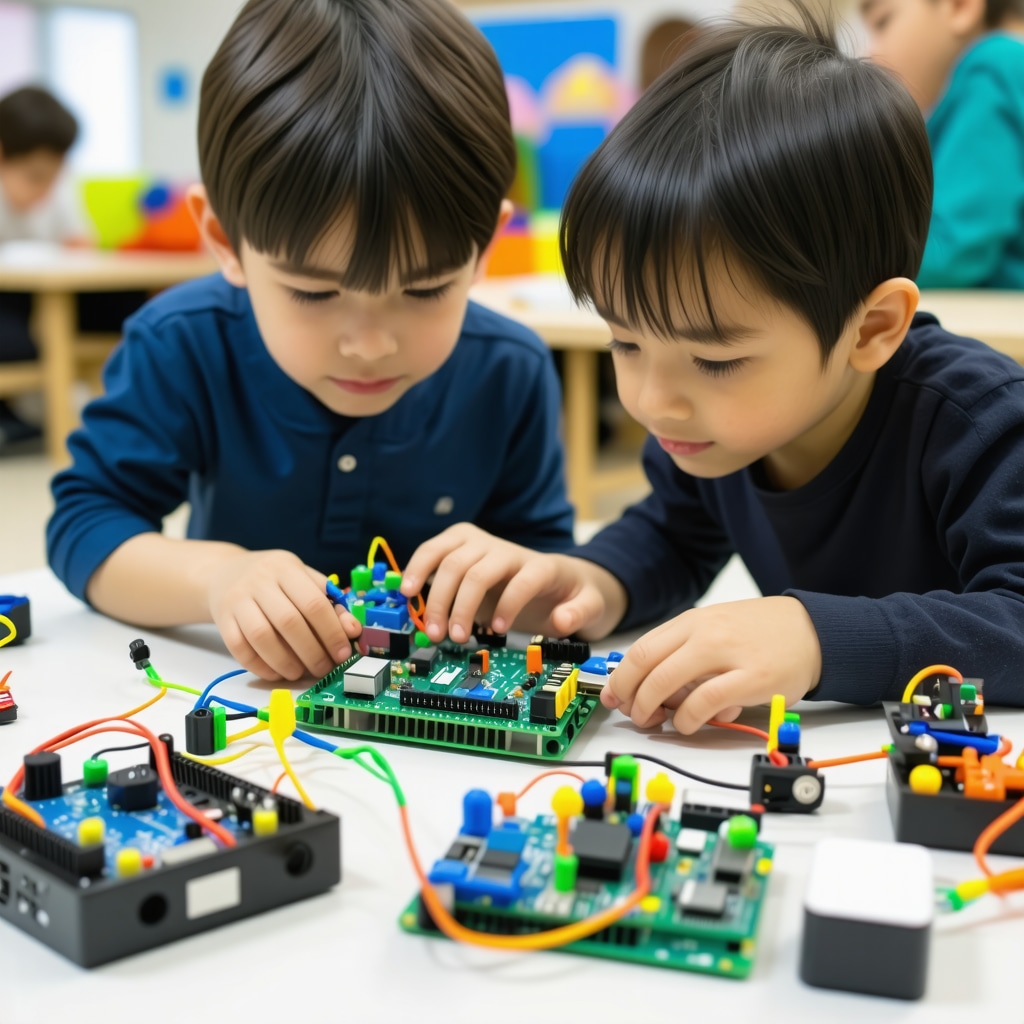
When I first got my hands on an Arduino kit, I was fascinated by its potential to bring electronics to life. But what truly captivated me was the idea of creating interactive toys that could respond to their environment. Integrating sensors into these DIY projects turned out to be not just fun, but a fantastic way to make learning engaging for both kids and adults alike.
Why Sensors Make Arduino Toys So Educational
Adding sensors like ultrasonic, light, or touch sensors transforms ordinary toys into dynamic learning tools. Through my experiments, I discovered that these components encourage problem-solving and critical thinking. For example, a simple distance sensor can teach concepts of measurement and physics in an intuitive way. This hands-on approach aligns with educational philosophies emphasizing experiential learning, which is why I often recommend exploring these projects for learners of all ages.
What Are the Best Sensors to Start With for Arduino Toys?
Many beginners ask me which sensors are ideal for getting started. Based on my experience, ultrasonic sensors are incredibly versatile for measuring distances and triggering actions. Light sensors can create toys that react to ambient brightness, and touch sensors add an interactive element that feels magical when a toy responds to a simple tap. Pairing these sensors with visual or audio feedback makes the learning experience immersive.
Building My First Sensor-Integrated Toy: Lessons Learned
My first project was a small robot that avoided obstacles using an ultrasonic sensor. Initially, I struggled with wiring and coding the sensor inputs correctly, but once I got it right, seeing the robot navigate around objects was thrilling. This experience taught me patience and the value of troubleshooting, skills that are crucial in any DIY tech project. If you want step-by-step guidance, I found the ultimate guide to building Arduino sensor toys incredibly helpful.
How Interactive Arduino Toys Can Inspire the Next Generation
From my perspective, the joy of seeing a toy respond to a child’s actions goes beyond entertainment—it fosters curiosity and a passion for STEM fields. By creating these interactive projects, I’ve witnessed firsthand how kids become more engaged and eager to experiment. This hands-on learning approach is supported by educators worldwide; even resources like Arduino’s official site emphasize the importance of sensor integration in educational kits (Arduino Official Guide).
If you’re inspired to dive into this rewarding hobby, I’d love to hear about your own projects or questions—feel free to share your experiences or ideas in the comments below. For more creative DIY ideas that spark learning and fun, check out engaging DIY projects for all ages.
Delving Deeper into Sensor Selection for Interactive Toys
While ultrasonic, light, and touch sensors are fantastic starting points, expanding your sensor repertoire can unlock more sophisticated interactions. For example, incorporating accelerometers or gyroscopes introduces motion detection capabilities, enabling toys that respond to orientation or shaking. Temperature sensors can add environmental responsiveness, perfect for projects simulating weather effects or monitoring conditions. Choosing the right sensor depends on your learning objectives and the complexity you want to embrace.
How Can Advanced Sensor Integration Elevate the Educational Value of Arduino Toys?
Integrating multiple sensors not only enhances interactivity but also deepens the educational impact by encouraging systems thinking. When learners program a toy to respond to combined sensor inputs—like light intensity and motion—they develop skills in logic design and multi-sensory data interpretation. This complexity mirrors real-world engineering challenges, offering a more authentic STEM experience. Moreover, troubleshooting sensor fusion fosters resilience and critical analysis.
For those interested in exploring sensor fusion techniques and more advanced coding strategies, resources such as Arduino’s official tutorial on sensor fusion provide authoritative guidance and practical examples.
Challenges and Solutions in Sensor-Based Toy Development
One common challenge in sensor integration is managing signal noise and ensuring reliable readings. For instance, ultrasonic sensors can sometimes produce erratic distance measurements due to environmental interference. Implementing software filtering techniques, such as averaging multiple readings or using median filters, can significantly improve stability. Additionally, calibrating sensors before deployment is crucial to maintain accuracy over time.
Another hurdle is power management, especially for mobile or battery-operated toys. Efficient coding to minimize sensor polling frequency and utilizing low-power sensor modes can extend battery life, making your projects more practical and user-friendly.
Incorporating Visual and Audio Feedback for Immersive Interaction
Complementing sensor inputs with immediate feedback mechanisms like LEDs, buzzers, or small displays can create a more engaging user experience. For example, a toy that lights up or plays a sound when a touch sensor is activated reinforces cause-and-effect learning. Combining these feedback elements with sensor data visualization tools can also help learners understand sensor behaviors and debug their projects more effectively.
Consider exploring smart DIY ideas for everyday problems to integrate creative feedback solutions into your Arduino projects.
Encouraging Creativity Beyond the Circuit Board
While the electronics are the heart of these interactive toys, the physical design and aesthetics play a vital role in user engagement. Experimenting with materials like wood, fabric, or recycled objects can personalize projects and teach interdisciplinary skills spanning crafting and engineering. Resources such as unique DIY crafts for home decor showcase imaginative ways to integrate electronics into everyday objects.
By blending technical skills with artistic creativity, makers can produce toys that captivate both the mind and the senses, inspiring continuous exploration.
If you’ve tackled advanced sensor integration or crafted unique interactive toys, please share your insights or questions in the comments. Your experiences enrich our community and inspire others to push the boundaries of DIY electronics.
When Projects Take Unexpected Turns: Embracing the Learning Curve
One of the most memorable experiences I’ve had with Arduino sensor projects was when my carefully planned interactive toy suddenly behaved unpredictably. After hours of coding and wiring, the robot I built started to respond erratically to its environment. Instead of frustration, I found myself fascinated by this challenge. Debugging sensor behavior pushed me deeper into understanding not just how sensors work, but also the quirks of real-world applications.
It taught me that sensor data isn’t always perfect; environmental factors like lighting, surface texture, or electrical noise can influence readings. This realization inspired me to explore software techniques like signal smoothing and sensor calibration, which transformed my projects from simple prototypes to reliable, enjoyable toys. If you want to explore these techniques yourself, you might find the advanced troubleshooting methods helpful for developing patience and precision.
How Do You Balance Technical Complexity with Playfulness in Arduino Toys?
This question often comes up in conversations with fellow makers and educators. From my personal journey, I’ve found that striking the right balance is less about limiting complexity and more about layering it thoughtfully. For beginners, simple sensors paired with clear, immediate feedback can spark engagement and confidence. As skills grow, adding layers like sensor fusion or conditional logic enriches the experience without overwhelming.
For example, combining a motion sensor with sound feedback in a toy can create a delightful surprise that’s easy to understand yet showcases advanced coding skills. This tiered approach ensures that toys remain playful and accessible while progressively introducing more sophisticated concepts. Arduino’s official resources (Arduino Sensor Fusion Tutorial) reflect this philosophy by guiding learners step-by-step through complex integrations.
The Art and Science of Sensor Calibration: A Personal Exploration
Calibration might sound technical, but I’ve come to see it as a creative process that deepens your connection to your project. Early on, I underestimated how much a sensor’s accuracy depends on environment and setup. I once built a light-sensitive toy that behaved differently in my workshop than in my living room. It was a humbling reminder that sensors perceive their surroundings uniquely.
By methodically adjusting thresholds and testing under different conditions, I learned to tailor the sensor’s “perspective”. This practice not only improved my toys’ reliability but also sharpened my observational skills and patience. For makers wanting to dive deeper, understanding calibration aligns with engineering principles and is well-covered in detailed guides like those on step-by-step DIY tutorials.
Connecting Electronics with Emotion: Designing Toys That Feel Alive
Beyond technical specs, the magic of interactive toys lies in their ability to feel alive. When a toy responds to a child’s touch or movement, it creates a moment of wonder that transcends circuits and code. I often experiment with subtle feedback—like dimming an LED gradually or varying a buzzer’s tone—to mimic lifelike responses.
This blending of technology and psychology fascinates me. It’s a reminder that our creations are not just machines but potential companions or teachers. Exploring this dimension encourages me to design projects that invite empathy and curiosity, aspects that go hand-in-hand with STEM learning. If you’re curious about adding emotional nuance to your projects, exploring creative crafts that blend art and tech can be inspiring.
I invite you to share your own stories of challenges or breakthroughs in sensor-based projects. Your unique experiences not only enrich this community but also inspire others to embrace the beautiful complexities of DIY electronics.
Sensor Synergy: Crafting Multi-Dimensional Interactions in Arduino Toys
As I ventured deeper into Arduino projects, I realized that the real magic happens when multiple sensors collaborate harmoniously, creating complex, multi-dimensional interactions. This sensor synergy transforms a simple toy into an immersive experience that adapts intuitively to its environment. For instance, combining accelerometers with temperature sensors allowed me to build a toy that not only reacted to motion but also adjusted its behavior based on ambient warmth, simulating a living creature’s responsiveness.
Achieving this level of sophistication demands a nuanced understanding of signal processing and timing coordination—skills that transcend beginner tutorials. It’s fascinating how layering sensor inputs cultivates a holistic sensory perception akin to human experience, an insight I gleaned from studying advanced embedded system designs. Integrating these principles has enabled me to design toys that challenge users to think critically about cause and effect, feedback loops, and environmental context.
How Can I Optimize Sensor Fusion Algorithms for Real-Time Arduino Toy Responses?
This question often arises among makers eager to push their projects beyond rudimentary interactions. From my hands-on experience and further research, optimizing sensor fusion revolves around balancing computational efficiency with accuracy. Implementing complementary filters or Kalman filters can dramatically refine data interpretation, smoothing out noise while preserving responsiveness. While these algorithms may seem daunting initially, Arduino’s rich ecosystem offers libraries and frameworks that simplify their deployment.
Diving into authoritative resources such as the IEEE embedded systems journal has been instrumental in deepening my grasp of these techniques. For those who want to explore practical implementations alongside theoretical foundations, Arduino’s official sensor fusion tutorial remains an invaluable starting point, bridging complex concepts with accessible code examples.
Embracing the Intricacies of Power Management in Sensor-Rich Toys
One aspect that often goes underappreciated is the intricate dance of power management when integrating numerous sensors. Early in my journey, I encountered frequent battery drain issues that hampered the playability of my creations. This challenge urged me to adopt advanced strategies such as duty cycling sensors, implementing sleep modes, and optimizing code to minimize active sensor polling. Such practices not only prolonged battery life but also improved the toy’s overall reliability and user satisfaction.
Power considerations also influence hardware choices; selecting low-power sensor variants and efficient microcontrollers can make a significant difference. To this end, exploring smart DIY innovations for modern living has been eye-opening, revealing how thoughtful design transcends mere functionality and impacts sustainability. Resources like smart DIY innovative solutions provide creative insights into balancing performance with energy efficiency, a lesson vital for any serious maker.
Fostering a Culture of Experimentation and Iteration in Advanced Projects
As projects grow more elaborate, embracing an iterative mindset becomes essential. I found that documenting each sensor’s behavior under varying conditions and systematically tweaking parameters led to breakthroughs that a linear approach might miss. This culture of experimentation nurtures resilience and agility, qualities that are indispensable when navigating the unpredictable terrains of sensor-based design.
Moreover, sharing your evolving journey fosters community growth and cross-pollination of ideas. If you’re tackling intricate sensor integrations or developing bespoke interactive toys, I warmly invite you to connect and exchange insights through our community platform. Your experiences enrich the collective knowledge and inspire innovative leaps beyond the ordinary.
Things I Wish I Knew Earlier (or You Might Find Surprising)
The Joy of Imperfection in Sensor Data
When I first started, I expected sensors to be flawless storytellers of their environment. What surprised me was how much “noise” and variability they introduced. Instead of frustration, embracing these quirks opened a new dimension of learning — teaching me to appreciate the subtle art of calibration and filtering as part of the creative process.
Complexity Doesn’t Have to Mean Confusion
It’s tempting to think advanced sensor fusion or multi-sensor setups are only for experts. But layering complexity gradually, like adding a new sensor or feedback element one step at a time, keeps the process playful and accessible. This approach helped me keep my projects engaging without feeling overwhelmed.
Physical Design Shapes Emotional Connection
Electronics can be fascinating, but it’s often the toy’s look and feel that make it truly captivating. Crafting with diverse materials like wood or fabric made my projects feel more alive and invited users to connect emotionally, turning a simple circuit into a cherished companion.
Power Management Is a Hidden Hero
Early on, I underestimated how important efficient power use would be. Battery life impacts playtime, portability, and overall satisfaction. Learning to optimize sensor polling and explore low-power modes transformed my projects from short-lived demos into practical, everyday toys.
Sharing Challenges Builds Community
Every hiccup or unexpected behavior felt isolating until I shared my experiences and read others’ stories. This exchange not only offered solutions but also motivated me to keep experimenting. If you’re diving into sensor-based Arduino toys, find or build your community—it’s invaluable.
Resources I’ve Come to Trust Over Time
Arduino’s Official Guide and Tutorials (https://www.arduino.cc/en/Guide/HomePage) have been my go-to for reliable, well-explained fundamentals and advanced concepts like sensor fusion. Their step-by-step tutorials helped me bridge theory and practice smoothly.
The Ultimate Guide to Building Arduino Sensor Toys for Learning (https://en.diykutak.com/ultimate-guide-to-building-arduino-sensor-toys-for-learning) offers practical, beginner-friendly projects that sparked many of my first successes and inspired me to try more complex integrations.
Smart DIY Innovative Solutions for Modern Living (https://en.diykutak.com/smart-diy-innovative-solutions-for-modern-living) broadened my perspective on power management and efficiency, helping me design toys that are both clever and sustainable.
Creative Solutions for Home Decor: Unique DIY Crafts to Try (https://en.diykutak.com/creative-solutions-for-home-decor-unique-diy-crafts-to-try) inspired me to blend electronics with art, reminding me that playfulness shines brightest when technology meets creativity.
Our Community Platform (https://en.diykutak.com/contact-us) has been a treasure trove of shared knowledge and encouragement, proving that collaboration is key in the maker journey.
Parting Thoughts from My Perspective
Exploring Arduino sensor toys has been more than a hobby; it’s a joyful journey of discovery that blends technology, creativity, and education. The magic lies not just in the sensors or code, but in the moments when a toy responds unexpectedly, sparking curiosity and wonder. For anyone eager to dive into this world, remember that patience, experimentation, and a willingness to embrace imperfection are your best tools.
If this resonated with you, I’d love to hear your thoughts or stories. Feel free to share your experiences or questions in the comments below. And if you’re looking for more inspiration, don’t miss the engaging DIY projects for all ages to keep your creative spirit thriving.
I really connect with your story about falling in love with Arduino through creating interactive toys that respond to their environment. When I started with electronics, I too underestimated the impact sensors could have on transforming a static project into something engaging and educational. Your point about ultrasonic sensors teaching measurement and physics intuitively resonates with me; I built a simple obstacle-avoidance car using one, and seeing it navigate obstacles while teaching basic physics concepts was rewarding. I also found that incorporating simple touch sensors with LED feedback captivated younger kids, making the learning process feel like play rather than work.
What I’m curious about is how others approach balancing the technical aspects with making toys still fun and accessible, especially for younger learners who might get frustrated with complexity. Have you or others found strategies to introduce layering complexity while keeping the magic and simplicity intact? I imagine blending the coding and tactile design thoughtfully can be a fine art itself. Glad to see your emphasis on troubleshooting patience too – that’s where real learning happens! Looking forward to hearing about others’ experiences with this balance.
Great question, Jessica — I’ve wrestled with the same balance and found a few practical approaches that keep the playfulness alive while easing in complexity. First, start with a “play-first” prototype: one sensor (touch or light) plus immediate, obvious feedback (an LED or sound). Let kids explore that before introducing any code changes. Second, use layered learning — provide a simple block-based interface (MakeCode/Scratch) for early tweaking, then offer the raw Arduino sketch as a challenge for older kids.
Modularity helps a lot: plug-and-play sensor shields or labelled jumper wires hide wiring complexity until learners are ready. I also add a physical mode switch on toys (Play / Tinker) so the toy behaves reliably for younger users but opens up parameters for curious learners. Make troubleshooting a game — a quick “sensor detective” checklist or visible data (serial plotter or simple bar LEDs) turns debugging into discovery rather than frustration.
Finally, craft and story matter: giving a toy a personality makes simple behaviours feel magical. Has anyone tried staged challenge cards or a badge system to reward each layer of learning? Would love to hear what’s worked in classrooms or at home.
Reading this post really inspired me to push my own Arduino projects further, especially in creating more interactive and educational toys. I completely agree that sensors like ultrasonic or touch sensors can make learning more engaging by turning static objects into dynamic experiences. One thing I’ve found particularly helpful is adding sensory feedback with simple LEDs or sounds, which makes the interaction more natural and exciting for kids.
A challenge I often face is how to incorporate multiple sensors without overcomplicating the project or making it overwhelming for beginners. Have others here experimented with layered approaches where you start simple and then add complexity gradually? I love the idea of using switches or mode selectors to let the user choose between beginner and advanced modes—this keeps the fun factor high while providing room to grow.
What are some creative ways you’ve seen or used to keep these projects playful yet educational? Looking forward to hearing your strategies and stories about balancing functionality with fun in Arduino toy design.
Your insights into the integration of sensors in Arduino toys really resonate with my own experiences. I’ve found that starting with simple, tangible feedback—like LEDs or buzzers—can make a huge difference in keeping both kids and beginners engaged. It’s interesting how you mention the importance of storytelling and personality in these projects; I believe that creating a narrative or character with your toy can spark even greater curiosity and emotional connection. I’ve experimented with combining sound effects and changing LED patterns to give toys a sense of