Discovering My Passion for Miniature Room Boxes
As someone who has always been fascinated by architecture and tiny details, I vividly remember the first time I tried creating a miniature room box. It was a small project inspired by my love for historical buildings and the challenge of capturing intricate details in a tiny space. That initial attempt ignited a passion that has only grown stronger over the years, leading me to explore the art of miniature room boxes with a focus on architectural authenticity and realistic furnishings.
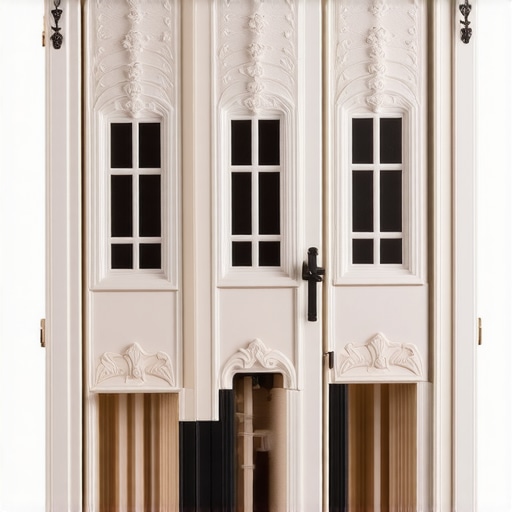
What Makes a Miniature Room Box Truly Captivating?
In my experience, the magic of a well-crafted miniature room box lies in the details. When I design these tiny worlds, I pay close attention to architectural features such as ornate moldings, period-specific fixtures, and authentic textures. Incorporating realistic furnishings, from miniature bookshelves to tiny vintage chairs, adds depth and personality to the scene. I often draw inspiration from real buildings, studying architectural plans and photographs to ensure accuracy. For a thorough guide, I recommend checking out this step-by-step DIY guide to learn how to build detailed miniature structures.
My favorite materials and techniques for miniature furnishings
I find that using a variety of materials like polymer clay, balsa wood, and tiny fabric scraps allows me to create realistic furniture and accessories. One technique I swear by is layering paint and applying tiny decals to mimic textures like wallpaper or upholstery. For example, I once crafted a miniature Victorian-style sofa using fine fabric and detailed carving, which truly brought the scene to life. Experimenting with different textures and finishes helps me achieve a more authentic look, making the miniature environment believable and engaging.
How do I approach designing architectural details?
I usually start by sketching the architectural elements I want to include, such as window casings, doorframes, and cornices. Precision is key, so I often use magnifying tools and detailed templates. I also enjoy incorporating period-specific features, like stained glass or decorative brackets, which I research thoroughly. To add both realism and a personal touch, I sometimes incorporate tinyLED lighting to highlight architectural features, creating a dynamic visual effect. For inspiration, I frequently explore online resources and historical archives, which help me refine my designs and ensure accuracy.
What are some common challenges when creating miniature room boxes, and how do I overcome them?
One challenge I faced early on was maintaining scale and proportion, especially when crafting tiny furniture. It required patience and a steady hand, but I learned to work slowly and double-check measurements. Another obstacle was achieving realistic textures, which I addressed by experimenting with different paints and surface treatments. If you’re interested in enhancing your skills, I recommend exploring DIY projects for beginners that focus on miniature crafting techniques.
If you’re passionate about miniature art or considering starting your own project, I encourage you to share your experiences or ask questions in the comments below. Creating miniature room boxes is a rewarding journey filled with endless possibilities!
Enhancing Architectural Authenticity in Your Miniature Creations
As enthusiasts delve deeper into miniature artistry, understanding how to accurately replicate architectural details becomes essential. From ornate moldings to period-specific fixtures, authentic architectural elements elevate the realism and charm of miniature room boxes. To achieve this, I often study real buildings through detailed photographs and architectural plans, which provide invaluable insights into scale and design nuances. Incorporating elements like tiny stained glass windows or decorative brackets requires both patience and precision, but the visual payoff is well worth the effort. For a comprehensive approach, check out this step-by-step DIY guide that covers detailed miniature building techniques.
Materials and Techniques for Realistic Architectural Features
Creating convincing architectural details involves selecting the right materials and mastering various techniques. Polymer clay is excellent for sculpting intricate moldings or decorative ornaments, while balsa wood can be cut and shaped into window frames and cornices. I often layer paints to mimic textures like stucco or stone, adding tiny decals for authenticity. Experimenting with surface treatments, such as dry brushing or patinas, helps bring aged or weathered appearances to life. For example, I once crafted a miniature Victorian facade, utilizing textured paper and fine carving to replicate intricate woodwork, which added a layer of depth and realism. If you’re eager to expand your skills, explore creative DIY crafts that teach advanced surface techniques.
How Do Experts Approach the Challenge of Scale and Proportion?
Maintaining accurate scale and proportion is arguably the most complex aspect of miniature architecture. I recommend beginning with detailed sketches and templates, then verifying measurements at every step. Using magnifying tools and fine detail brushes can help perfect tiny features without sacrificing precision. Additionally, understanding the historical context of the architectural style you wish to replicate ensures that your details are not only proportionally correct but also stylistically authentic. Incorporating period-specific fixtures like tiny stained glass or decorative brackets involves thorough research, often consulting online archives or historical references. For inspiration and practical tips, consider exploring advanced origami techniques that can inform complex structural detailing in miniature projects.
What Are Some Common Pitfalls in Architectural Miniature Crafting, and How Can You Avoid Them?
One frequent mistake is overloading tiny structures with too many elements, which can make scenes appear cluttered and detract from realism. To avoid this, I focus on selecting a few key architectural features that define the style and scale back on extraneous details. Another challenge is achieving textures that convincingly mimic real materials; experimenting with different paints, surface treatments, and decals is crucial. Patience and meticulous measurement are vital—rushing can lead to inaccuracies and uneven details. For those looking to refine their craftsmanship, I recommend exploring DIY projects for beginners that emphasize foundational miniature building skills.
If you’re passionate about miniature architecture or want to share your insights, I invite you to comment below or suggest reading more about advanced miniature construction techniques. The journey of mastering detailed architectural miniatures is endless and deeply rewarding!
Embracing the Complexity of Architectural Details
As I delved deeper into the art of miniature architecture, I realized that capturing authentic architectural nuances is both a challenge and a rewarding pursuit. The minute details, such as tiny beveled window sills or delicate cornices, require not only precision but also an understanding of the architectural style I aim to replicate. My journey involved countless hours studying old photographs, blueprints, and even visiting historical sites virtually. This meticulous research opened my eyes to subtle design elements that breathe life into miniature scenes.
Refining Material Use for Architectural Realism
Over time, I experimented with a broader palette of materials. Polymer clay remains my go-to for sculpting intricate moldings, but I’ve found that combining it with fine paper or textured surfaces can produce remarkably realistic effects. For example, using textured paper painted with dry brushing techniques simulates aged stucco or stone surfaces beautifully. Layering surface treatments, such as applying patinas or weathering powders, further enhances the aged authenticity of miniature facades. If you’re eager to elevate your craftsmanship, exploring advanced surface techniques through resources like encaustic painting tutorials can provide valuable insights.
How Do I Tackle the Challenge of Scale and Proportion?
Maintaining accurate scale and proportion remains my most intricate task. I’ve learned that starting with detailed sketches and employing precise templates helps set a solid foundation. Using magnifying tools allows me to work on tiny features without sacrificing accuracy. One trick I adopted was creating a miniature ‘style guide’ for each project, listing key proportions and stylistic elements based on the period I’m modeling. This approach helps keep every element in harmony, preventing the scene from looking cluttered or disproportionate. For those interested in mastering complex structures, I recommend exploring advanced origami techniques to understand how folding and structural integrity can inform miniature architectural design.
What Are Some Hidden Nuances That Elevate Miniature Architectural Detail?
One subtlety I’ve embraced is the use of lighting to accentuate architectural features. Installing tiny LED lights inside window recesses or under eaves can create shadows and highlights that mimic real-world depth. Additionally, paying attention to the minutiae of wear and aging—like chipped paint or moss growth—can transform a pristine model into a convincing relic. These details often escape the casual observer but make a significant difference in realism. For example, I once added tiny moss patches made from green flocking to a miniature Victorian facade, which completely elevated the scene’s authenticity. If you’re interested in exploring innovative lighting or aging techniques, consider browsing smart DIY solutions for inspiration.
In my ongoing journey, I’ve come to appreciate that mastery in miniature architecture is a blend of art, science, patience, and a deep respect for historical accuracy. I love sharing these insights because I believe that the more we exchange tips and techniques, the richer our creative community becomes. I invite you to share your experiences or ask questions—perhaps your challenge is different, but together, we can find innovative solutions. Feel free to explore more about advanced techniques and creative projects on my blog or through related DIY guides, which continuously inspire my work and help me push the boundaries of miniature craftsmanship.
Exploring the Subtle Art of Architectural Authenticity in Miniature Creations
Delving into the world of miniature architecture, I’ve found that capturing the nuanced details of period-specific buildings elevates the realism of my miniature room boxes. From tiny beveled window sills to intricate cornices, each element demands a meticulous approach rooted in thorough research and refined craftsmanship. My process involves studying architectural blueprints and historical photographs, which serve as invaluable resources for understanding proportions, materials, and stylistic nuances. For instance, replicating a Victorian facade requires attention to elements like ornate brackets and textured surfaces, often achieved through layered materials and specialized painting techniques. To deepen your understanding, I recommend exploring encaustic painting tutorials that teach advanced layering and surface treatments, perfect for replicating aged textures authentically.
Innovative Material Strategies for Architectural Realism
Over the years, I’ve experimented with a broad spectrum of materials to mimic real-world textures convincingly. Polymer clay remains my primary choice for sculpting detailed moldings, but I often combine it with textured paper or lightweight plaster for larger surfaces. Layering paints with dry brushing and applying micro-decal techniques allow me to simulate aged stucco, worn stone, or weathered wood with remarkable fidelity. A recent project involved creating a miniature stone archway where I used finely crushed textured paper painted with a dry brush to add depth and realism. Advanced surface techniques, such as applying patinas or weathering powders, further enhance aged appearances. For those eager to elevate their craftsmanship, exploring creative DIY crafts can provide innovative ideas for surface treatments and material blending.
Addressing the Challenges of Scale and Proportion with Precision
Ensuring accurate scale and proportion remains one of the most complex facets of miniature architecture. My approach involves starting with detailed sketches and creating templates that serve as guides throughout the building process. I utilize magnifying glasses and precision tools to work on tiny features, ensuring every element aligns harmoniously. Developing a ‘style guide’ for each project, noting specific proportions and stylistic cues based on the architectural period, helps maintain consistency and authenticity. In some instances, I incorporate advanced origami-inspired techniques to understand complex structural folds and supports, which informs my miniature structural detailing. For further inspiration, I recommend exploring advanced origami methods that can enhance your understanding of complex structural forms in miniature design.
What Are Hidden Nuances That Can Truly Transform Your Miniature Architectural Scenes?
One subtle yet impactful technique I’ve embraced is strategic lighting. Installing tiny LED lights within window recesses or beneath eaves creates shadows and highlights that mimic natural sunlight, adding depth and dimension. Additionally, paying attention to minute wear—such as chipped paint, moss patches, or dirt streaks—can turn a pristine model into a convincing relic. For example, I used green flocking to simulate moss on a weathered stone wall, which dramatically increased its authenticity. Incorporating these nuanced details requires patience and a keen eye, but the visual payoff is worth every effort. If you’re interested in exploring innovative lighting or aging techniques, consider browsing smart DIY solutions for modern enhancements.
In my ongoing journey, I’ve realized that mastery in miniature architecture is a harmonious blend of artistic intuition, scientific precision, and historical accuracy. Sharing these insights helps foster a community of passionate enthusiasts eager to push creative boundaries. I invite you to share your experiences or ask questions—together, we can discover new techniques and refine our craft. For more advanced insights, visit my blog or explore related DIY guides that continue to inspire my work and that of others in this intricate art form.
Things I Wish I Knew Earlier (or You Might Find Surprising)
The Power of Patience
One of the most surprising lessons I learned was how essential patience is when working on tiny details. Rushing often leads to mistakes, and I used to get frustrated when my miniature structures didn’t turn out perfectly. Over time, I realized that taking my time and paying close attention to every small element made a huge difference in achieving realistic results.
The Value of Research
Deep research into architectural styles and historical context can elevate your miniature projects from good to extraordinary. I once tried to replicate a Victorian facade without much study, and it showed. Once I started studying blueprints and old photographs thoroughly, the authenticity of my work improved dramatically, making the miniature scenes much more convincing.
Material Versatility
Experimenting with different materials like polymer clay, textured paper, and tiny fabrics opened up new possibilities. I was amazed at how combining these materials could mimic real textures such as stone, wood, or plaster. This experimentation not only improved my craftsmanship but also made the process more enjoyable and creatively fulfilling.
Lighting as a Game-Changer
Incorporating tiny LED lights into my miniature scenes added depth and realism that were previously missing. Shadows and highlights created by lighting made architectural details pop, giving the scene a dynamic, lifelike feel. It was a game-changer that transformed my miniature projects into captivating displays.
Attention to Wear and Aging
Adding subtle signs of aging—like chipped paint, moss patches, or weathered surfaces—can turn a pristine model into a convincing relic. These small touches require patience but pay off by making the scene more authentic and engaging for viewers.
Embracing Mistakes as Learning Opportunities
Early on, I made many mistakes, but I soon realized each error was a chance to learn and improve. Embracing imperfections and learning from them helped me develop my skills faster and made the journey more rewarding.
Resources I’ve Come to Trust Over Time
- DIYKutak’s Step-by-Step Guides: An invaluable resource for detailed miniature building techniques, especially for beginners and advanced crafters alike. I often revisit their tutorials to refine my skills.
- Architectural Blueprints and Historical Archives: Studying original blueprints and historical photos has been crucial in understanding authentic details. I highly recommend exploring online archives for inspiration and accuracy.
- Miniature Craft Communities: Online forums and social media groups provide support, inspiration, and feedback from fellow enthusiasts. They’ve helped me stay motivated and learn new tips.
- Painting and Surface Technique Tutorials: Resources like encaustic painting tutorials have expanded my surface treatment repertoire, allowing me to replicate aged textures convincingly.
Parting Thoughts from My Perspective
Reflecting on my journey with miniature architecture, I realize how much there is to discover and master. The most valuable lesson is that patience, research, and experimentation are key to creating authentic, captivating scenes. Every project is an opportunity to learn something new, and sharing experiences within the creative community only enriches our craft. If this resonates with you, I’d love to hear your thoughts or stories about your own miniature adventure. Feel free to share this with someone who might find it inspiring, and keep nurturing your passion for miniature art!