Discovering the Charm of Restored Cast Iron Bathtubs
When I first decided to breathe new life into my old bathroom, I was drawn to the timeless elegance of cast iron bathtubs. My journey started with a simple idea: to transform a neglected fixture into a stunning centerpiece. Little did I know, this DIY project would become one of the most rewarding experiences in my home improvement adventures.
Getting Started: Assessing the Condition and Gathering Supplies
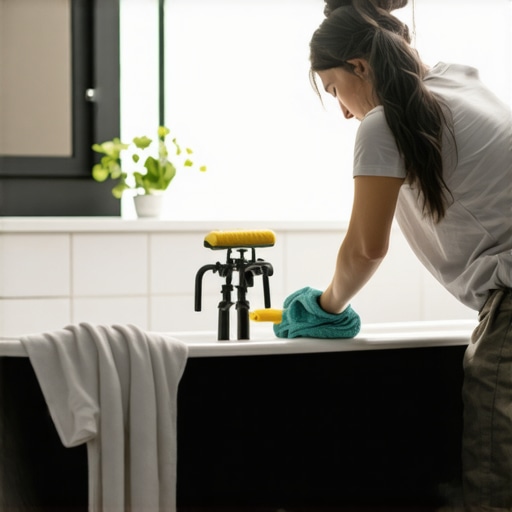
Before diving into restoration, I carefully examined the bathtub’s condition. It was crucial to identify rust spots, chips, or cracks. I learned that a thorough cleaning and removal of old paint or enamel is essential—this is where patience and the right tools, like a wire brush and chemical stripper, come into play. For supplies, I gathered sandpaper, rust remover, epoxy primer, and high-quality enamel paint, inspired by expert recommendations from sources like home improvement tips.
The Art of Sanding and Surface Preparation
Preparing the surface was perhaps the most labor-intensive part. I wore a mask and gloves to stay safe while sanding away rust and old paint. Achieving a smooth, clean surface is vital for a durable finish. I found that using fine-grit sandpaper and a steady hand made all the difference. Proper preparation not only improves adhesion but also ensures that the final look is sleek and professional.
Painting and Sealing: Achieving a Flawless Finish
Applying the epoxy primer followed by enamel paint was a delicate process. I opted for a spray gun for an even coat, which I learned from detailed tutorials on step-by-step DIY guides. Multiple thin coats, with adequate drying time, resulted in a glossy, resilient surface. Sealing the paint with a clear coat added extra protection against everyday wear and tear.
Is Restoring a Cast Iron Bathtub Worth the Effort?
What are the real benefits of DIY bathtub restoration compared to replacement?
In my experience, restoring your cast iron tub is incredibly satisfying and cost-effective. It preserves the vintage charm and adds character to your bathroom. Additionally, it’s eco-friendly—reducing waste and avoiding the environmental impact of new manufacturing. The process also gave me a sense of accomplishment, knowing I transformed a forgotten piece into a stunning feature.
If you’re considering a similar project, I recommend exploring guides like home decor ideas to get inspired. Remember, patience and careful preparation are your best friends in this journey. Don’t hesitate to share your experiences or ask questions in the comments—I love hearing from fellow DIY enthusiasts!
Unlocking the Secrets of Professional-Grade Bathtub Restoration
Restoring a cast iron bathtub to its former glory involves a blend of art and science. As an experienced DIY enthusiast, I’ve learned that mastering surface preparation is fundamental. Achieving a smooth, rust-free base not only enhances adhesion but also sets the stage for a flawless finish. Many professionals advocate for meticulous sanding and rust removal, often using a combination of chemical rust removers and fine-grit sandpaper. This ensures that the primer bonds securely, preventing future deterioration. For those looking to take their skills further, exploring comprehensive guides such as step-by-step DIY guides can elevate your project from amateur to pro-level.
The Nuances of Applying Durable, Eco-Friendly Finishes
Once the surface is prepared, choosing the right paint and sealant is crucial. I recommend high-quality epoxy primers combined with eco-friendly enamel paints, which are both durable and environmentally conscious. Using specialized tools like spray guns can help achieve an even coat, minimizing drips and brush marks. Multiple thin coats, with proper drying intervals, are essential for a glossy, resilient surface that withstands daily use. Sealing with a clear, UV-resistant topcoat further prolongs the lifespan of your restoration, keeping your bathtub looking pristine for years. For a detailed walkthrough, consider consulting home decor ideas for inspiring finishing techniques.
Balancing Aesthetics and Practicality in DIY Restoration Projects
One of the most rewarding aspects of restoring a cast iron bathtub is the ability to customize the look. Whether you prefer a classic glossy white or a bold, modern hue, the right paint can dramatically transform your space. It’s worth investing in high-quality, heat-resistant, and chemical-resistant finishes to ensure longevity. Additionally, I’ve found that sealing edges and corners with painter’s tape helps prevent paint bleed and ensures clean lines. This attention to detail not only results in a professional appearance but also adds to the durability of your work. Curious about innovative techniques? Exploring advanced surface coatings or eco-friendly paint options can give your project a unique edge. For creative inspiration, check out creative DIY crafts to elevate your bathroom aesthetics.
Can DIY Restoration Match Professional Results?
What are the key factors that influence the final look and durability of a DIY cast iron tub?
Achieving professional results depends heavily on preparation, material selection, and patience. Proper cleaning and rust removal set the foundation, while meticulous application of primers and paints ensures resilience. Environmental factors like humidity and temperature during curing also play a role in the final appearance. In my experience, following detailed tutorials and sourcing quality products, such as those recommended by experts in home improvement tips, can lead to impressive outcomes. Remember, setbacks are part of the process—scratches or uneven coats can be corrected with additional sanding and touch-ups. Your commitment to detail can make a DIY project indistinguishable from professional work, especially when you embrace the learning process and seek inspiration from seasoned DIYers.
If you’re eager to expand your skills further, exploring related projects like upcycling ceramics or creating custom eco-friendly home accents can broaden your creative horizons. Don’t forget to share your experiences or ask questions—your insights can inspire others on similar DIY journeys!
Reflecting on my journey through bathtub restoration, I realize that each project reveals new layers of complexity and opportunity for personal growth. One of the most intriguing aspects is understanding how surface preparation impacts long-term durability, especially when tackling older, vintage cast iron tubs that have endured decades of use. In my experience, meticulous rust removal combined with advanced sealing techniques can dramatically extend the lifespan of your restoration, turning a worn fixture into a statement piece that last for years. I’ve found that integrating eco-friendly paints not only benefits the environment but also enhances the richness of the final finish, adding a layer of sophistication that DIY enthusiasts often overlook.
To elevate my skills further, I delved into professional-grade surface treatments, such as modern chemical rust removers that work faster and cleaner than traditional methods. These tools, paired with high-quality epoxy primers, create a resilient base, capable of resisting daily wear and tear. From my perspective, mastering these nuanced steps is crucial for achieving that flawless, mirror-like sheen that rivals professional restorations. For anyone considering a similar project, I highly recommend exploring detailed tutorials on step-by-step DIY guides—they provide invaluable insights into advanced techniques that can make all the difference.
What are the deeper considerations when choosing eco-friendly finishes for a vintage cast iron bathtub?
Choosing eco-friendly finishes involves balancing environmental responsibility with durability and aesthetics. In my research and practice, I’ve learned that high-quality epoxy primers with low VOC emissions are essential, as they form a strong bond without releasing harmful fumes. When selecting enamel paints, I look for products specifically formulated for bathroom fixtures—these are resistant to moisture, heat, and chemical exposure. Interestingly, some eco-friendly options incorporate natural resins or earth-based pigments, which can impart unique color qualities and textures that traditional paints can’t match. Exploring resources like natural earth pigments has opened new creative avenues for me, blending sustainability with artistic expression.
If you’re passionate about eco-conscious DIY, I encourage sharing your experiences or questions in the comments. It’s inspiring to see how small choices in materials can contribute to a more sustainable home environment, and I’m always eager to exchange insights with fellow enthusiasts.
How can advanced finishing techniques transform the final aesthetic of a restored bathtub?
Advanced finishing techniques, such as multi-layered glazing or specialized sealing, can elevate the visual appeal and tactile quality of your restoration. I’ve experimented with applying a thin, transparent glaze over the enamel paint, creating a subtle depth and sheen that catches light beautifully—this technique is often used in professional restorations. Additionally, employing UV-resistant topcoats not only prolongs the lifespan but also preserves the vibrant colors and gloss for years to come. These details, though seemingly minor, make a significant difference in achieving a luxurious, high-end look that truly mimics professional craftsmanship. For those seeking inspiration, exploring home decor ideas can spark ideas for creative finishing touches that personalize your space.
As I continue to refine my skills, I realize that patience and attention to detail are my best tools. Every scratch, every layer of paint, and every sealant application is part of a larger artistic process—one that rewards persistence and passion. If you’re contemplating your own restoration project, remember that each step, from surface prep to final seal, offers a chance to learn and create something uniquely yours. I encourage you to share your progress or ask questions—your experiences can inspire others on their DIY journeys and deepen our collective appreciation for the art of restoration.
Refining Surface Preparation with Cutting-Edge Rust Removal Technologies
In my ongoing quest for professional-grade restoration, I discovered that utilizing advanced chemical rust removers, such as phosphoric acid-based solutions, significantly enhances efficiency and safety compared to traditional methods. These products penetrate deeper into rust layers, dissolving corrosion with minimal abrasive action, which preserves the integrity of vintage cast iron. Incorporating tools like oscillating multi-tools equipped with fine wire brushes allows for meticulous cleaning of intricate curves and corners, ensuring a flawless base for subsequent layers. This combination of chemical and mechanical techniques not only accelerates the process but also results in a smoother, more durable surface. For those aiming to elevate their restoration game, exploring authoritative guides such as step-by-step DIY guides can provide invaluable insights into integrating these advanced methods effectively.
Implementing Eco-Friendly, High-Performance Finishes for Longevity
Choosing environmentally responsible yet resilient finishes is crucial for long-term durability. I recommend high-quality epoxy primers with low VOC emissions, which form a robust barrier against moisture ingress and chemical attack. When selecting enamel paints, opt for products specifically formulated for high-humidity environments, such as bathroom fixtures, to prevent peeling and discoloration. A breakthrough in eco-friendly coatings is the advent of bio-based epoxy resins derived from renewable resources, offering comparable performance to conventional options while reducing environmental impact. Applying these finishes with professional-grade spray systems ensures an even, glossy coat that resists daily wear. Sealing the final layer with UV-resistant, clear topcoats further preserves the aesthetic appeal over decades. For advanced techniques and detailed advice, I recommend exploring home decor ideas that emphasize sustainable, high-performance finishes.
Deep Dive into Surface Coating Innovations for a High-End Finish
Innovations in surface coatings now allow for multi-layered glazing techniques that create depth and richness reminiscent of professional restorations. Applying a transparent, UV-resistant glaze over the enamel not only enhances the visual appeal but also adds a protective layer against scratches and chemical etching. I experimented with nano-coatings that form a superhydrophobic surface, repelling water and maintaining cleanliness with minimal effort. This technology, detailed in recent industry research, offers a promising avenue for DIY enthusiasts seeking lasting beauty and ease of maintenance. Integrating these advanced finishes requires precision and patience, but the results—an ultra-smooth, glossy surface with exceptional resistance—are well worth the effort. For those interested in elevating their craft, exploring home decor ideas for innovative finishing techniques can provide inspiring ideas.
Enhancing Aesthetic Customization with High-Quality, Eco-Conscious Paints
Personalization plays a vital role in professional-looking restorations. I found that selecting eco-friendly, heat-resistant, and chemical-resistant paints allows for a wide palette of colors while maintaining durability. Investing in high-quality, multi-layered painting systems with integrated flow modifiers ensures smooth application and minimizes imperfections. Techniques such as dry brushing and subtle blending can create unique textures and finishes, giving your bathtub a bespoke appearance. Sealing edges with painter’s tape and employing multiple thin coats prevent drips and uneven layers, resulting in a polished, high-end look. Additionally, natural pigments sourced from earth-based resins can add depth and richness, blending sustainability with aesthetics. For creative inspiration, I recommend exploring creative DIY crafts that showcase innovative surface treatments.
Can Expert Techniques Be Replicated by Enthusiasts for Flawless Results?
What are the critical factors that determine the success of a DIY cast iron tub restoration matching professional standards?
Achieving professional results hinges on meticulous surface preparation, meticulous material selection, and environmental control. Ensuring a dust-free environment during painting, maintaining optimal humidity levels, and curing at controlled temperatures prevent imperfections like bubbles or uneven gloss. Using high-grade tools, such as airless spray systems and precision masking tapes, enhances application quality. My experience shows that integrating modern chemical treatments, like corrosion inhibitors, and advanced sealing techniques—such as plasma treatment—can dramatically extend the lifespan and aesthetic appeal of your restoration. Regular inspections and touch-ups, especially in high-wear areas, sustain the flawless finish over time. For those eager to refine their skills, I recommend diving into comprehensive DIY guides that detail professional techniques adapted for enthusiasts. Remember, patience and attention to detail are the cornerstones of success, transforming your project into a true masterpiece.
If you’re passionate about pushing your restoration skills further, consider exploring related projects like upcycling discarded materials into functional art or mastering complex surface coatings. Sharing your experiences and experimenting with innovative approaches can inspire others and elevate the standard of DIY craftsmanship across the community.
Reflecting on my journey, I realize that integrating high-end techniques into DIY projects not only enhances the visual outcome but also deepens your understanding of material science and craftsmanship. For instance, employing nano-coatings or bio-based resins involves a learning curve but rewards with superior durability and environmental benefits. As I continually explore these advanced methods, I find that mastering surface intricacies transforms a simple restoration into a true work of art—proof that dedication and innovation can rival professional standards. I encourage you to embrace these challenges, share your insights, and push the boundaries of what’s possible with your DIY projects, creating a space that’s uniquely yours and inspiring others to elevate their craft.
Things I Wish I Knew Earlier (or You Might Find Surprising)
1. Patience is a Virtue
When I started restoring my cast iron bathtub, I underestimated how long the surface preparation would take. Rushing through sanding or skipping rust removal only led to imperfect results. Taking my time with each step, especially during rust removal and surface smoothing, paid off in the final glossy finish, proving that patience truly makes a difference.
2. Not All Paints Are Created Equal
I initially used generic enamel paints, but they chipped easily. Switching to high-quality, epoxy-based, eco-friendly paints recommended by home improvement tips changed the game. The durability and glossiness of the final coat blew me away, and I realized investing in good materials is worth every penny.
3. Surface Preparation Is Everything
From my experience, a perfectly clean, rust-free surface is the foundation of a professional-looking restoration. Using chemical rust removers combined with fine-grit sandpaper created a smooth base that ensured the paint adhered well and lasted longer. Skipping this step is tempting but ultimately costly.
4. Eco-Friendly Options Are Quite Effective
I was skeptical about natural or low-VOC paints, but after trying them, I found they performed admirably, especially when sealed with a UV-resistant topcoat. Exploring resources like natural earth pigments opened new creative avenues for me, blending sustainability with style.
5. Small Details Make a Big Difference
Sealing edges with painter’s tape, applying thin multiple coats, and allowing proper drying time all contributed to a flawless, high-end look. These seemingly minor steps elevate the final appearance and durability, making the entire project feel truly professional.
Resources I’ve Come to Trust Over Time
- Home Improvement Tips: Their comprehensive guides helped me understand the nuances of surface prep and material choices, making my project smoother and more successful. I recommend them to anyone tackling DIY restorations.
- Natural Earth Pigments: This resource deepened my understanding of eco-friendly paints and inspired me to incorporate natural pigments into my projects for richer, more authentic finishes.
- DIY Guides: The detailed, step-by-step tutorials from here are invaluable for advancing from beginner to more confident DIYer, especially in surface treatment and finishing techniques.
Parting Thoughts from My Perspective
Restoring my vintage cast iron bathtub was more than just a DIY project; it was a journey of patience, learning, and creativity. I discovered that paying attention to surface preparation and choosing eco-friendly, durable materials can produce results that rival professional restorations. If this story resonates with you, I’d love to hear your own DIY experiences or tips—sharing our journeys makes the process even more rewarding. Remember, every scratch and coat of paint is part of creating something truly personal and beautiful, so don’t hesitate to start your own restoration adventure!