Have you ever picked up an old, dusty doll or a vintage mechanical toy and felt that pang of disappointment when it didn’t move or show signs of life? I’ve been there. I once bought a beautiful vintage wind-up car, only to realize that the key wouldn’t turn and the gears were seized. That moment of frustration sparked my journey into expert restoration techniques, and I’m here to tell you: with the right skills, you can breathe new life into these treasured antiques.
Why Restoring Antique Toys and Dolls Matters
Restoring these nostalgic pieces isn’t just about aesthetics. It’s about preserving history, reviving memories, and maintaining craftsmanship that often can’t be found in modern mass-produced toys. Plus, tackling the repair process yourself is incredibly rewarding and cost-effective. But here’s the catch: many enthusiasts shy away because they fear damaging fragile parts or making costly mistakes.
That fear is valid; I made plenty of mistakes early on. I once tried to fix a delicate porcelain doll’s arm without proper tools, and I ended up cracking the porcelain. That taught me a vital lesson: understanding proper techniques is crucial. Today, I want to share what I’ve learned—the expert methods that help you avoid those pitfalls and restore toys with confidence.
Is Expert Restoration Really Worth the Effort?
Absolutely. Some skeptics ask whether it’s worth investing time and money into restoring old toys. From my experience, the answer is a definite yes. Restoring isn’t just about repair; it’s about revival. It saves pieces from being discarded and keeps the craftsmanship alive. Plus, it’s a satisfying hobby that challenges your skills and patience. If you’ve ever wondered whether you can do it, I promise: you can, with a bit of guidance. And if you’re new to the world of toy repair, check out beginner-friendly guides like DIY projects for beginners to build your confidence.
So, if you’ve faced the frustration of broken antique toys or dolls that no longer move or look their best, don’t give up. The techniques I’ll show you aren’t magic—they’re tried and true methods that can turn a neglected piece into a cherished heirloom. Ready to dive into the world of expert restoration? Let’s get started with the essential skills that will make your projects successful and enjoyable.
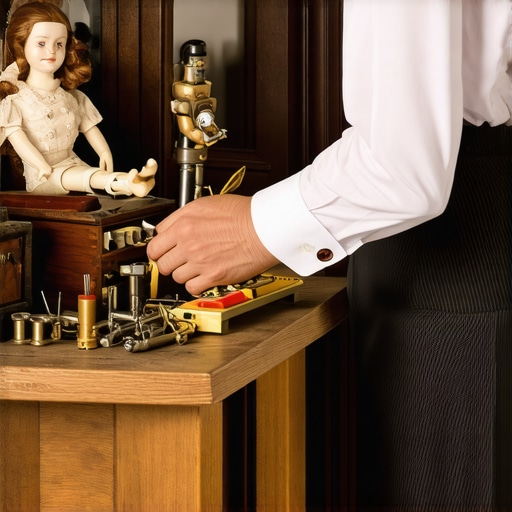
Disassemble Carefully to Preserve Fragile Parts
Start with a gentle disassembly to access internal mechanisms. For example, I once restored a vintage wind-up train. I used precision screwdrivers to loosen tiny screws without cracking the body. Keep track of all parts and take photos at each step to avoid confusion during reassembly.
Clean Gently to Remove Dirt and Corrosion
Use soft brushes, cotton swabs, and mild cleaning solutions. For metal gears, a soak in isopropyl alcohol can dissolve grease and rust. I remember soaking a corroded key in a small container of alcohol overnight, which made it much easier to turn during reassembly. Avoid harsh abrasives that could damage delicate surfaces.
Identify and Source Replacement Parts
Match broken components with similar vintage parts or custom-make replacements using materials like resin or 3D printing. During a porcelain doll repair, I sourced a replacement arm from a similar doll and carefully painted it to match the original skin tone. This step is crucial to maintain authenticity without damaging the original pieces.
Repair Mechanical Components with Precision
Recondition gears, springs, and motors. For instance, I repaired a broken spring in a mechanical clown figure by carefully winding it and replacing the worn-out coil with a new one I fabricated. Lubricate moving parts with light machine oil to ensure smooth operation without overdoing it.
Reassemble with Care and Test
Follow your photos and notes during reassembly. Test the toy or doll at each stage. I once reassembled a vintage music box, tested it, and discovered a gear was misaligned, which I corrected before final assembly. This iterative process prevents issues later.
Finish with Preservation Techniques
Seal and protect restored items using appropriate finishes. Use clear conservation-grade sprays or wax to prevent future deterioration. For example, I applied a light wax coating to a restored wooden doll’s face to enhance its appearance and safeguard against moisture.
Restoring antique toys and dolls demands patience and attention to detail. With these expert steps, you can revive cherished pieces while preserving their history and charm. Remember, practice makes perfect—start with simpler projects and gradually take on more complex restorations. If you’re interested in other creative DIY solutions, explore DIY projects for beginners to build your skills.

When diving into the world of antique toy restoration, many enthusiasts fall prey to misconceptions that can hinder their progress or even cause irreversible damage. Let’s dig deeper into some of the most overlooked nuances and debunk prevalent myths that often trip up even seasoned DIYers.
Why Fixing Everything Yourself Can Backfire
A common belief is that DIY restoration always saves money and guarantees authenticity. While this is true for straightforward repairs, it can lead to costly mistakes when tackling complex mechanisms or delicate materials. For example, trying to reassemble a vintage wind-up toy without understanding the precise gear alignment can result in further damage, making professional intervention unavoidable. To avoid such pitfalls, it’s wise to know your limits and consult specialized resources like comprehensive DIY guides or seek expert advice.
Misconception About Material Compatibility
Many assume that all restoration adhesives and paints are interchangeable. This is a dangerous myth. Using the wrong glue for porcelain or inappropriate paint on vintage plastics can cause discoloration or structural failure. For advanced restorations, understanding material compatibility is key. For instance, epoxy resins work well for metal parts but can damage fragile porcelain if not applied carefully. A helpful tip is to research or consult authoritative sources such as restoration experts or technical datasheets before proceeding.
Advanced Techniques That Are Often Overlooked
One frequently missed nuance is the significance of micro-lubrication in mechanical parts. Applying a tiny amount of specialized oil to gears or springs can vastly improve performance and longevity. Many overlook this step, leading to sluggish mechanisms or premature wear. Moreover, mastering the art of controlled cleaning—using mild solutions and soft brushes—can prevent stripping away original paint or damaging surfaces. These advanced techniques require patience and practice but are worth the effort for authentic results.
Have you ever fallen into this trap? Let me know in the comments. Remember, the goal is to preserve the integrity and charm of your vintage pieces, and understanding these hidden nuances makes all the difference. If you’re eager to elevate your skills, explore creative DIY projects that challenge your craftsmanship and deepen your knowledge.
< >
>