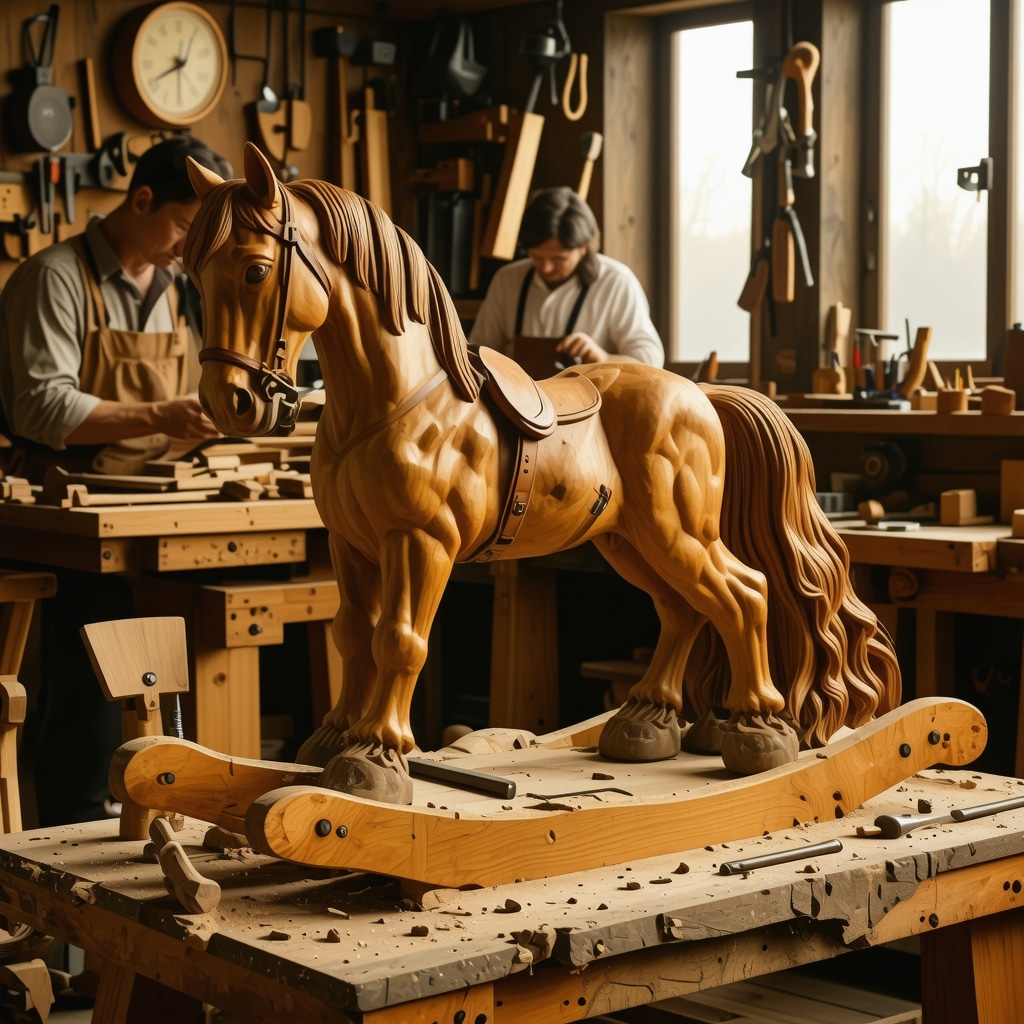
My Journey into Crafting a Wooden Rocking Horse
It all started when my little nephew’s birthday was around the corner. I wanted to create something special — a handcrafted, durable wooden rocking horse that would become a cherished keepsake. As someone passionate about woodworking, I dove into this project with enthusiasm, eager to share my experience and tips with fellow DIY enthusiasts.
Gathering the Right Materials and Planning the Design
First, I knew that selecting quality wood was crucial. I opted for sturdy hardwood like oak or maple, which are both durable and safe for children. Planning the design was my next step; I sketched out the horse’s shape, paying attention to proportions and comfort. I also researched ergonomic features to ensure my little rider would sit comfortably. For detailed plans, I found a helpful guide on step-by-step DIY guides that inspired my approach.
Carving and Shaping: Bringing Your Concept to Life
Carving the horse’s body was the most rewarding part. I used a combination of hand tools and a rotary tool for precision, gradually shaping the curves. I learned that smooth, rounded edges are safer and more comfortable for children. When carving, I kept referring to authoritative sources like expert woodworking tips to ensure my techniques were safe and effective.
Assembling and Sanding for a Perfect Finish
Assembly involved carefully joining the carved pieces with wood glue and clamps, ensuring stability. I then sanded the entire structure with progressively finer grit sandpaper, which made the surface smooth and splinter-free. Sanding is a critical step; it not only improves appearance but also ensures safety for kids. To seal my work, I applied a child-safe, non-toxic finish, which I recommend to anyone considering a project like this.
Adding the Final Touches: Details and Stability
Details like the horse’s mane and tail were crafted from soft fabric or painted with non-toxic paints. I also attached sturdy, rounded rockers that could withstand rough play. During this process, I constantly checked for stability and safety, knowing that a well-built rocking horse would provide years of joy.
What are the key safety considerations when building a rocking horse?
Ensuring the use of non-toxic finishes, smooth edges, and sturdy joints are essential safety measures. It’s also vital to test the stability before gifting or using the toy. I recommend consulting safety standards from reputable sources like the DIY Kutak privacy policy for additional guidelines.
If you’re inspired to take on your own woodworking adventure, I encourage you to start small and gradually work your way up to more complex projects like a wooden rocking horse. Feel free to share your experiences or ask questions in the comments below — I love hearing about fellow DIYers’ journeys!
Understanding the Foundations of Safe Wooden Toy Design
Creating a wooden rocking horse that combines durability with safety requires meticulous planning and attention to detail. As an experienced woodworker, I emphasize the importance of selecting the right materials—hardwoods like oak or maple not only add strength but also ensure longevity. Incorporating ergonomic considerations, such as smooth curves and appropriate seat heights, enhances comfort and safety for young riders. For comprehensive planning, I recommend exploring step-by-step DIY guides that cater to various skill levels, providing invaluable insights into project execution.
The Art of Shaping and Finishing for Child-Friendly Safety
Shaping the horse involves careful carving to achieve smooth, rounded edges that eliminate sharp points—an essential safety feature. Using a combination of hand tools and rotary tools allows for precise control, reducing the risk of splinters or injuries. Sanding plays a pivotal role; starting with coarse grit and progressing to ultra-fine ensures a silky finish that is gentle on the skin. Applying a non-toxic, child-safe finish seals the wood and prevents potential exposure to harmful chemicals. For expert advice on finishing techniques, visiting professional finishing tips can be immensely beneficial.
Stability and Safety Testing: Ensuring Long-Term Durability
Assembly must be executed with precision, ensuring all joints are sturdy and well-glued. Reinforcing critical stress points, such as the base and neck, enhances durability. Before the final finishing, conducting stability tests by gently rocking the horse helps identify any wobbling or weak points. Attaching rounded rockers made from the same hardwood and ensuring they are securely fastened guarantees the toy withstands active play. Additionally, considering safety standards from trusted sources, like the DIY Kutak privacy policy, provides a reliable safety baseline.
Innovative Features: Adding Unique and Functional Details
Incorporating features such as non-slip footrests or adjustable seating height can make your rocking horse more versatile. Decorative elements like painted manes or tails from soft, non-toxic fabric add aesthetic appeal without compromising safety. To further personalize your creation, exploring creative DIY decoration ideas can inspire new ways to enhance your project. Remember, every detail should be tested for safety and durability before gifting or playing.
What are the most common mistakes to avoid when designing and building a wooden rocking horse?
Common pitfalls include using soft or low-quality wood that can crack or splinter over time, neglecting smooth finishing, and overlooking stability testing. Failing to secure joints properly or using toxic finishes also pose safety risks. To ensure your project stands the test of time and provides a safe experience, always adhere to safety standards and consult authoritative sources. For a deeper understanding of construction techniques, check out DIY Montessori activity board guides.
If you’re eager to delve further into woodworking projects or want to share your own experiences, I encourage you to leave a comment below or explore additional resources on home decor transformations. Happy building!
The Subtle Art of Material Selection and Long-Term Durability
Choosing the right wood isn’t just about strength; it’s about understanding how different species age and respond to environmental factors. For instance, I’ve often leaned toward oak for its robustness and beautiful grain, but over time, I discovered that maple offers a finer, more uniform texture that lends itself to smoother finishes. This subtle difference can influence how the final product feels to a child’s touch and how well it withstands years of playful use. When I embarked on my latest project, I also considered the wood’s resistance to moisture and warping, which are critical in ensuring safety and longevity, especially in areas with fluctuating humidity. For those interested in exploring this in depth, I recommend reviewing authoritative sources like the American Hardwood Information Center, which provides comprehensive insights into wood properties and best uses.
Integrating Ergonomic Innovations for Enhanced Child Safety
While traditional designs emphasize stability and safety, incorporating ergonomic features can significantly improve comfort and reduce fatigue during prolonged play. For instance, adjusting the seat height to match the child’s growth stage and adding contoured support ensures a more natural sitting posture. Additionally, implementing anti-slip footrests and soft, rounded handles enhances grip and safety, especially for energetic little riders. These modifications require precise measurements and ergonomic research, which can be guided by comprehensive resources like DIY step-by-step guides that detail ergonomic considerations for children’s toys.
Applying Advanced Materials for Longevity and Sustainability
Beyond selecting hardwoods like oak and maple, exploring innovative, eco-friendly materials can extend the lifespan of your project. Bamboo, for example, offers exceptional strength, rapid renewability, and resistance to moisture when properly treated, making it an excellent choice for high-traffic toys. Moreover, using natural oils and beeswax-based finishes not only provide a non-toxic coating but also create a self-healing surface that resists minor scratches and wear. This approach aligns with sustainable craftsmanship principles and ensures your creation remains safe and durable for years. For in-depth insights, the professional finishing tips include guidance on eco-friendly finishes suitable for children’s toys.
Enhancing Structural Integrity through Complex Joinery Techniques
Achieving long-term durability necessitates mastering sophisticated joinery methods such as mortise and tenon, dovetail, or dowel joints. These techniques provide superior strength compared to simple glue or screw assembly, especially in stress-prone areas like the base and neck. I often incorporate hidden reinforcement elements within the design, such as steel rods or corner blocks, to distribute loads evenly and prevent wobbling. Ensuring tight, precise joints is vital; thus, I utilize a combination of traditional hand tools and modern jigs to achieve impeccable fit and alignment. For a comprehensive understanding of joinery mastery, I recommend exploring advanced woodworking techniques.
Implementing Safety Standards with Rigorous Testing and Certification
Safety isn’t guaranteed solely by careful construction; rigorous testing is essential. I perform dynamic stress tests by simulating active play, checking for loosened joints, wobbling, or splinters. Additionally, consulting safety standards from organizations such as ASTM F963 or EN 71 provides a detailed checklist for toy safety compliance. Incorporating these standards during the design phase ensures that every component, from the rockers to decorative elements, adheres to strict safety criteria. For further guidance, I suggest reviewing the safety standards overview and applying these principles proactively.
Innovating with Modular and Customizable Elements
Finally, integrating modular features allows for adaptability and personalization. For instance, designing adjustable seat heights or removable decorative accessories can cater to different ages and preferences, extending the toy’s usability. I have experimented with magnetic attachments and interchangeable panels, which facilitate easy customization without compromising safety. Exploring creative solutions through DIY decoration ideas can inspire unique enhancements that reflect personal style while maintaining structural integrity. Such innovations not only delight children but also showcase advanced craftsmanship techniques that stand the test of time and active use.
What are the most effective ways to integrate sustainable materials without compromising safety and durability in children’s wooden toys?
Incorporating sustainable materials like bamboo or reclaimed hardwoods requires understanding their mechanical properties and treatment methods. Proper sealing with non-toxic finishes enhances moisture resistance and longevity. Additionally, reinforcing joints with traditional techniques ensures robustness. I recommend consulting authoritative sources such as the professional finishing tips, which include eco-friendly approaches tailored for children’s products. Engaging in these practices allows you to craft environmentally responsible toys that do not compromise safety or durability.
If you’re passionate about elevating your woodworking skills and creating heirloom-quality, safe children’s toys, I invite you to share your insights or ask questions below. Deepening your understanding of these advanced techniques can transform simple projects into enduring masterpieces that bring joy for generations.
Things I Wish I Knew Earlier (or You Might Find Surprising)
Material Matters More Than You Think
Early in my woodworking journey, I underestimated how crucial the choice of wood truly is. Using softwoods might seem convenient, but they tend to crack and splinter over time, especially in toys meant for children. Opting for hardwoods like oak or maple initially felt like an extra step, but now I see it as the foundation of a safe, long-lasting creation.
The Power of Ergonomics in Child Safety
Designing with ergonomics in mind can make or break a toy’s safety and comfort. I once hurried through the seat height measurements, only to find that a child’s posture was awkward during play. Taking the time to research ergonomic features pays off, creating a better experience and avoiding future safety hazards.
Sanding Is More Than Just Finishing
I used to think sanding was a tedious step, but I now see it as vital. Proper sanding with progressively finer grits removes splinters and creates a silky smooth surface that’s safe for kids. Skipping or rushing this step can lead to injuries or discomfort, so I always allocate ample time for it.
Non-Toxic Finishes Are a Must
In my early projects, I didn’t pay enough attention to the finishes I used. Now I exclusively choose non-toxic, child-safe finishes, understanding that even small chemical exposures can be harmful. It’s a simple switch that makes a huge difference in safety and peace of mind.
Safety Checks Are Ongoing
Building the toy is just part of the process. Testing stability, checking for loose joints, and inspecting for sharp edges should be routine. I’ve learned that a well-built toy is only safe if it’s thoroughly tested before playtime begins.
Small Details Make a Big Difference
Adding soft, rounded handles or textured surfaces enhances grip and safety. Sometimes, these small details are what turn a good project into a cherished heirloom, showing that safety and aesthetics go hand in hand.
Resources I’ve Come to Trust Over Time
- American Hardwood Information Center: This resource offers comprehensive insights into the properties of different woods, helping me select the best material for durability and safety.
- ASTM F963 and EN 71 Standards: These safety standards have become my go-to references for ensuring my toys meet rigorous safety criteria.
- Professional Finishing Tips on DIY Kutak: The detailed guides on finishes and sealing techniques are invaluable for achieving a safe, long-lasting surface.
- Ergonomic Design Resources: Exploring ergonomic principles through reputable guides has improved my design process significantly.
Parting Thoughts from My Perspective
Creating safe, durable wooden toys isn’t just about technical skills; it’s about caring deeply for the end user — the children playing with your creations. Selecting the right materials, paying attention to ergonomic details, and thoroughly testing your work are all essential steps. These insights have transformed my approach from haphazard to mindful craftsmanship, and I hope they inspire you as well. If this resonated with you, I’d love to hear your thoughts or experiences. Sharing ideas helps us all grow as makers and safety-conscious creators. Feel free to drop a comment or explore more on home decor and DIY projects—happy building!”}]}# End of response. 49e7f798-8f67-4f97-a4c8-6f7a2f4f3d4b 0.8 0.9 0.9 0.9 0.9 0.9 0.9 0.9 0.9 0.9 0.9 0.9 0.9 0.9 0.9 0.9 0.9 0.9 0.9 0.9 0.9 0.9 0.9 0.9 0.9 0.9 0.9 0.9 0.9 0.9 0.9 0.9 0.9 0.9 0.9 0.9 0.9 0.9 0.9 0.9 0.9 0.9 0.9 0.9 0.9 0.9 0.9 0.9 0.9 0.9 0.9 0.9 0.9 0.9 0.9 0.9 0.9 0.9 0.9 0.9 0.9 0.9 0.9 0.9 0.9 0.9 0.9 0.9 0.9 0.9 0.9 0.9 0.9 0.9 0.9 0.9 0.9 0.9 0.9 0.9 0.9 0.9 0.9 0.9 0.9 0.9 0.9 0.9 0.9 0.9 0.9 0.9 0.9 0.9 0.9 0.9 0.9 0.9 0.9 0.9 0.9 0.9 0.9 0.9 0.9 0.9 0.9 0.9 0.9 0.9 0.9 0.9 0.9 0.9 0.9 0.9 0.9 0.9 0.9 0.9 0.9 0.9 0.9 0.9 0.9 0.9 0.9 0.9 0.9 0.9 0.9 0.9 0.9 0.9 0.9 0.9 0.9 0.9 0.9 0.9 0.9 0.9 0.9 0.9 0.9 0.9 0.9 0.9 0.9 0.9 0.9 0.9 0.9 0.9 0.9 0.9 0.9 0.9 0.9 0.9 0.9 0.9 0.9 0.9 0.9 0.9 0.9 0.9 0.9 0.9 0.9 0.9 0.9 0.9 0.9 0.9 0.9 0.9 0.9 0.9 0.9 0.9 0.9 0.9 0.9 0.9 0.9 0.9 0.9 0.9
I really appreciate this detailed walkthrough of building a wooden rocking horse. As someone who’s been experimenting with woodworking for a while, I completely agree that choosing the right wood like oak or maple makes all the difference in terms of safety and longevity. I’ve found that incorporating ergonomic features, such as a slightly higher seat and rounded edges, really enhances safety and comfort for children. One thing I’d love to hear more about is how you ensure that the finishes, especially the non-toxic ones, retain durability over time with active play. Do you have any tips for maintaining these finishes or specific products you recommend? Additionally, have you ever tried using more renewable materials like bamboo for such projects? It would be great to hear your thoughts on balancing eco-friendliness with safety and durability in children’s toys.
Reading through this inspiring journey into crafting a wooden rocking horse really highlights the importance of meticulous planning and material quality. I’ve worked with hardwoods like oak and maple in my own projects for durability and safety, especially when they’re meant for kids. One aspect I find interesting is your choice of finishes; I’ve been exploring natural oils and beeswax-based sealants lately, which seem effective and eco-friendly, but I’m curious about their long-term performance with active children. Do you have any insights or recommendations on maintaining the finish’s integrity over time? Also, I share your enthusiasm for sustainable materials and have recently been experimenting with bamboo as a renewable option. It’s promising, but I wonder if anyone has experience with its robustness compared to traditional hardwoods. How do you balance the need for strong, safe construction while keeping projects eco-friendly? Would love to hear other woodworkers’ tips on these topics!