My Unexpected Oven Troubles: A Personal Tale of DIY Repair
Last winter, I faced a frustrating dilemma: my trusty electric oven suddenly stopped heating. As someone who loves tackling home improvement projects, I decided to roll up my sleeves and dive into troubleshooting and repairing the oven element myself. That experience not only saved me money but also gave me a newfound confidence in handling appliance repairs.
Understanding the Electric Oven Element: What’s Really Going On?
When my oven refused to heat, I started by understanding the core component—the heating element. I learned that these elements are usually made of metal coils and are responsible for generating heat through electrical resistance. Over time, they can develop cracks or burn out, especially with frequent use or power surges. To diagnose the problem, I first checked for visible signs of damage such as discoloration, warping, or breaks in the coil. According to industry resources, a visual inspection is often the first step in troubleshooting (source: hvac.com).
Step-by-Step: How I Troubleshot My Oven Element
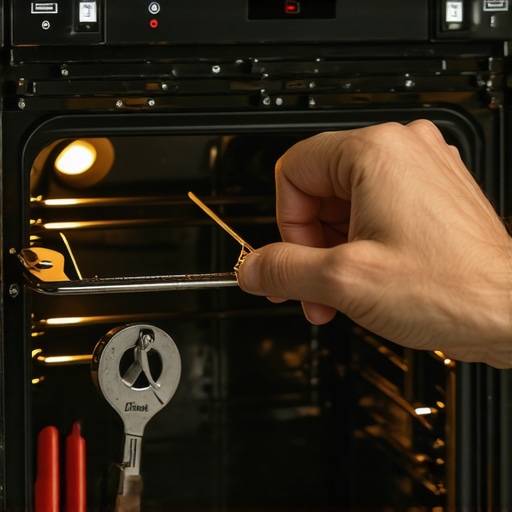
Question: How can I safely test my oven’s heating element?
My first tip is to always disconnect the power before inspecting or working on electrical components. Using a multimeter, I tested the continuity of the element—if it shows no continuity, it’s a sign that the element is faulty and needs replacement. I found that most oven elements are straightforward to test with a multimeter, which I highly recommend for DIY enthusiasts.
Once I confirmed the element was defective, I ordered a replacement part compatible with my oven model. I was pleasantly surprised by the detailed instructions available online, which made the installation process manageable even for a beginner. Remember, always consult your oven’s manual or manufacturer’s guide for specific instructions.
Replacing the Faulty Element: A DIY Win
Replacing the element involved removing the oven’s back panel or side panel, disconnecting the broken coil, and installing the new one securely. I took care to reconnect the wires correctly—taking photos beforehand was a lifesaver. After reassembling the panel and restoring power, I tested the oven. To my delight, it heated up perfectly again. This experience reaffirmed my belief that DIY repairs, when done cautiously, can be incredibly rewarding.
Why Troubleshooting Your Oven’s Heating Element Matters
Understanding the inner workings of your electric oven not only helps in repairs but also in maintaining appliance longevity. Regular inspections and knowing what to look for can prevent larger issues down the road. Plus, it’s satisfying to know that you can troubleshoot and fix common problems yourself, saving time and money.
Have you ever attempted to repair an appliance yourself? What was your experience like?
If you’re interested in exploring more DIY home projects or need guidance on appliance repairs, I recommend visiting this resource. Sharing your experiences in the comments can also help others learn and grow their DIY confidence!
Mastering Your Kitchen Appliance: Deep Dive into Oven Heating Elements
Understanding the intricacies of your electric oven’s heating element can significantly enhance your DIY repair confidence. These components, often overlooked, are vital for ensuring your oven functions efficiently. As an expert in home appliance troubleshooting, I recommend regular inspections and understanding common failure signs to prevent unexpected breakdowns. For instance, a visual check for cracks, discoloration, or warping can provide early warning signs, saving you time and money. Industry resources, such as hvac.com, emphasize the importance of proper diagnosis before attempting repairs.
How to Safely Diagnose and Test Your Oven’s Heating Element
Question: What are the essential safety steps and tools needed for testing my oven’s heating element?
Safety first is the golden rule—always disconnect the appliance from power before beginning any inspection. Using a reliable multimeter, you can check for electrical continuity in the heating element. If the multimeter shows no continuity, it indicates a break in the coil, confirming the need for replacement. This process is straightforward but requires attention to detail. For comprehensive guidance, visiting DIY beginner projects can provide valuable insights into safe testing practices.

Visual aids, such as wiring diagrams and step-by-step photos, can make troubleshooting more manageable. Remember, always consult your specific oven model’s manual for precise instructions to avoid mishaps.
Replacing the Oven Element: From Troubleshooting to Triumph
Once you’ve confirmed the faulty element, replacing it involves removing panels—usually the back or side—disconnecting the damaged coil, and installing a new one. Taking photos during disassembly can be a lifesaver, ensuring correct reassembly. When installing the new element, double-check wire connections to prevent future issues. After reassembling, restoring power and testing the oven’s heating capability will confirm a successful repair. For detailed step-by-step guides, exploring DIY step-by-step guides can be incredibly helpful.
Why Regular Inspection of Your Oven’s Components Enhances Longevity
Maintaining your oven’s health isn’t just about quick fixes—it’s about understanding the components that keep it running smoothly. Regularly inspecting for signs of wear, such as discoloration or warping, can extend the lifespan of your appliance. Moreover, a well-maintained oven reduces energy consumption, contributing to your home’s efficiency. Learning about the inner workings of your appliances empowers you to troubleshoot minor issues before they become major problems. For more advanced techniques, consider exploring restoration and repair methods to develop your DIY skill set further.
Have you ever repaired an appliance yourself? What challenges did you face, and what tips would you share with fellow DIY enthusiasts?
If you’re eager to expand your DIY knowledge or need guidance on other home projects, I recommend visiting this resource. Sharing your experiences in the comments can inspire others and foster a community of skilled DIYers!
Beyond Basic Troubleshooting: Deepening Your Understanding of Oven Heating Elements
As I delved further into oven repairs, I realized that understanding the nuances of how heating elements function under different conditions can dramatically improve troubleshooting accuracy. For example, the materials used in high-quality elements, often alloys like nickel-chromium, are designed to withstand thermal expansion and resist corrosion. Recognizing subtle signs, such as minor discoloration or slight warping, can indicate early stages of failure, long before a complete break occurs. Industry insights, such as those from Industrial Heating, emphasize the importance of material science in predicting element lifespan, which has helped me refine my diagnostic approach.
How to Diagnose Complex Failures in Oven Heating Systems
Question: What are the advanced diagnostic techniques for diagnosing intermittent or elusive oven heating issues?
Beyond simple continuity tests, I’ve adopted techniques like thermal imaging to detect uneven heat distribution or hotspots that suggest partial failures. Using infrared cameras, I can identify areas where the element struggles to heat uniformly, which often points to internal cracks or partial resistance increases. Additionally, examining the oven’s control board and wiring harnesses with a multimeter and oscilloscope uncovers issues like faulty relays or inconsistent power delivery. According to Electronic Design, such diagnostic tools are invaluable for complex electrical systems, especially when standard tests yield inconclusive results.
Personal Reflection: The Hidden Complexities of DIY Repairs
One thing I’ve learned through these advanced troubleshooting experiences is that DIY repairs often reveal the hidden complexities of household appliances. It’s tempting to think of these tasks as straightforward, but each component interacts within a delicate system. Sometimes, a seemingly simple replacement uncovers underlying issues—like wiring degradation or control system malfunctions—that require a more holistic approach. This journey has taught me patience and the importance of continuous learning, as every repair deepens my understanding and prepares me for future challenges.
Sharing Knowledge and Growing Community
If you’ve ventured into appliance repairs yourself, I encourage you to share your experiences. Whether it was a surprising discovery or a tricky problem you overcame, your story can inspire others to approach DIY projects with confidence. For those eager to expand their technical skills, exploring resources like home improvement tips can provide valuable insights. Engaging with a community of DIY enthusiasts not only enhances your skills but also turns repairs into rewarding, shared experiences.
Further Resources for Advanced DIY Enthusiasts
To deepen your understanding of appliance systems, I recommend exploring detailed guides on advanced repair techniques and troubleshooting methods. Continuous education and hands-on practice are the keys to transforming yourself from a novice into a skilled DIYer capable of tackling complex projects. Remember, every successful repair builds confidence and expands your mastery over household systems.
Unveiling the Subtle Art of Oven Element Diagnostics: Beyond the Basics
As I delved deeper into appliance troubleshooting, I realized that diagnosing complex issues with oven heating elements requires a nuanced understanding of their material properties and failure modes. For instance, high-quality elements made from nickel-chromium alloys are engineered to withstand repeated thermal cycling, but microscopic cracks can develop over time, leading to intermittent heating problems. Recognizing early signs such as slight discoloration or uneven heating patterns can preempt complete failure. Industry insights from Industrial Heating highlight the importance of material science in predicting element longevity, which has profoundly enhanced my diagnostic precision.
Advanced Techniques for Diagnosing Hidden Failures
Standard continuity tests provide valuable information, yet they sometimes fall short in uncovering partial or intermittent failures. To overcome this, I employ thermal imaging cameras to detect hotspots or uneven heat distribution, revealing internal cracks or resistance variations. Additionally, examining the control circuitry with oscilloscopes allows me to identify subtle electrical anomalies, such as relay malfunctions or fluctuating power supplies, which can mimic element failures. These techniques, endorsed by Electronic Design, have enabled me to diagnose elusive issues accurately, saving time and preventing unnecessary replacements.
Building a Knowledge Foundation for Complex Repairs
This journey into advanced diagnostics has taught me that appliance repair is a blend of scientific understanding and practical skill. Each component interacts within a delicate system, and sometimes, a simple part replacement uncovers deeper systemic issues like wiring degradation or control board malfunctions. Developing a comprehensive knowledge base through continuous learning—be it through specialized courses, technical manuals, or industry publications—has been instrumental. For example, mastering techniques like Kintsugi-style restoration, as detailed in furniture restoration guides, has reinforced the importance of precision and patience in every project.
Engage and Share Your Expertise
If you’ve undertaken complex DIY repairs, I invite you to share your experiences and insights. Your stories of troubleshooting elusive issues or implementing advanced techniques can inspire and educate fellow enthusiasts. To deepen your technical mastery, exploring resources such as home improvement tips can provide valuable guidance. Remember, every repair is a step toward becoming a more skilled and confident DIYer, turning challenges into opportunities for growth.
Things I Wish I Knew Earlier (or You Might Find Surprising)
Hidden Complexity of Simple Repairs
When I first started repairing my oven, I underestimated how intricate even a seemingly straightforward task can be. It’s not just about swapping out a part; understanding the underlying systems can save you from future headaches. This realization came after I replaced my heating element and noticed uneven heating, prompting me to dig deeper into the oven’s wiring and control systems.
The Power of Visual Inspection
Many problems can be diagnosed with a good visual check. Cracks, discoloration, or warped components often tell the story before any tools are involved. I learned to inspect thoroughly, which often saved me from unnecessary replacements and gave me confidence in my troubleshooting skills.
Patience Is Key
DIY repairs require patience and a steady hand. Rushing through disassembly or reassembly can lead to mistakes or damage. Taking my time, documenting each step, and double-checking connections made my repair successful and less stressful.
Safety First, Always
Handling electrical appliances can be dangerous. Disconnecting the power, using insulated tools, and wearing protective gear are non-negotiable. I learned this the hard way when I accidentally touched a live wire—lesson learned, and now I always prioritize safety above all.
Knowledge Turns Frustration into Triumph
The more I learned about my oven’s components—like the resistance coils, wiring, and control board—the more confident I became. Resources like hvac.com provided invaluable insights that helped me troubleshoot effectively. It’s empowering to understand your appliances better and handle issues without calling in a pro.
Resources I’ve Come to Trust Over Time
- hvac.com: An excellent source for understanding electrical systems and troubleshooting tips. It’s trustworthy and easy to follow, even for beginners.
- DIY Kitchen Repairs Guide: This site offers step-by-step tutorials on common appliance fixes, which boosted my confidence significantly.
- YouTube DIY Channels: Visual learners will find countless videos demonstrating repairs like replacing heating elements or wiring checks—highly recommended for practical guidance.
- Manufacturer Manuals: Never underestimate the value of your oven’s manual. Specific instructions tailored to your model can prevent mishaps and ensure correct repairs.
Parting Thoughts from My Perspective
Looking back, DIY oven repair was more than just fixing a broken appliance; it was a journey of discovery. I learned to approach problems systematically, prioritize safety, and appreciate the inner workings of household appliances. If you’re considering tackling your own repairs, remember that patience, proper research, and safety are your best allies. Trust me, there’s a real sense of accomplishment when your oven heats up again after a successful DIY fix. If this resonated with you, I’d love to hear your thoughts. Share your experiences or ask questions in the comments—let’s learn from each other and keep the DIY spirit alive!
Reading through this personal account really highlights how crucial a solid understanding of your appliance’s components can be. I’ve also had my fair share of DIY repair adventures, especially with kitchen appliances, and I agree that safety precautions should never be overlooked. My recent project involved replacing a faulty thermostat in my oven, and what I learned was that sometimes issues aren’t just isolated parts but could stem from underlying wiring problems or control board malfunctions. Do others have experience with diagnosing intermittent faults that seem unpredictable? Sometimes, I wonder if taking a systematic approach, like thermal imaging or checking control circuitry, is really necessary for troubleshooting those elusive problems, or if a good old visual inspection suffices. I’d love to hear more about how experienced DIYers handle these complex issues—especially the tools or techniques they find most useful.
This personal story really resonates, especially the part about taking photos before disconnecting wires—it’s such a simple yet crucial tip that can save a lot of headaches during reassembly. I’ve also found that understanding the materials used in the heating element, like nickel-chromium alloys, helps in recognizing early signs of failure, such as minor discoloration or warping, before the element outright burns out. I’ve encountered intermittent heating issues that turned out to be faulty relays on the control board rather than the element itself, which shows how sometimes the problem isn’t directly where you might first think. For others troubleshooting similar flaky issues, have you explored using thermal imaging or measuring voltage at different points under operation? I’m curious whether incorporating these advanced techniques makes diagnosing elusive faults more efficient or if sticking to visual checks and continuity tests suffices in most cases. Anyway, I agree that patience and careful attention to detail are the keys when working with household appliances!
This post really hit close to home for me. Last year, I encountered a similar issue where my oven suddenly refused to heat, and I was initially clueless about where to start. I appreciated the step-by-step troubleshooting approach—initial visual inspection, followed by using a multimeter for continuity checks. I found that having a good quality multimeter and knowing how to use it is absolutely crucial for safe and effective DIY repairs. One thing I learned through my own experience is the importance of taking detailed photos during disassembly; it made reassembling so much easier and prevented any wiring mix-ups. Also, I’ve started using thermal imaging on more complex electrical faults—it’s surprisingly accessible and really helps spot hidden problems like hotspots or partial resistance issues. Has anyone else tried thermal imaging for appliance troubleshooting? I’d love to hear your thoughts on whether it’s worth the investment or if traditional methods still suffices. Overall, this article offers great encouragement—not just to fix appliances but to really understand how they work, which is a huge confidence booster for a DIY enthusiast like me.