My First Encounter with Silicone Molds: A Creative Awakening
Ever since I started exploring DIY crafts, I was fascinated by the endless possibilities of creating unique resin and soap projects. My curiosity led me down the path of making custom silicone molds, which quickly became a game-changer in my craft room. I remember that initial attempt—there was a mix of excitement and a few mishaps, but every mistake was a lesson in disguise.
Why I Chose Silicone: The Perfect Material for Custom Molds
Silicone has always impressed me with its flexibility, durability, and heat resistance. I learned from authoritative sources like DIY Kutak that silicone molds are ideal for repeated use and can capture intricate details. This versatility made it my top choice for crafting molds for resin casting and soap making, especially when I wanted to produce complex shapes or personalized designs.
My Step-by-Step Process: From Concept to Silicone Mold
How Do I Ensure My Mold Captures Every Detail?
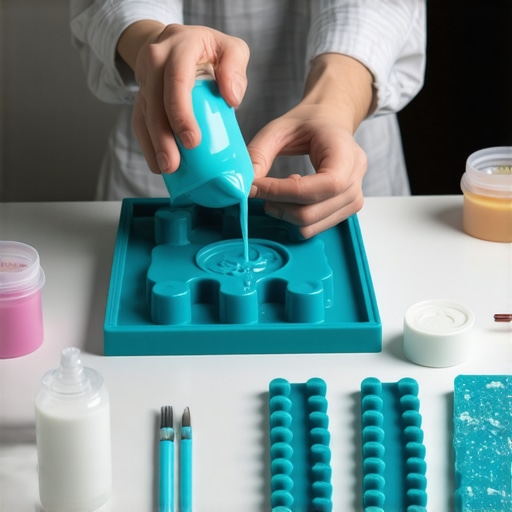
Achieving fine details requires a good mold release agent and careful pouring. I first design my prototype, often using clay or 3D printing for precision. Then, I build a containment box using simple materials like LEGO bricks or cardboard, ensuring it’s airtight to prevent leaks. When I pour the silicone, I do it slowly to avoid air bubbles, which can ruin the final product. For best results, I follow a trusted recipe—usually a 1:1 mix of silicone parts—and cure it as per manufacturer instructions.
My Experience: The Joys and Challenges of Custom Silicone Molds
Creating my own molds has been incredibly rewarding. I love the freedom to personalize my resin and soap designs without relying on pre-made molds. However, I’ve also encountered challenges like silicone tearing or air bubbles. Over time, I learned to troubleshoot issues by adjusting my pouring techniques and using degassing methods, which I found detailed on DIY Kutak. Practice truly makes perfect!
What’s Next in My DIY Mold-Making Adventure?
Now, I’m exploring eco-friendly alternatives and experimenting with different silicone formulas. I also plan to try making multi-part molds for more complex projects. If you’re curious about starting your own silicone mold journey, I highly recommend checking out DIY Kutak’s guides for expert tips and tricks.
Have You Tried Making Custom Silicone Molds? Share Your Experiences!
If you’re passionate about DIY crafts, I’d love to hear your stories or answer any questions. Feel free to leave a comment below or explore more creative solutions on DIY Kutak. Happy mold making!
Unveiling Advanced Techniques: Creating Multi-Part Silicone Molds for Complex Designs
One of the most sophisticated skills in the realm of silicone mold-making is designing multi-part molds. This approach allows artisans to craft intricate, detailed objects that would be impossible to produce with a single-piece mold. To achieve seamless results, I recommend dividing your model into manageable sections, ensuring each part captures specific details. Use registration keys—small notches or guides—on each segment to align the mold precisely during assembly. This technique is particularly useful for complex resin sculptures or layered soap designs, where precision is paramount. For step-by-step instructions and professional insights, check out DIY Kutak’s comprehensive guides.
Addressing Common Pitfalls: Silicone Tearing and Air Bubbles—Expert Troubleshooting
Even seasoned DIYers encounter challenges like silicone tearing or trapped air bubbles, which can compromise mold quality. To prevent tearing, it’s crucial to select high-quality silicone with appropriate elasticity and to avoid overstretching during demolding. Incorporating a flexible mold release agent can also reduce stress on the silicone. As for air bubbles, degassing the silicone before pouring—using a vacuum chamber or simple hand-held vacuum pump—can significantly improve surface finish. When pouring, do so slowly and from one corner to allow bubbles to escape naturally. Practicing these techniques can elevate your mold quality to professional standards. For more detailed troubleshooting tips, explore DIY Kutak’s expert advice.
Eco-Friendly Alternatives: Biodegradable Silicones and Natural Materials
As environmental consciousness grows, many artisans seek sustainable options for mold-making. Biodegradable silicone formulations are emerging as eco-friendly alternatives that do not compromise performance. These silicones are designed to break down naturally after disposal, reducing environmental impact. Additionally, natural materials like beeswax or plant-based resins can sometimes be used to create reusable molds for specific projects. Incorporating these alternatives requires understanding their limitations and compatibility with your casting materials. For comprehensive guidance on eco-friendly craft practices, visit DIY Kutak’s eco-conscious tips. Experimenting with sustainable options not only benefits the planet but also inspires innovative craft solutions.
How Can You Elevate Your Mold-Making Skills for Professional Results?
Developing mastery in silicone mold-making involves a blend of technical knowledge, patience, and creativity. Regular practice, combined with experimenting with different silicone brands, mold designs, and casting materials, will hone your skills. Attending workshops, viewing online tutorials, and engaging with community forums can provide new perspectives and troubleshooting strategies. Remember, even small adjustments—like improving your mixing technique or refining your mold release process—can drastically enhance the final product. If you’re eager to expand your expertise, consider exploring advanced tutorials on digital pattern creation and custom design techniques. Continuous learning and innovation are key to becoming an expert in this craft.
Feeling inspired to push your DIY mold-making to the next level? Share your experiences or ask questions in the comments below! For more creative project ideas and expert tips, explore DIY Kutak’s extensive craft resources. Happy mold making!
Beyond the Basics: Discovering the Art of Multi-Part Silicone Molds
My journey into advanced silicone mold-making began when I realized that some of my most intricate resin sculptures and layered soap designs required more than just a simple, single-piece mold. I wanted to push my creative boundaries and capture every fine detail without sacrificing the ease of demolding. That’s when I ventured into mastering multi-part molds, a technique that transforms a daunting task into an engaging challenge.
Why Multi-Part Molds Changed My Perspective
Initially, I thought creating multi-part molds was reserved for professionals or those with access to high-end equipment. However, I discovered that with patience, careful planning, and some clever registration features, even DIY enthusiasts like myself could achieve professional results. This approach allows you to produce complex shapes—think detailed figurines, layered jewelry, or multi-colored resin art—without the limitations of a one-piece mold.
How I Designed My First Multi-Part Mold
The key was breaking down my model into manageable sections. I started by analyzing the object and deciding where to create seams that wouldn’t disrupt the aesthetic. Then, I added registration keys—small notches or guides—on each section to ensure perfect alignment during assembly. Building a containment box with materials like silicone or even cardboard ensured that the silicone would stay contained during pouring. For detailed step-by-step instructions, I recommend reviewing DIY Kutak’s comprehensive guides.
The Nuances of Using Registration Keys and Seams
Registration keys are more than just alignment guides—they’re essential for ensuring the final piece fits together seamlessly. I experimented with different shapes and sizes, often using small cylinders or notches that could be easily sanded or filled if needed. The placement of seams was also critical; I aimed to hide them within natural features of my design or on less visible surfaces. This attention to detail made my final casts look polished and professional.
Overcoming Challenges: Silicone Tearing and Air Bubbles
One of the most common pitfalls I faced was tearing at the seams during demolding. To mitigate this, I used flexible, high-elasticity silicone—like the formulations recommended by DIY Kutak—and ensured I didn’t overstretch the mold. Degassing the silicone was crucial in eliminating trapped air bubbles, which could cause surface imperfections or weaken the mold structure. I found that investing in a simple hand-held vacuum pump made a significant difference in achieving a smooth, bubble-free surface.
Refining Your Technique for Professional Results
The process of perfecting multi-part molds is iterative. I learned to refine my registration keys, experiment with different silicone brands, and even incorporate mold release agents to facilitate demolding. Sharing my progress with the community on DIY forums helped me troubleshoot issues and discover innovative solutions. Remember, patience and persistence are your best allies in this craft.
What’s Next? Exploring Complex, Multi-Component Molds
As I gain confidence, I’m now venturing into multi-component molds for even more complex projects—like multi-layered resin sculptures with embedded objects or detailed architectural models. The ability to create seamless, multi-part molds opens up a world of possibilities, enabling me to realize designs that once seemed impossible. If you’re inspired to elevate your craft, I encourage you to explore the detailed tutorials on DIY Kutak’s site.
Have you experimented with multi-part molds? What challenges or successes have you encountered on your journey?
I’d love to hear your stories or answer any questions—feel free to share your experiences in the comments below. And for more advanced tips on DIY projects, don’t forget to check out DIY Kutak’s creative solutions. Happy molding!
What Are the Nuances of Creating Seamless Multi-Part Silicone Molds for Intricate Projects?
Delving into the realm of multi-part silicone molds has been one of my most rewarding yet challenging experiences. To achieve seamless, professional-quality casts, I focus heavily on the strategic placement of seams and registration keys. These tiny but mighty features ensure that each mold segment aligns perfectly, preserving intricate details and allowing for smooth demolding. I often incorporate natural features of my design—like folds or textures—to hide seams, a technique advised by industry experts such as DIY Kutak, which emphasizes the importance of thoughtful seam placement in complex molds.
How Do I Prevent Silicone Tearing at Seams and During Demolding?
Silicone tearing has been a common hurdle in my projects, especially when demolding multi-part molds. To counteract this, I select high-elasticity silicones, such as platinum-cure formulations, which offer superior flexibility and resilience. Proper curing, avoiding overstretching, and applying a flexible mold release agent further reduce stress on the silicone. Degassing the silicone prior to pouring eliminates trapped air bubbles that could weaken the mold and cause tearing over time. These techniques, highlighted by DIY Kutak, have allowed me to craft durable, tear-resistant molds that stand the test of repeated use.
Can Eco-Friendly Silicone Alternatives Match Professional Standards?
As an advocate for sustainable crafting, I’ve experimented with biodegradable silicone formulations and natural mold materials. While eco-friendly silicones are still evolving, recent advancements have shown promising results—they offer comparable flexibility and detail capture, as documented by DIY Kutak. Natural materials like beeswax or plant-based resins work well for small, simple molds but often lack the durability required for repeated casting. Balancing environmental benefits with material performance is key, and ongoing research continues to push the boundaries of sustainable mold-making.
What Are My Tips for Achieving Professional Results in Multi-Component Molds?
Continuous experimentation and meticulous attention to detail define my approach. I recommend starting with small-scale projects to refine your registration key design and seam placement. Using digital modeling software can assist in visualizing how parts will fit together, reducing trial and error. Additionally, engaging with communities—such as on DIY Kutak—provides invaluable feedback and innovative ideas. Remember, patience and iterative refinement are your best allies in mastering this advanced craft.
If you’re eager to elevate your mold-making skills further, I invite you to explore my detailed tutorials and share your progress. The journey toward professional-grade multi-part molds is both challenging and immensely satisfying—embrace each step and enjoy the creative process!
Things I Wish I Knew Earlier (or You Might Find Surprising)
Mastering the Art of Seams
Looking back, I wish I had understood the importance of seam placement from the start. Properly hiding seams within natural design features can make a huge difference in the final appearance of your mold. It’s like solving a puzzle, but once you get the hang of it, your projects look incredibly professional.
Degassing is a Game Changer
At first, I overlooked the significance of removing air bubbles before pouring silicone. Using a simple vacuum chamber or even a handheld pump can eliminate bubbles, resulting in smoother, more detailed molds. It’s a step that truly elevates your craftsmanship.
Choosing the Right Silicone
Not all silicones are created equal. I learned that investing in high-elasticity, platinum-cure formulations reduces tearing and enhances durability. This knowledge saved me from endless frustrations and repeated repairs.
Eco-Friendly Options are Better Than You Think
Switching to biodegradable silicone and natural materials initially seemed risky, but recent advancements prove they can match traditional silicones in quality. It’s rewarding to create eco-conscious molds that perform just as well.
Patience and Practice Matter Most
My biggest lesson was that perfection comes with patience. Taking the time to experiment, refine registration keys, and test different techniques turned my DIY mold-making into a true art form. Don’t rush—your future self will thank you.
Resources I’ve Come to Trust Over Time
- DIY Kutak: Their comprehensive guides and expert advice have been invaluable for troubleshooting and advanced techniques. I highly recommend exploring their site for detailed tutorials.
- Silicone Solutions: A trusted supplier offering high-quality silicone formulations that I’ve used extensively, ensuring professional results in my projects.
- Online Forums and Communities: Engaging with fellow DIY enthusiasts on forums has provided fresh ideas and support, making my craft journey more enjoyable and successful.
Parting Thoughts from My Perspective
Creating custom silicone molds has been one of my most fulfilling DIY adventures. The key takeaway? Don’t be discouraged by initial setbacks. With patience, the right materials, and a willingness to learn, you can craft professional-quality molds that unlock endless creative possibilities. If this resonates with you, I’d love to hear your thoughts or stories. Share it with someone who might find it helpful, and keep experimenting—your next masterpiece might be just around the corner!