My Unexpected Encounter with a Vintage Cast Iron Bathtub
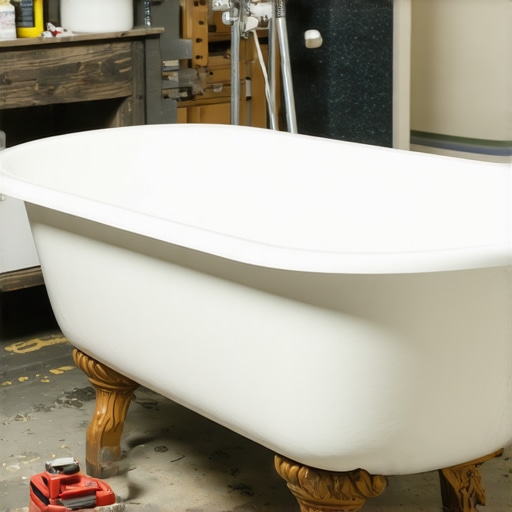
It all started when I inherited an old, worn-out cast iron bathtub from my grandmother’s house. At first glance, I was overwhelmed by its chipped enamel and rusty patches. But deep down, I knew this was a gem waiting for a second chance. My journey into refinishing cast iron bathtubs began with curiosity and a desire to restore a piece of history in my home.
Why I Chose to Refinish Instead of Replace
Initially, I considered replacing the bathtub entirely. However, after researching, I realized that refinishing could be both cost-effective and environmentally friendly. Plus, I wanted to preserve the vintage charm that only a cast iron tub can offer. According to industry experts, proper refinishing can extend a bathtub’s life by decades, making it a smart choice for sustainable home improvement.
Step-by-Step: My Personal Approach to Rejuvenation
First, I removed the old, peeling enamel using a chemical stripper, taking care to work in a well-ventilated area. Next, I sanded the surface to remove rust and create a smooth base. I applied a rust-inhibiting primer, followed by a durable epoxy paint specifically designed for tubs. The process was time-consuming but incredibly rewarding. I also added a slip-resistant coating for safety and a fresh coat of enamel paint to give it that glossy, new appearance.
What Surprised Me About the Refinishing Process
One thing I didn’t expect was how much patience and attention to detail it required. Achieving a professional finish meant multiple coats and careful curing time. I also discovered the importance of using high-quality products. For instance, I relied on recommendations from home improvement experts to select the best materials for my project.
How Can I Ensure Long-Lasting Results After Refinishing?
To make sure my refinished bathtub stayed beautiful, I learned that regular cleaning with non-abrasive cleaners and avoiding harsh chemicals are crucial. Applying a clear sealant every few years can also help maintain the finish. Sharing my experience, I encourage anyone considering this DIY project to invest in quality supplies and follow the manufacturer’s instructions carefully.
Refinishing cast iron bathtubs is truly a rewarding experience. Not only did I save money, but I also gained a sense of accomplishment and a stunning focal point for my bathroom. If you’re contemplating a similar project, I say go for it! And if you have tips or questions, I’d love to hear your thoughts in the comments below. For more inspiration on creative DIY solutions, check out this article.
Mastering the Art of Durable Bathtub Refinishing: Expert Insights and Practical Tips
Refinishing a cast iron bathtub is more than just a cosmetic upgrade; it’s a meticulous process that demands an understanding of materials, surface preparation, and environmental conditions to achieve a professional, long-lasting finish. As an experienced DIY enthusiast, I’ve learned that the key to success lies in attention to detail and choosing the right products. For instance, selecting a high-quality epoxy paint designed specifically for tubs can dramatically influence durability. Industry leaders emphasize that proper surface preparation, including thorough cleaning and rust removal, is essential for adhesion and longevity. Home improvement experts recommend following manufacturer instructions meticulously to ensure optimal results.
What Are the Common Pitfalls That Can Undermine Your Refinishing Efforts?
Many DIYers face challenges such as improper surface preparation, which can lead to peeling or chipping over time. Using low-quality primers or paints might seem cost-effective initially but can compromise the finish’s integrity in the long run. Temperature and humidity during application also play critical roles. For example, applying paint in a humid environment can cause bubbling or uneven curing, reducing durability. Moreover, neglecting adequate curing time before use can result in premature damage. An expert approach involves working in a controlled environment, ensuring the surface is impeccably clean, and allowing ample drying time between coats.

Proper surface preparation with rust removal and cleaning is vital for a durable finish.
How Can You Maintain the Refinished Surface for Maximum Longevity?
Once your bathtub is refinished, maintenance becomes crucial. Regular cleaning with non-abrasive, pH-neutral cleaners prevents surface degradation. Avoid harsh chemicals like bleach or abrasive scrubbing pads that can scratch or dull the finish. Applying a clear, waterproof sealant every few years can act as an additional barrier against moisture and wear. Additionally, installing a slip-resistant mat not only enhances safety but also minimizes physical impact on the finish. Sharing practical tips, I recommend documenting your refinishing process and keeping a maintenance schedule to detect early signs of wear and address them promptly.
If you’re interested in exploring more advanced DIY techniques, such as upcycling old furniture or creating eco-friendly home decor, I encourage you to check out creative DIY projects for your home. These projects can complement your refinishing efforts by adding unique, personalized touches to your living space.
Have you tried refinishing a bathtub or other vintage fixtures? I’d love to hear your experiences or answer any questions you might have. Share your thoughts in the comments below or suggest other DIY projects you’d like to master!
Understanding the Nuances of Durable Refinishing: A Personal Reflection
Over the years, I’ve come to realize that achieving long-lasting results in bathtub refinishing isn’t just about following a set of steps—it’s about embracing a mindset of meticulousness and continuous learning. One of the most crucial lessons I learned was the importance of environmental control during application. Working in a controlled, dust-free environment, especially with low humidity, significantly impacts the adhesion and curing process of epoxy paints. This insight came after experiencing premature chipping due to humid conditions, a mistake I won’t repeat again.
The Role of Surface Preparation in Ensuring Longevity
For me, surface preparation is the foundation of a durable finish. I spend extra time cleaning, rust removing, and sanding to create an impeccable surface. Using a high-quality, rust-inhibiting primer is non-negotiable—it’s like giving your tub a protective armor. Industry experts, such as those at home improvement professionals, emphasize that skipping or rushing this step can compromise the entire project, leading to peeling or chipping within a few years.
Advanced Techniques for Reinforcing Your Finish
Once the basic refinishing is complete, I recommend exploring advanced techniques like applying a clear sealant or topcoat designed specifically for high-moisture environments. This extra layer acts as a shield against water ingress and physical wear. I’ve found that periodic touch-ups with matching epoxy paint can also help maintain the finish, especially in high-traffic areas of the tub. Sharing these personal strategies, I’ve seen my refinished tubs stand the test of time, sometimes over a decade, with proper maintenance.
Deep Dive: How Can You Address Common Challenges to Maximize Durability?
Addressing common pitfalls is essential. For instance, I once applied paint in a slightly humid environment, which resulted in bubbles and uneven curing. Now, I check weather forecasts and choose optimal days for refinishing. Additionally, I avoid rushing through curing times, even if it means postponing my project. Patience is key; according to industry experts, this ensures the epoxy fully hardens and bonds properly, preventing future failures.
What Are the Most Overlooked Details That Can Impact Long-Term Results?
One overlooked aspect is the condition of the surrounding areas—caulking, grout, and seals. Ensuring these are intact and well-maintained prevents water from seeping behind the refinished surface, which can cause delamination or rusting over time. I also recommend documenting your process thoroughly—photos, product details, and environmental conditions—which helps troubleshoot any issues later and guides future touch-ups. If you’re interested in expanding your DIY skills, exploring projects like creative home decor can complement your refinishing efforts and personalize your space even further.
Maintaining the durability of a refinished bathtub is an ongoing process. Regular cleaning with non-abrasive, pH-neutral cleaners, combined with periodic inspections, can significantly extend the life of your work. I encourage fellow DIY enthusiasts to keep experimenting, learning from each project, and sharing their experiences—because every refinishing journey is unique and offers valuable lessons. If you’ve faced challenges or achieved remarkable results, I’d love to hear your stories or see your photos—feel free to share in the comments or reach out through contact page. For those looking to refine their skills further, resources like step-by-step guides can be invaluable in elevating your DIY game.
Mastering the Art of Structural Reinforcement in Vintage Bathtub Refinishing
One often overlooked aspect in achieving durable refinishing results is the structural integrity of the underlying surface. As I delved deeper into professional refinishing techniques, I discovered that integrating reinforcement methods, such as applying a fiberglass mesh layer beneath the epoxy coating, can significantly enhance adhesion and prevent future cracking or delamination. This approach, rooted in advanced surface engineering, is especially beneficial for older, heavily used tubs where surface fatigue has compromised the substrate’s stability. Industry experts, like those at home improvement professionals, emphasize that addressing structural weaknesses during refinishing is crucial for longevity.
Balancing Surface Preparation with Micro-Mechanical Adhesion Techniques
Beyond traditional sanding and chemical stripping, employing micro-mechanical surface treatments can dramatically improve coating adhesion. Techniques such as micro-etching with acid-based primers create nano-scale roughness, increasing the surface area for bonding. I incorporated this method after learning how it mimics the surface preparation standards used in industrial corrosion protection. The result was a more resilient finish that withstands thermal expansion and contraction cycles without cracking. This nuanced process demands precision but offers substantial benefits, transforming a standard refinishing into an industrial-grade restoration. For those interested in elevating their skills, exploring advanced surface treatment techniques can provide valuable insights.

Micro-etching enhances adhesion by increasing surface roughness at the nano-scale.
Implementing Multi-Layer Protective Systems for Ultimate Durability
To push the durability limits, I adopted a multi-layer protective approach. Starting with a high-grade primer, I then applied multiple coats of epoxy paint, each cured meticulously. The final step involved sealing the surface with a UV-resistant, waterproof topcoat that acts as a barrier against moisture ingress and chemical attack. This layered system, inspired by industrial coatings used in marine environments, provides a comprehensive shield, extending the lifespan of the refinished tub well beyond standard expectations. According to creative DIY solutions, layering is key to creating resilient finishes that endure years of use.
Expert Tips: Diagnosing and Addressing Hidden Structural Flaws
An often underestimated challenge is identifying and repairing hidden flaws, such as micro-cracks or rust cavities, which can undermine the entire refinishing process. I learned to use ultrasonic flaw detectors and magnification tools to detect subsurface issues before proceeding. Repairing these with epoxy filler or metal reinforcement, followed by surface treatment, is necessary for long-term success. This proactive approach, rooted in industrial maintenance practices, ensures that the surface remains stable under stress and temperature variations. If you’re eager to deepen your expertise, I recommend exploring advanced diagnosis techniques for hidden structural issues.
What Are the Most Innovative Materials and Methods for Extending the Lifespan of Refinished Cast Iron Tubs?
Innovative materials, such as ceramic nano-coatings and self-healing epoxies, are revolutionizing the industry. These advanced coatings not only provide superior resistance to scratches, chemicals, and UV exposure but also actively repair minor damages through microcapsules embedded within the coating matrix. Incorporating such cutting-edge solutions can elevate your refinishing project from standard to museum-quality restoration. I recommend staying updated with industry developments through resources like industry publications and participating in professional workshops.
If you’re serious about mastering these advanced refinishing techniques, I invite you to share your experiences or questions. Engaging in community discussions can provide invaluable insights that refine your craft and ensure your projects stand the test of time. Feel free to reach out via the contact page.
Things I Wish I Knew Earlier (or You Might Find Surprising)
The Importance of Environment Control
One of the biggest surprises in my refinishing journey was how crucial working in a controlled environment is. I once tried to paint on a humid day, and the finish bubbled and peeled within months. Now, I always check the weather forecast and choose a dry, low-humidity day for the best results, realizing that patience and timing are everything.
Surface Preparation is Everything
I underestimated how much effort proper cleaning and rust removal would take. Skipping or rushing this step led to premature chipping. Taking my time to sand thoroughly and use high-quality primers made all the difference, extending the life of my refinished tub significantly.
The Power of Layering
Applying multiple thin coats of epoxy paint and sealing with a UV-resistant topcoat created a much more durable finish. This layered approach, inspired by industrial coatings, transformed my DIY project into a professional-looking, long-lasting restoration.
Addressing Hidden Structural Issues
Detecting and repairing micro-cracks or rust cavities early with tools like ultrasonic flaw detectors prevented future failures. Investing time in these inspections paid off, ensuring my tub remained sturdy and beautiful for years.
Maintenance Matters
Regular cleaning with non-abrasive, pH-neutral cleaners and reapplying sealants every few years keeps the finish looking fresh. I’ve learned that ongoing maintenance is the key to long-term success.
Resources I’ve Come to Trust Over Time
- Home Improvement Experts: Their articles and product recommendations helped me choose the right materials and avoid common pitfalls. I recommend browsing their insights for a solid foundation.
- DIY Network: A treasure trove of detailed tutorials on surface preparation and finishing techniques that boosted my confidence with step-by-step guidance.
- Industrial Coatings Publications: These sources introduce advanced layering and sealing methods that elevate DIY projects into professional-quality restorations. Highly recommended for those serious about durability.
- Ultrasonic Testing Guides: Learning how to detect hidden flaws was a game-changer, and these resources made complex techniques accessible to a DIYer like me.
Parting Thoughts from My Perspective
Refinishing a cast iron bathtub is more than just a DIY task; it’s a journey of patience, attention to detail, and continuous learning. From understanding the importance of environment control to mastering surface preparation and layering, each step contributed to a durable, beautiful finish. If you’re considering this project, I encourage you to invest time and effort—because the reward is a stunning, long-lasting transformation that can save you money and preserve your vintage fixtures. If this resonated with you, I’d love to hear your thoughts or experiences. Share it with someone who might find it helpful, and don’t hesitate to explore more DIY adventures on your home improvement journey.