Discovering the Art of Doll Sculpting: A Personal Tale
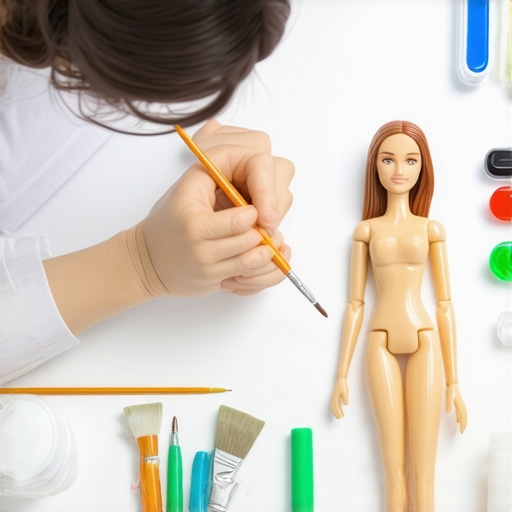
My fascination with ball-jointed dolls (BJDs) started during a quiet weekend when I stumbled upon a beautifully handcrafted resin doll online. As someone passionate about arts and crafts, I was instantly captivated by the intricate details and realistic articulation. That moment marked the beginning of my adventure into sculpting and articulating these unique dolls using polymer clay and resin.
Why I Chose Polymer Clay and Resin for My Creations
Over the years, I’ve experimented with various materials, but polymer clay and resin stood out due to their versatility and durability. Polymer clay, especially brands like creativity with polymer clay, allows for fine detail work and easy manipulation. Resin, on the other hand, offers a smooth, glass-like finish perfect for realistic skin tones and transparent effects.
My Process: From Concept to Finished Doll
Creating a ball-jointed doll begins with sketching and planning the anatomy. I then sculpt the head and limbs with polymer clay, paying close attention to proportions and facial features. Once satisfied, I cure the clay in the oven, which is a crucial step I learned from expert guides like advanced polymer clay techniques.
Next comes the painting and detailing—adding realistic eyes, eyebrows, and subtle skin shading. For joints, I use small metal or resin connectors to ensure smooth articulation, mimicking real movement. I then seal the doll with a protective coating, which enhances durability and provides a natural skin finish.
What Makes Articulated Dolls So Special?
One of the most rewarding aspects of this craft is the ability to pose my dolls in lifelike stances. The flexibility and realism they offer make them not just collectibles but also art pieces. I find that developing these skills has deepened my appreciation for craftsmanship and patience.
Have you ever wondered how to perfect the articulation in your own doll projects?
If you’re curious about improving joint mobility or mastering resin finishing techniques, I recommend exploring resources like expert guides on DIY craftsmanship. They’ve been invaluable in honing my skills.
For fellow enthusiasts or beginners, I encourage sharing your experiences or asking questions in the comments below. Connecting with others has been a huge motivator on my journey.
Remember, creating these dolls is a blend of artistry, patience, and technical skill. With practice and the right materials, your sculptures can become stunning pieces of art that reflect your personal style and craftsmanship.
Unlocking the Secrets to Perfect Joint Articulation in Your Dolls
One of the most challenging yet rewarding aspects of high-quality doll sculpting is achieving seamless and natural joint movement. As an expert in this craft, I’ve found that understanding the biomechanics of joints and using the right materials can dramatically improve your results. Precise joint placement, combined with the use of miniature metal or resin connectors, allows for a realistic range of motion that enhances the overall aesthetic and functionality of your dolls.
When designing joints, consider the anatomy you aim to replicate. For instance, ball-and-socket joints provide a broader range of movement, ideal for limbs, while hinge joints work well for elbows and knees. Incorporating small, durable connectors like reliable connectors ensures longevity and smooth articulation, even after repeated posing. Experimenting with different materials and techniques, such as embedding tiny metal pins or using flexible resins, can optimize joint stability and mobility.
Advanced Resin Finishing Techniques for a Flawless Skin Effect
Resin finishing is an art in itself. Achieving a realistic skin tone requires multiple layers of color and careful polishing. I recommend starting with a high-quality clear resin, which, when poured and cured correctly, provides a perfect base for detailed painting. Using specialized pigments and lightfast dyes, like those discussed in natural dyeing techniques, can add depth and vibrancy to your doll’s skin tones.
Once the base layer is cured, I apply translucent glazes to build up shadows and highlights, mimicking the subtle variations in real skin. Polishing with fine abrasives and buffing compounds, often combined with a matte or satin sealant, results in a soft, lifelike finish that captures light beautifully. For those seeking an expert-level finish, experimenting with layered resin pours and inlaid color accents can elevate your work to new artistic heights.
How Can You Troubleshoot Common Articulation and Finishing Challenges?
Ever faced joints that feel stiff or resin that appears uneven? These issues are common, even among seasoned artisans. A practical approach involves meticulous planning during the design phase—double-checking joint alignments and ensuring proper curing times for resin. For articulations, fine-tuning connector sizes and applying lubricants like silicone grease can improve movement. As for resin surfaces, sanding with progressively finer grits and polishing with buffing compounds can remove imperfections, revealing a smooth, realistic surface.
Incorporating these techniques requires patience and attention to detail, but the results are well worth the effort. If you’re eager to master these skills, I recommend exploring resources like expert guides on DIY craftsmanship that cover advanced sculpting and finishing methods.
What innovative methods can elevate your doll sculpting to an art form?
Thinking beyond traditional techniques, some artists experiment with integrating embedded LEDs for lighting effects or using layered transparent resins to create embedded scenes or textures. These approaches not only showcase technical prowess but also add a unique artistic dimension to your dolls. Sharing your experiments or seeking inspiration from other experienced artisans can spark new ideas, pushing your craft toward professional mastery.
If you’re passionate about advancing your skills, don’t hesitate to ask questions or share your progress in the comments below. Connecting with a community of dedicated creators is a powerful way to learn and grow.
Remember, developing expertise in articulation and resin finishing transforms your doll sculpting from simple crafts into true art. With dedication and practice, your creations can become stunning masterpieces that reflect your personal style and technical skill. For more insights into advanced DIY projects, check out advanced craft techniques.
Delving Deeper: The Nuances of Joint Mechanics and Artistic Expression
As I continued refining my skills, I discovered that the key to truly lifelike articulated dolls lies not only in the precision of joint placement but also in understanding the biomechanics behind each movement. This deeper insight allows for more natural poses and a greater range of expressiveness, transforming a simple sculpture into a convincing character. For instance, studying human anatomy and joint function—something I delved into extensively—has dramatically improved my ability to mimic realistic postures. I recall spending hours analyzing photographs and even attending anatomy workshops, which proved invaluable in creating joints that move seamlessly and convincingly.
Innovative Resin Techniques: Pushing Boundaries for a Hyper-Realistic Finish
When it comes to resin finishing, I found that layering translucent glazes and experimenting with embedded textures can produce astonishing effects. One method I adopted involves creating a multi-layered pour with varying opacity and color depth, inspired by advanced techniques detailed in encaustic layering guides. This approach allows for subtle skin tones and a luminous glow that mimics real flesh. Additionally, incorporating tiny embedded elements—like microbeads or powdered pigments—into the resin can add depth and a tactile quality, elevating the artwork from mere sculpture to a textured masterpiece.
Addressing Articulation Challenges: From Stiff Joints to Fluid Motion
One challenge I frequently encounter is joints that resist movement or feel overly stiff after assembly. My solution involves meticulous calibration—using smaller connectors or adjusting the tension of the joint mechanisms. Applying a tiny amount of silicone grease or specialized lubricants can significantly improve flexibility without compromising stability. For resin surfaces, achieving a perfectly smooth finish often requires a multi-stage sanding process, starting with coarser grit and gradually moving to ultra-fine abrasives, followed by polishing with buffing compounds. This process reveals a reflective, glass-like surface that enhances realism. If you’re venturing into complex joint systems or resin finishing, I highly recommend exploring advanced crafting resources for expert tips.
Innovative Ideas: Elevating Your Doll Artistry to New Heights
Thinking beyond conventional methods, one idea I’ve been experimenting with involves embedding tiny LED lights within the dolls’ joints or eyes to create subtle lighting effects. This technique adds a new dimension of realism and interactivity, perfect for display or photography. Additionally, layered transparent resins combined with inlaid miniature scenes or textures can produce stunning visual effects that captivate viewers. These innovative methods are not just about technical mastery but also about expressing your unique artistic voice. Sharing your experiments and seeking feedback from fellow artisans can ignite inspiration and help you push boundaries further.
If you’re eager to explore these advanced techniques and elevate your craft, I encourage you to connect with a community of passionate creators or browse comprehensive guides, such as those available on DIY craftsmanship resources. Your journey into sophisticated doll sculpting is an ongoing adventure filled with learning and discovery—embrace it and let your creativity flourish.
Harnessing Biomechanics for Fluid and Expressive Articulations
Achieving natural movement in high-end doll sculptures involves a deep understanding of biomechanics and joint mechanics. By studying human anatomy and joint function, I’ve been able to design joints that mimic real human motion, enhancing the realism of poses. For example, incorporating ball-and-socket joints with precisely calibrated connectors allows for a broader and more natural range of motion. This approach not only elevates the aesthetic quality but also increases the functional versatility of your dolls, making them suitable for dynamic displays or storytelling projects. To refine these skills, I recommend exploring detailed anatomy resources, such as those provided by professional illustrators and anatomists, which can provide invaluable insights into joint behavior and muscle movement.
Innovative Resin Layering and Embedded Art for Hyper-Realistic Skin Effects
Advanced resin techniques involve multi-layered pours that create depth and luminosity, closely resembling real flesh. Inspired by encaustic layering methods, I experiment with varying opacities and embedded elements like microbeads or powdered pigments to add tactile dimension and visual complexity. These embedded textures, combined with translucent glazes, produce a captivating glow and subtle skin variations. Polishing these layers with fine abrasives and buffing compounds results in a smooth, lifelike finish that captures light beautifully, elevating your doll from a simple sculpture to a stunning piece of art. For a comprehensive guide on layering techniques, I found encaustic layering guides particularly helpful in mastering this nuanced process.
Overcoming Articulation and Finishing Challenges with Precision and Patience
Common issues such as stiff joints or uneven resin surfaces can be addressed through meticulous calibration and multi-stage finishing. Adjusting connector tension, using small quantities of silicone grease, and employing fine-grit sanding followed by polishing are crucial steps. This process reveals a glass-like, flawless surface that enhances realism. Patience is key here—layering and polishing must be performed carefully to achieve seamless results. For complex joint systems or advanced resin finishing, I recommend consulting expert craft resources, which offer detailed techniques for precise problem-solving and refinement.
How Can You Integrate Innovative Lighting or Embedded Textures into Your Dolls?
Thinking beyond traditional methods, embedding tiny LED lights within joints or eyes can add a captivating lighting effect, bringing your sculptures to life. Additionally, layered transparent resins with embedded miniature scenes or textured materials can produce stunning visual effects, making your dolls unique artistic statements. Sharing your experiments with these techniques can inspire others and open new avenues for creative exploration. If you’re eager to push your craft further, I encourage you to connect with a community of passionate artists or explore detailed guides like DIY craftsmanship resources that delve into innovative artistic techniques. Your journey into advanced doll artistry is a continuous process of learning, experimentation, and self-expression—embrace it fully and let your creativity soar.
Things I Wish I Knew Earlier (or You Might Find Surprising)
The Hidden Complexity of Joints
When I first started sculpting dolls, I underestimated how crucial joint placement and biomechanics are. Learning that even tiny adjustments can dramatically improve poseability was a game-changer for me, and I wish I had known this from the start.
The Power of Layered Resin Techniques
Initially, I thought a single resin pour was enough for realistic skin effects. Discovering layered pours and embedded textures opened a new world of depth and luminosity, making my dolls look almost lifelike. It’s a technique I highly recommend exploring.
Patience Over Perfection
One of the most valuable lessons I’ve learned is that patience and meticulous finishing surpass rushing for perfection. Taking the time to sand, polish, and refine results in a much more convincing and durable sculpture—something I wish I had appreciated earlier.
Incorporating Artistic Expression
Beyond technical skills, I found that adding personal touches—like unique skin tones or embedded scenes—gives each doll its own personality. Embracing creativity makes the process more fulfilling and the end result more meaningful.
Handling Common Challenges
Joints that feel stiff or uneven resin surfaces are common issues. Through trial and error, I learned that small tweaks in connector tension and multi-stage polishing can solve these problems effectively, saving me frustration and time.
Resources I’ve Come to Trust Over Time
- Expert Guides on DIY Craftsmanship: These comprehensive resources helped me understand advanced sculpting and finishing techniques, offering step-by-step instructions that are easy to follow.
- Natural Dyeing Masterclass: For adding vibrant, lightfast skin tones, this course introduced me to eco-friendly pigments and layering methods that truly elevate my work.
- Encaustic Layering Techniques: This resource deepened my understanding of resin layering, enabling me to create luminous, multi-dimensional surfaces that mimic real flesh.
- Online Communities of Artisans: Connecting with fellow doll artists has been invaluable for sharing tips, troubleshooting, and inspiring new ideas.
- Technical Articles on Joint Mechanics: Understanding the biomechanics behind movement has allowed me to design more natural and expressive poses in my dolls.
Parting Thoughts from My Perspective
Reflecting on my journey into doll sculpting, I realize that mastering articulation, resin finishing, and artistic expression transforms this craft into true art. The blend of technical skill and personal creativity is what makes each piece special. If you’re passionate about creating articulated dolls or exploring resin techniques, I encourage you to stay curious and patient. Share your experiences, ask questions, and connect with others—this community is full of generous, talented individuals eager to help. Remember, every mistake is a step toward mastery, and the joy of bringing your unique vision to life makes the effort worthwhile. If this resonated with you, I’d love to hear your thoughts or see your projects. Feel free to drop a comment or reach out through my contact page. Happy sculpting!