My Journey into Drywall Repair: From Frustration to Confidence
I’ll never forget the day I discovered how to repair those large, unsightly holes in my walls without calling in a professional. It was a frustrating experience initially, but once I learned the secrets of effective drywall patching and texturing, I felt empowered. If you’re like me, eager to restore your walls flawlessly, keep reading—I’ll share my personal tips and insights based on real experience.
Why Texture and Precision Matter in Wall Repairs
When I first attempted drywall repair, I underestimated the importance of matching the texture. A seamless finish depends on understanding the nuances of drywall patching and texturing techniques. Properly blending the repair with the existing wall surface can turn a messy fix into a virtually invisible repair. I found that using high-quality patching compounds and mastering texturing techniques made all the difference.
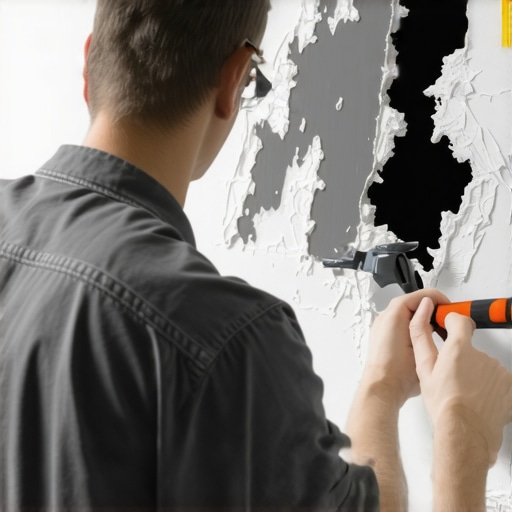
The Step-by-Step Process to Repair Large Holes
My approach is straightforward but effective. First, I clear the area and cut a clean, square patch from drywall to fit the hole. Then, I secure the patch with drywall screws, ensuring it’s flush. Applying a joint compound over the edges, I feather the seams for smoothness. Once dry, I sand lightly to get a perfect surface. To mimic the wall’s texture, I use a sponge or spray technique, depending on the existing pattern. This careful process ensures the repair is seamless, both visually and tactilely.
How to Achieve a Professional Textured Finish
Matching the wall texture can be tricky, but I learned a few tricks. For example, if your wall has a knockdown texture, I recommend applying joint compound with a roller or trowel, then lightly knocking down the peaks with a drywall knife. For popcorn or orange peel textures, specialized sprays work best. I often experiment on scrap drywall to perfect my technique before tackling the actual wall. For detailed guidance, I also rely on tutorials from reputable sources like DIY guides.
What Are Common Mistakes to Avoid When Patching Large Holes?
In my experience, rushing the drying process or not feathering the edges properly can lead to noticeable patches. Also, neglecting to prime the repaired area before painting can cause uneven color. I recommend patience and attention to detail for a flawless finish. Remember, small imperfections can be hidden with additional texturing and painting, so don’t worry if it’s not perfect the first time.
If you’re interested in transforming your home with creative DIY projects, check out home decor ideas for inspiring ideas to complement your repair skills. And if you want to share your own drywall adventures, I’d love to hear your stories—drop a comment below!
Mastering the Art of Wall Texturing: An Expert’s Guide to Flawless Finishes
When it comes to drywall repairs, texture matching is often the most challenging aspect. As an experienced DIY enthusiast, I’ve found that understanding various texturing techniques can dramatically improve your wall finishing skills. Whether you’re dealing with knockdown, orange peel, or popcorn textures, practicing on scrap drywall helps refine your technique before applying it to your actual wall. Using the right tools, such as textured spray guns or sponges, can make a significant difference in achieving professional results. For comprehensive tutorials, I recommend exploring home decor ideas.
Essential Tools and Materials for Expert Wall Repair
High-quality joint compounds, textured sprays, and sanding supplies are essentials in my toolbox. Investing in a good drywall knife and a spray gun designed for textured finishes allows for greater control and consistency. When feathering edges, I prefer using a wide taping knife to create a smooth transition between the patch and the existing wall. Proper priming after texturing ensures uniform paint adhesion, preventing any color inconsistencies. Remember, patience with drying times and meticulous surface preparation are crucial for an expert-level finish.
How to Tackle Complex Wall Repairs with Confidence
Addressing large holes or multiple imperfections requires a strategic approach. I often start by cutting a precise square patch, securing it carefully, and applying multiple layers of joint compound, allowing each to dry thoroughly. Sanding between coats helps achieve a seamless surface. For textured matching, I experiment with different spray techniques or sponge patterns on scrap material, ensuring the final look blends naturally. To learn more about advanced DIY projects, visit DIY projects.
What Are the Nuances That Separate a Good DIY Repair from a Professional Finish?
In my experience, the key lies in attention to detail and understanding the subtle differences in textures. Small imperfections in sanding or uneven application of compound can be hidden with additional texturing or light touch-ups. Moreover, mastering the feathering technique ensures the patch is invisible under paint. The choice of texture style should match not only the existing wall but also the room’s overall aesthetic. For an even more detailed guide, check out expert restoration techniques.
If you want to elevate your drywall repair skills further, I encourage you to experiment with different textures and share your results. Engaging with a community of DIYers can provide valuable feedback and inspiration. Feel free to comment below with your project stories or questions about specific textures you’re trying to match!
Reflections on the Nuances of Texturing: Going Beyond the Basics
As I delved deeper into wall texturing, I realized that mastering texture matching is an art that demands patience, a keen eye, and a willingness to experiment. One experience that stands out was attempting to replicate a delicate knockdown texture on a ceiling that had been painted over multiple times. I learned that subtle differences in application technique or drying time could dramatically alter the final look. It became clear that understanding the chemistry of joint compounds and the specific drying conditions in my home environment was crucial. For instance, humid days can extend drying times and affect texture adhesion, which I discovered through trial and error. This journey taught me that precision and observation are vital, especially when blending new textures seamlessly with existing surfaces, and that sometimes, small adjustments make all the difference. Engaging with online communities or reputable tutorials, like those found on home decor ideas, can provide valuable insights and inspiration for more complex projects.
The Deep Dive into Tools and Materials for Professional Results
Achieving a flawless textured finish requires more than just technique; it hinges on the right tools and materials. Over time, I’ve come to appreciate the subtle differences that high-quality tools make. For example, a flexible spray gun designed for textured finishes allows for more even application and better control over spray patterns, especially when working on larger areas. I also found that using a wide trowel or knife for knocking down textures provides a smoother, more natural look. Investing in professional-grade joint compounds and texture sprays has consistently improved my results, reducing the need for touch-ups later. Additionally, meticulous surface preparation, including sanding and priming, ensures that textures adhere properly and paint finishes remain even. For those interested in elevating their skills further, exploring advanced techniques such as layering multiple textures or experimenting with custom finishes can add unique character to your walls. To deepen your understanding, I recommend reviewing comprehensive guides on specialized tools and techniques.
Why Texture Matching Is Both Science and Art—And How to Master It
What are the subtle factors that influence the final appearance of textured walls?
In my experience, the final look of a textured wall hinges on multiple interconnected factors: the type of joint compound used, environmental conditions, the application method, and the drying process. For instance, the consistency of the compound—whether it’s too thick or too runny—can affect spray patterns or sponge impressions. Environmental humidity and temperature directly impact drying times and texture adhesion, which is why I often adjust my techniques based on weather conditions. Moreover, the skillful application of texture requires an understanding of the specific pattern you aim to replicate, whether it’s knockdown, orange peel, or a custom design. I’ve found that practicing on scrap drywall, experimenting with different tools and settings, helps develop an intuitive sense of what works best. As this process involves a delicate balance between science and creativity, patience and careful observation are key. For those eager to refine their skills, exploring the advanced techniques outlined in advanced DIY guides can be invaluable.
If you’ve undertaken similar projects or faced unique challenges in matching textures, I’d love to hear your stories. Sharing your experiences can inspire others and deepen our collective understanding of this nuanced craft. Feel free to leave a comment or reach out via the contact page—let’s keep the conversation going and learn from each other’s journeys.
Unraveling the Science of Texture Adhesion: Why Environmental Conditions Are Crucial
One of the most overlooked yet decisive factors in achieving a flawless textured finish lies in understanding how environmental conditions influence the drying and adhesion process. I vividly recall a project where a humid day caused my joint compound to dry unevenly, resulting in a less-than-perfect match with the existing wall. This experience underscored the importance of controlling humidity and temperature during application. Using a dehumidifier or air conditioner can significantly improve results, especially in fluctuating climates. Additionally, selecting the right type of joint compound—such as setting compounds for high-humidity environments—can make a noticeable difference. According to professional drywallers, managing ambient conditions is not just a recommendation but a necessity for high-quality finishes. For those interested in mastering environmental controls, exploring advanced guides on climate management in drywall projects can be invaluable.
The Nuances of Tool Selection: Elevating Your Texturing Technique
While technique plays a vital role, the choice of tools often determines the level of finesse you can achieve. From textured spray guns to specialized sponges, each tool offers unique capabilities. I’ve experimented extensively with different spray nozzles, discovering that adjusting spray patterns and pressure settings allows for highly customized textures. For instance, creating a delicate knockdown effect requires a specific spray consistency and timing, which I perfected after several trials. Investing in high-quality tools not only improves the quality of your finish but also reduces fatigue and inconsistencies. For advanced DIYers, exploring professional-grade equipment—like multi-pattern spray guns—can elevate your craftsmanship. Reputable sources such as DIY guides provide detailed insights into selecting and mastering these tools.
Mastering Layering and Coloring Techniques for Unique Textured Finishes
Beyond basic texturing, layering different compounds and pigments opens a realm of creative possibilities. I’ve delved into multi-layered textures, blending shades of joint compound with natural dyes to produce subtle, nuanced surfaces that add depth and character to my walls. Achieving this requires patience and a keen eye for color transitions, often involving sanding between layers to reveal underlying textures. Incorporating metallic or iridescent pigments can introduce shimmering effects, transforming a simple wall into an artistic statement. This approach resembles professional decorative finishes used in high-end interiors, where the wall becomes a canvas of layered artistry. For those eager to push their boundaries, exploring the techniques outlined in advanced DIY digital fabric patterns can offer inspiration for innovative layering ideas.
How Can I Achieve Perfect Texture Uniformity Across Large Surface Areas?
Achieving consistent texture over expansive walls demands meticulous planning and technique. I recommend dividing the area into smaller sections, applying and feathering each section before moving on. Using a wide spray nozzle or large trowel helps maintain uniform application. Additionally, practicing on scrap drywall to calibrate your spray gun or trowel techniques ensures even texture distribution. Patience during drying and a light touch with finishing tools help prevent ridges or overlaps. For complex projects, employing professional tools like automatic texture sprayers can provide consistent results that rival commercial finishes. To deepen your skills, I suggest exploring comprehensive tutorials on large-area texturing, which can be found in dedicated DIY resources or professional workshops.
Engaging with the Community: Sharing Your Advanced DIY Wall Projects
If you’ve experimented with complex textures, layered finishes, or environmentally sensitive techniques, I encourage you to share your experiences. Engaging with a community not only provides valuable feedback but also inspires new ideas and approaches. Whether you’ve mastered intricate knockdown patterns or innovative color blending, your insights can motivate others to elevate their craft. Feel free to reach out via the contact page—let’s continue the conversation and learn from each other’s advanced DIY adventures. Remember, mastery in wall texturing is a journey of constant experimentation and refinement, and your unique experiences contribute to a richer DIY community.
Things I Wish I Knew Earlier in Drywall and Texture Repair
Patience is Key
One of the biggest lessons I learned was that rushing through drywall repairs often leads to less-than-perfect results. Taking my time to properly prep, apply, and dry each layer has made a huge difference in the final look. I wish I had understood this sooner, as it would have saved me from some frustrating redo efforts.
The Power of Practice
Experimenting on scrap drywall before tackling the real wall helped me understand how different textures respond to tools and techniques. This practice phase boosted my confidence and allowed me to refine my methods without the pressure of the actual project.
Matching Existing Textures is an Art
Getting the texture just right is often the most challenging part. I found that using a sponge or spray gun with adjustable settings really helped me mimic my wall’s pattern. Sometimes, I’d mix a small batch of joint compound with a bit of texture powder to match the original surface more closely.
Don’t Skip Priming and Sanding
Priming the patched area before painting and lightly sanding between coats create a seamless finish. I used to neglect these steps, but now I see how they make the difference between a good repair and a professional-looking one.
Invest in Quality Tools
High-quality drywall knives, textured spray guns, and sanding sponges might seem pricey initially, but they make the process smoother and the results better. Over time, I’ve found that the right tools save me time and effort, leading to more satisfying projects.
Environmental Conditions Matter
Humidity and temperature can significantly affect drying times and texture adhesion. I learned to work during drier days or use dehumidifiers when needed, especially for larger or more delicate textured finishes.
Resources I’ve Come to Trust Over Time
- DIY Guides: The comprehensive tutorials at DIY guides have been invaluable for step-by-step techniques and troubleshooting tips.
- Home Decor Inspiration: Exploring home decor ideas has helped me see how textured walls can add character and style to any room.
- Community Forums: Online DIY communities are fantastic for exchanging advice, sharing photos, and learning new tricks from experienced enthusiasts.
Parting Thoughts from My Perspective
Reflecting on my drywall and texturing journey, I realize that the key to flawless finishes lies in patience, practice, and attention to detail. From mastering texture matching to understanding environmental influences, every step taught me something valuable. If you’re venturing into wall repairs or texture matching, remember that every project is a learning experience—don’t be afraid to experiment and take your time. If this resonated with you, I’d love to hear your stories or tips—feel free to drop a comment below or share your progress. Happy DIY-ing!