My Unexpected Encounter with Broken Ceramics
It all started one lazy Sunday afternoon when I stumbled upon a box of broken ceramics in my garage. Instead of tossing them away, I remembered reading about upcycling and how discarded materials could be transformed into beautiful art. That moment sparked my curiosity and became the beginning of my journey into creating garden mosaics from broken ceramics.
Why Upcycling Broken Ceramics is a Game-Changer
Using broken ceramics for garden art not only adds a unique, colorful touch to my yard but also feels incredibly eco-friendly. According to environmental experts, upcycling reduces waste and minimizes our carbon footprint (source). I love the idea of giving these shards a second life and turning them into eye-catching mosaics that tell a story.
The Creative Process: Turning Shards into Art
My first step was to gather all the broken pieces and clean them thoroughly. I then sketched my design on a sturdy base—an old wooden board I repurposed. Using a strong adhesive, I started placing the ceramic fragments, carefully arranging colors and shapes to create a harmonious pattern. The process was therapeutic and satisfying, blending artistic vision with hands-on craftsmanship.
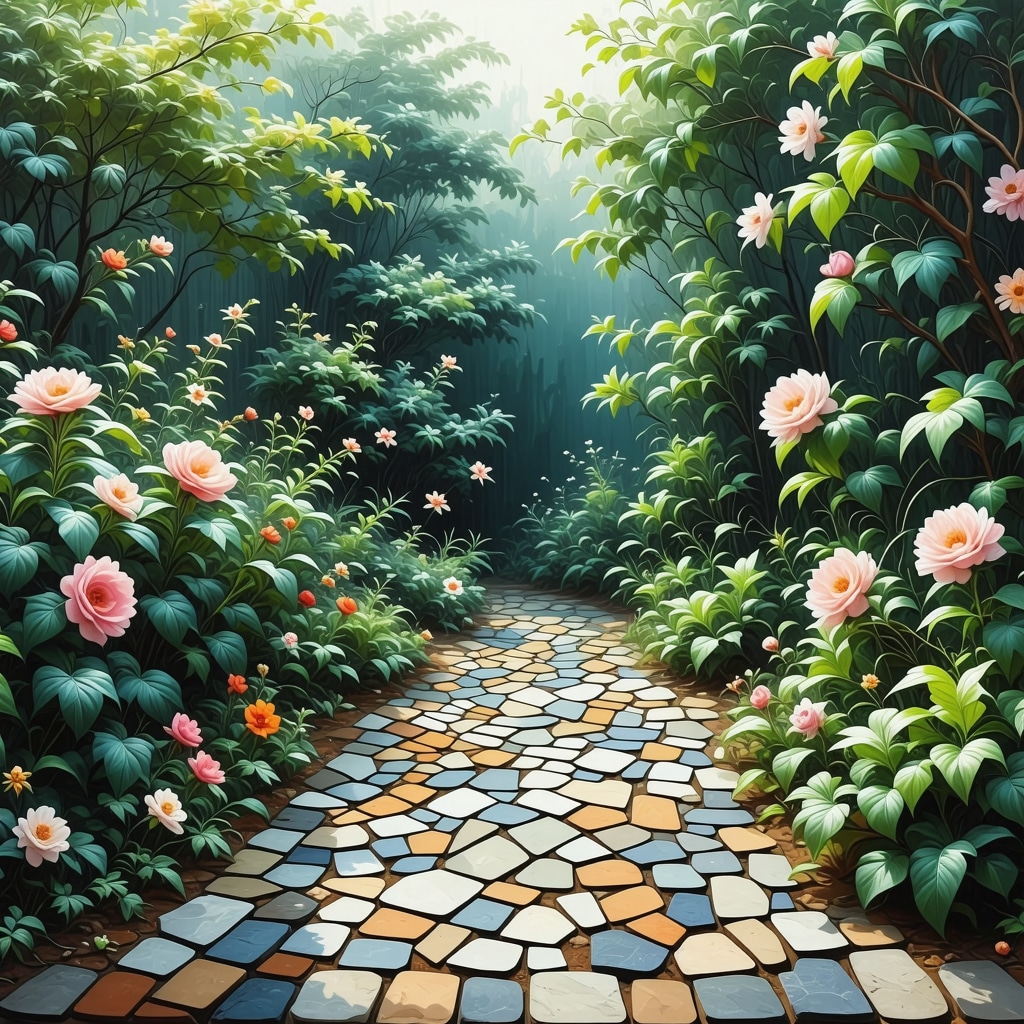
What Materials Do You Need for a Garden Mosaic?
Here’s what I found essential: ceramic shards, outdoor-grade adhesive, grout, a sturdy base, and sealant. For a professional finish, I also used some decorative pebbles and glass beads to add texture. You can experiment with different materials to match your garden’s aesthetic. If you’re new to mosaics, I recommend exploring DIY guides for detailed steps and tips.
How Can You Ensure Your Mosaic Lasts Outdoors?
Weatherproofing is crucial for garden mosaics. I learned that applying a good sealant protects the mosaic from rain and sun damage, preserving its vibrancy. I also positioned my creation in a shaded spot to prevent fading. For more expert guidance on outdoor DIY projects, check out home decor ideas.
Ever Wondered How to Incorporate Personal Touches Into Your Garden Art?
Personalized mosaics can include mosaic tiles with initials, favorite colors, or themed patterns. I added a few glass pieces that reflected sunlight beautifully, making my garden a personal sanctuary. The best part? Every shard of ceramic carries a story, and now they all come together to create a mosaic storybook in my yard.
If you’re inspired to try this DIY project, don’t hesitate to share your experiences or ask questions in the comments. Creating garden mosaics from broken ceramics has been a fulfilling adventure and a wonderful way to upcycle waste into art that brightens my outdoor space.
Mastering Weatherproofing Techniques for Lasting Garden Mosaics
One of the critical steps in creating durable outdoor mosaics from broken ceramics is mastering the art of weatherproofing. As an expert, I recommend applying a high-quality outdoor sealant that penetrates the grout and ceramic surface, providing a protective barrier against moisture, UV rays, and temperature fluctuations. This not only preserves the vibrant colors but also prevents the shards from loosening over time. Additionally, choosing the right adhesive—specifically formulated for outdoor use—ensures your mosaic remains intact despite the elements.
How Can Personalization Elevate Your Garden Art?
Personal touches make garden mosaics truly special. For instance, incorporating mosaic tiles with initials, symbols, or themes that resonate with your personal story can transform a simple project into a heartfelt piece of art. Consider adding reflective glass pieces that catch sunlight and create shimmering effects, or integrate natural stones that complement your garden’s aesthetic. Personalization not only enhances visual appeal but also imbues your outdoor space with unique character and sentimentality.
What Are the Nuanced Challenges in Large-Scale Mosaic Projects?
When scaling up mosaic projects, several expert considerations come into play. Larger surfaces demand meticulous planning in layout and material placement to maintain symmetry and harmony. Structural support becomes crucial; ensuring the base is stable and capable of bearing the mosaic’s weight prevents future cracks or detachment. Additionally, managing grout application uniformly across vast areas requires precision to avoid uneven surfaces or color inconsistencies. For those interested in tackling complex projects, exploring detailed DIY guides, such as step-by-step DIY guides, can be invaluable.
Expert Insights on Choosing the Right Materials for Outdoor Durability
Material selection is paramount for longevity. While ceramic shards are aesthetically appealing, combining them with other durable materials like porcelain or tempered glass can enhance resilience. Using a mortar mix designed for outdoor mosaics ensures proper adhesion and flexibility. Moreover, selecting grout with water-repellent properties minimizes the risk of cracks and staining. For inspiration and practical tips on mixing and application, visiting home decor ideas can provide valuable insights.
How Can You Inspire Others with Your Creative Garden Mosaic?
Share your project journey through photos, videos, or detailed blog posts. Creating a narrative around your process—from selecting shards to the final sealant—can motivate others to pursue their own DIY garden art. Engaging with online DIY communities or local craft groups fosters feedback, new ideas, and encouragement. Additionally, suggesting related projects, such as creative home decor crafts, can expand your skill set and inspire cross-disciplinary creativity. Remember, every shard of ceramic carries a story, and sharing your mosaic storybook enriches the community’s collective artistic journey.
Embracing the Nuances of Material Selection for Enduring Outdoor Art
Over the years, I’ve experimented with various materials, discovering that blending ceramics with tempered glass or even stones can significantly enhance the durability of outdoor mosaics. The key is to select materials with similar thermal expansion properties, preventing cracks caused by temperature fluctuations. For example, tempered glass, known for its resilience, adds a shimmering touch and withstands weather better than regular glass. When choosing adhesives, I’ve found that epoxy-based, outdoor-rated glue provides a stronger bond, ensuring the mosaic withstands the elements for years to come. Incorporating these nuanced choices elevates the longevity and aesthetic appeal of your garden art.
Personalizing Your Garden Mosaics: Beyond Aesthetics to Emotional Connection
Personalization transforms a garden mosaic from a simple decorative piece to a heartfelt storybook. I once embedded tiny mosaic tiles with my family’s initials and favorite symbols, which became a cherished focal point. Reflective glass pieces that catch sunlight can symbolize specific memories or moments, creating dynamic visual effects that change throughout the day. I also recommend experimenting with incorporating natural elements like small pebbles or even tiny seashells that carry personal significance. These touches deepen emotional resonance and make your garden a true sanctuary of memories and personality.
Facing the Challenges of Large-Scale Mosaic Projects: A Personal Reflection
When I embarked on my first large-scale mosaic, I underestimated the importance of a meticulous layout plan. Managing vast surfaces requires advanced planning—using grids or templates helps maintain symmetry. Structural support is crucial; I learned to reinforce the base with mesh or additional layers to prevent cracking over time. Uniform grout application across large areas was tricky but manageable with proper tools and patience. My advice? Break down large projects into sections and work systematically. For those ready to dive into complex projects, comprehensive guides like step-by-step DIY guides can be invaluable in navigating nuanced challenges effectively.
Advanced Techniques in Weatherproofing and Material Preservation
Mastering weatherproofing is as much an art as the mosaic creation itself. I always apply a high-quality, penetrating outdoor sealant after the grout has cured thoroughly. This sealant forms a breathable yet water-repellent barrier, safeguarding colors and shards from moisture damage. Additionally, positioning mosaics in shaded areas minimizes UV fading, prolonging vibrancy. For added resilience, I reinforce vulnerable edges with protective coatings or embed them behind protective barriers. These nuanced techniques, borrowed from professional practices, significantly extend the life of outdoor mosaics, turning them into heirloom pieces that withstand the test of time and weather.
Encouraging Others to Share Their Artistic Journeys
Creating a community around DIY garden art has been incredibly rewarding. I invite readers to share their projects, photos, or even the stories behind their mosaics. Documenting the process—from selecting shards to sealing—can inspire others and foster a vibrant exchange of ideas. Consider hosting small workshops or online galleries to showcase your work and learn from fellow enthusiasts. Remember, every shard of ceramic carries a story, and sharing your journey not only enriches your experience but also ignites creativity in others. For more creative ideas, explore creative home decor crafts and see how diverse projects can spark new inspiration.”,
Harnessing the Power of Color Theory for Sophisticated Mosaic Designs
One of the most overlooked yet impactful aspects of professional-grade garden mosaics is an intricate understanding of color theory. As I delved deeper into this craft, I realized that mastering complementary, analogous, and triadic color schemes significantly enhances visual harmony and emotional resonance. By carefully selecting ceramic shards that align with these principles, I could craft mosaics that evoke specific moods—serene blues for tranquility or vibrant reds for energy. Incorporating subtle gradations and shading techniques, inspired by classical art, allows for a nuanced depth that turns a simple mosaic into a captivating narrative. For those seeking to refine their color mastery, exploring resources like home decor ideas can provide invaluable inspiration.
Integrating Mixed Media for Textural Complexity and Depth
While ceramic shards form the backbone of my mosaics, I discovered that integrating various materials—such as natural stones, glass beads, and metallic elements—can elevate the tactile and visual complexity exponentially. This approach introduces a layered dimension that invites viewers to explore the mosaic from multiple angles. I experimented with embedding small mirrors for reflective effects, which bounce sunlight and attract attention, or incorporating textured pebbles that contrast with smooth ceramic surfaces. Such mixed media techniques require an understanding of material compatibility and adhesion strategies. For advanced insights and detailed tutorials, I recommend exploring creative DIY crafts that push the boundaries of traditional mosaic art.
Mastering the Art of Seamless Grouting for a Polished Finish
Achieving a seamless, professional look in outdoor mosaics hinges on expert grouting techniques. I learned that precise application and color-matching of grout can dramatically influence the final aesthetic. Using a flexible, water-repellent grout formula ensures durability in various weather conditions. I also found that cleaning excess grout promptly and polishing the surface with a damp cloth enhances the vibrancy of the shards. For larger projects, employing a grid layout and dividing the work into manageable sections prevents inconsistencies. If you’re eager to elevate your grouting skills, consulting detailed guides like step-by-step DIY guides can be transformative.
Creating Personal Narratives through Symbolism and Embellishments
In my most cherished mosaics, I incorporated symbolic motifs—such as sun, moon, or family initials—that imbue the piece with personal significance. Reflective glass fragments and tiny treasures embedded within the design serve as storytelling elements, transforming the mosaic into a visual diary. I also experimented with thematic patterns—like floral motifs or abstract shapes—that mirror my garden’s personality. Personalization elevates a simple decorative element into a meaningful artwork that resonates emotionally. To incorporate your own story, consider adding elements with sentimental value or thematic consistency, making your garden truly one-of-a-kind.
What Are the Nuanced Challenges in Large-Scale Mosaic Projects and How Do Experts Overcome Them?
Scaling up mosaic projects introduces complexities such as maintaining symmetry over expansive surfaces and ensuring structural integrity. I learned that detailed planning, including drafting precise templates and using grid systems, is essential. Reinforcing the base with mesh or additional support prevents future cracking, especially when working with heavy materials. Uniform grout application becomes more challenging but can be managed through specialized tools and patience. For ambitious projects, I recommend studying comprehensive resources like detailed DIY guides that address these nuances systematically.
Advanced Material Selection for Outdoor Resilience and Artistic Excellence
Choosing resilient materials is vital for longevity. I found that combining ceramics with tempered glass or porcelain enhances durability and aesthetic variety. Epoxy-based adhesives designed for outdoor use ensure a strong, flexible bond that withstands temperature fluctuations. Additionally, selecting grout with water-repellent properties minimizes staining and cracking. Experimenting with materials that have similar thermal expansion coefficients prevents stress-induced damage. For innovative material blends and expert recommendations, exploring home decor ideas can provide fresh perspectives.
Sharing Your Artistic Journey to Inspire a Community of Creators
Documenting and sharing your mosaic projects through social media, blogs, or community workshops fosters a vibrant creative network. I encourage you to tell your story—highlighting challenges faced, techniques used, and personal touches added—so others can learn and feel inspired. Engaging with fellow enthusiasts through online forums or local craft groups not only offers feedback but also sparks new ideas. Remember, every shard of ceramic carries a story, and by sharing your narrative, you help build a collective tapestry of artistic expression. If you’re eager to deepen your knowledge, exploring creative DIY projects can be an excellent starting point.
Things I Wish I Knew Earlier (or You Might Find Surprising)
Patience Is Key
When I first started creating garden mosaics from broken ceramics, I underestimated how much patience and planning it would require. Rushing through often led to misaligned shards or uneven grout, but taking my time really paid off in the final look. I’ve learned that a steady pace ensures a more polished and durable piece, especially for outdoor use.
Material Compatibility Matters
Not all adhesives or grouts are suitable for outdoor mosaics. I initially used indoor-grade materials, which didn’t stand up well to weather changes. Switching to outdoor-rated adhesives and water-resistant grout made a huge difference in longevity and vibrancy. It’s worth investing in quality supplies if you want your mosaic to last through seasons.
The Power of Personal Touches
Adding personal elements—like initials, favorite colors, or meaningful symbols—transforms a simple mosaic into a heartfelt piece of art. I once embedded tiny family photos behind glass shards, creating a mosaic that tells a story and brings me joy every time I look at it.
Weatherproofing Is Not Optional
Applying a good sealant after completing your mosaic is essential. I’ve learned that sealants protect against rain, UV rays, and temperature swings, preserving the colors and preventing shards from loosening. Proper weatherproofing has kept my outdoor mosaics vibrant for years.
Scaling Up Requires Strategy
Large-scale projects can be daunting. I recommend dividing the surface into sections and planning your layout meticulously. Using templates or grids helps maintain symmetry and coherence. Reinforcing the base and working slowly ensures structural integrity over time.
Experiment with Mixed Media
Incorporating different materials like glass beads, natural stones, or metallic pieces adds texture and depth. I’ve found that mixed media mosaics are more engaging and visually dynamic, making them a real conversation starter in my garden.
I really enjoyed reading about your journey with upcycling broken ceramics into garden art. It’s inspiring to see how everyday waste can be transformed into something so beautiful and meaningful. I agree that weatherproofing is a crucial step, especially here in Brisbane where weather can be quite unpredictable. I’ve found that using a high-quality outdoor sealant really makes a difference in maintaining the vibrancy and integrity of mosaic pieces over time.
In my experience, balancing aesthetics with durability is key. Have you experimented with different types of adhesive or grout to see which ones hold up best in your climate? I used a epoxy resin-based adhesive for my outdoor mosaics, and it has held up well, even through heavy rain.
Overall, your post has encouraged me to revisit my own mosaic projects with a fresh perspective on personalization and material choice. Do you have tips on integrating natural elements like stones or shells to enhance both durability and aesthetic appeal? Would love to hear your thoughts or any additional advice for outdoor mosaic enthusiasts.
Thanks for sharing your detailed process and insights! I completely agree that weatherproofing is one of the most vital steps to ensure outdoor mosaics last and keep their vibrant look. From my experience in similar projects here in Melbourne, using a high-quality, breathable sealant combined with a durable outdoor adhesive has been essential for weather resilience. I’m curious, have you experimented with embedding natural elements like small stones or shells into your mosaics? I’ve found that these additions not only add aesthetic charm but can also help reinforce the structure, especially if you choose materials with similar thermal properties.
Regarding adhesion, I tend to opt for epoxy-based glues designed for outdoor use—I’ve noticed they tend to provide a stronger, more flexible bond over time, even with heavy rain or temperature swings. What has been your experience with different adhesives? Do you have a preferred brand or type that you swear by?
Your project definitely inspires me to explore more personalized and textured designs. Would love to hear your thoughts on integrating natural elements for both durability and visual appeal—thank you for sparking this idea!
What an inspiring journey into upcycling! I love how turning broken ceramics into garden mosaics not only adds vibrancy but also helps reduce waste. Your process of cleaning and carefully arranging shards really resonates with me, as I’ve found that patience is key to achieving a harmonious design. Weatherproofing is definitely a critical step—I’ve personally used outdoor epoxy adhesive and a good breathable sealant, which have served me well in Melbourne’s unpredictable climate.
I’m curious, have you considered incorporating natural elements like pebbles or tiny shells into your mosaics? They can enhance aesthetic appeal while also contributing to durability, especially if you select materials with similar thermal expansion. It’s fascinating how personal touches, such as reflective glass pieces, can make garden art come to life with sunlight.
Thanks for sharing your experience and tips—it’s motivated me to revisit my own mosaic projects and experiment with new textures. How do you decide on color schemes to evoke specific moods? Looking forward to hearing more from fellow enthusiasts about their creative ideas and techniques!