My First Step into Crafting a Wooden Playhouse
Ever since I was a kid, I dreamed of creating my own little sanctuary for my children where they could play, imagine, and explore. When I finally decided to build a child-sized wooden playhouse with doors and windows, I felt a mix of excitement and nervousness. This project turned out to be more rewarding than I anticipated, offering not just a playful space but also a wonderful learning experience.
Designing the Perfect Playhouse: From Dream to Draft
My journey began with sketching out a simple yet functional design. I wanted the playhouse to be sturdy, safe, and easy to build. I focused on choosing durable materials like high-quality pine and cedar, which are ideal for outdoor furniture and play structures. Incorporating doors and windows required careful planning, especially to ensure safety and accessibility. I consulted some expert woodworking guides and found helpful tips on step-by-step DIY guides to navigate through the complexities of framing and assembly.
Building the Frame: A Step-by-Step Adventure
Once I had my plan, I started with the foundation, making sure it was level and stable. I used basic tools like a saw, hammer, and drill, which I had familiarized myself with through DIY projects for beginners. Building the walls was straightforward, but fitting the doors and windows required patience and precision, especially to ensure smooth opening and closing. I learned that proper measurements and joints are key, and I often referred to online tutorials for guidance.
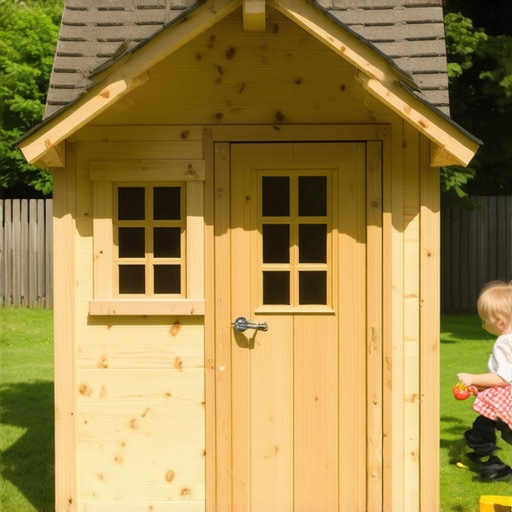
Adding Doors & Windows: Personal Touches for Safety and Charm
My favorite part was installing the doors and windows. I chose a hinged door with a latch for safety and clear acrylic panes for the windows to let in natural light. I customized the window frames with decorative trims to give the playhouse a charming look. Installing these features was a delicate task, but I appreciated the challenge. It reminded me of the importance of planning for ventilation and weatherproofing, which I explored further on home improvement tips.
What Did I Learn About DIY Woodworking?
Building this playhouse taught me that patience and careful planning are essential. I also discovered that using the right materials and tools makes a significant difference in the final outcome. If you’re considering embarking on a similar project, I highly recommend checking out authoritative resources like advanced DIY techniques to enhance your skills. Remember, every mistake is a learning opportunity, and the satisfaction of creating something with your own hands is truly priceless.
How Can I Personalize My Playhouse to Make It Truly Unique?
Adding personal touches like painted murals, custom furniture, or decorative hardware can elevate your DIY project. Think about incorporating themes your children love or using eco-friendly paints for safety. For inspiration, explore creative ideas on home decor DIYs. Sharing your experience or asking for tips can also be a fun way to connect with fellow DIY enthusiasts—so don’t hesitate to comment below!
Transforming Your DIY Playhouse into a Magical Retreat
Once you’ve completed the basic structure of your wooden playhouse, the next step is to infuse it with personality and charm. Custom touches not only make the space more inviting but also reflect your child’s personality and your creativity. From thematic paint jobs to personalized furniture, the possibilities are endless. Consider painting murals that tell stories or feature favorite characters, a technique that can be enhanced using eco-friendly paints for safety and sustainability. For guidance on applying decorative finishes, explore creative DIY home decor ideas.
Expert Strategies for Creative Personalization
One of the most effective ways to customize your playhouse is to incorporate thematic elements that resonate with your child’s interests. Whether it’s a fairy-tale castle, a pirate ship, or a space station, using thematic paint schemes, themed furniture, or decorative hardware can turn a simple structure into an imaginative world. Additionally, adding built-in shelves, custom benches, or a mini chalkboard wall can make the space functional and fun. If you’re interested in advanced woodworking techniques for seamless integration, learning from authoritative sources like professional decoupage tips can elevate your craftsmanship.
What Are the Most Innovative Ways to Personalize a DIY Playhouse for Lasting Joy?
Innovative personalization extends beyond paint and furniture. Think about adding interactive elements such as a weatherproof chalkboard, a mini climbing wall, or a handcrafted doorbell. Incorporating natural materials like reclaimed wood or recycled hardware not only promotes sustainability but also adds a rustic charm. For example, repurposed vintage handles or hinges can give your playhouse a unique, upcycled look. Moreover, integrating outdoor lighting with solar-powered fixtures can make the space magical during evening hours. To ensure durability and weather resistance, explore advanced weatherproofing techniques, which are well-covered in resources like home improvement tips. Sharing your personalized touches in a blog or social media can inspire others and create a community of DIY enthusiasts.
Practical Tips for Maintenance and Longevity
Once your playhouse is personalized, maintaining its appeal and structural integrity becomes essential. Regular inspections for signs of weather damage, repainting, or hardware wear will keep it safe and attractive. Applying protective finishes, such as exterior-grade sealants or stains, can extend the lifespan of your handcrafted masterpiece. Remember, a well-maintained playhouse not only provides ongoing joy but also retains its value over time. For more in-depth guidance on maintenance and upgrades, you might find home decor DIY projects helpful.
Reflecting on the Art of Personalization: Beyond Basics
As I delved into personalizing my playhouse, I realized that the true magic lies in the details. Incorporating themes that resonate with my children’s imagination—like a fairy-tale castle or a pirate hideout—transformed the space into a world of endless possibilities. It’s fascinating how small touches, such as handcrafted furniture or themed hardware, can evoke a sense of wonder and ownership. These nuances require patience and a keen eye for craftsmanship, pushing me to learn advanced techniques like upcycling and detailed woodworking. The challenge was balancing aesthetics with durability, especially when selecting weatherproof paints and hardware that withstand outdoor conditions, which I found to be crucial for lasting joy.
Mastering Weatherproofing and Longevity: My Deep Dive
Ensuring the longevity of my playhouse meant going beyond simple protective coatings. I explored advanced weatherproofing techniques, including the use of high-grade sealants and weather-resistant paints. I learned that sealing joints meticulously and applying multiple coats significantly enhances resistance against rain, wind, and sun. It’s also important to consider the impact of humidity and temperature fluctuations, which can cause wood to warp or crack over time. Implementing proper drainage and ventilation further extends the lifespan, a lesson I absorbed from authoritative guides on home improvement. This process was an exercise in patience, but I appreciated how each step contributed to a resilient, enduring structure that my children will enjoy for years to come.
Incorporating Sustainable and Reclaimed Materials: A Personal Philosophy
One of the most rewarding aspects was choosing sustainable materials—reclaimed wood, recycled hardware, and eco-friendly paints. This decision not only reduced my environmental footprint but also added character to the playhouse. Reclaimed wood, with its rich textures and stories, offered a rustic charm that new timber simply cannot replicate. Integrating these materials demanded a nuanced approach, including selecting the right reclaimed pieces, treating them for pests, and adapting my design to accommodate their unique flaws. This process deepened my respect for craftsmanship and sustainability, making the project more meaningful. I encourage fellow DIY enthusiasts to explore eco-friendly paints and upcycling techniques for not only aesthetic enhancement but also environmental responsibility.
Custom Elements and Interactive Features: Elevating Imagination
Adding interactive elements like a mini chalkboard wall, a handcrafted doorbell, or a small climbing wall transformed the playhouse into an engaging adventure hub. These features required advanced carpentry skills, such as precise joinery and weatherproof wiring for lighting or electronic features. I found that integrating solar-powered outdoor lighting not only added a magical glow during evenings but also promoted sustainability—an aspect I’m increasingly passionate about. The process involved some trial and error, especially when ensuring safety and durability, but it was deeply satisfying to see my ideas come to life. If you’re interested in exploring intricate woodworking or electrical integration, authoritative resources like advanced DIY techniques provide invaluable guidance.
Sharing and Inspiring: Building Community Through Creativity
The journey of creating my playhouse has been more than just a personal project; it’s a story I love sharing with friends and fellow DIY enthusiasts. I’ve found that documenting the process through photos, blogs, or social media not only inspires others but also invites valuable feedback and new ideas. Engaging with a community of like-minded crafters opens doors to discovering innovative solutions and refining my skills further. If you’re passionate about DIY, I encourage you to share your projects and experiences—each one adds a unique thread to the vibrant tapestry of craftsmanship that unites us all. For more advanced ideas or to connect with fellow enthusiasts, explore home decor DIYs and community forums.
Innovative Weatherproofing Strategies for Enduring Outdoor Creations
Achieving longevity for your DIY wooden playhouse requires a nuanced understanding of weatherproofing techniques. Beyond basic sealants, I adopted an integrated approach involving high-grade exterior paints, meticulous sealing of joints, and strategic drainage solutions. For instance, I applied multiple coats of weather-resistant paint, ensuring each layer was fully cured before proceeding. I also reinforced vulnerable joints with specialized sealants to prevent water ingress, a method supported by experts at home improvement tips. Incorporating proper drainage pathways and ventilation not only protected the structure but also enhanced its resilience against the elements. This deep dive into weatherproofing underscores the importance of a comprehensive, expert-backed approach for those passionate about sustainable craftsmanship.

Sustainable Material Selection: Upcycling and Eco-Conscious Craftsmanship
My commitment to sustainability led me to explore reclaimed and recycled materials, which added both character and eco-friendliness to the project. Utilizing reclaimed wood, I sourced aged planks with rich textures and stories, treating them carefully to eliminate pests and defects. This process demanded advanced techniques, such as precise sanding and reinforcement, to accommodate the imperfections inherent in reclaimed materials. Incorporating recycled hardware and eco-friendly paints further aligned with my environmental values. This approach not only minimized waste but also enriched the aesthetic appeal of the playhouse, demonstrating that sustainability and craftsmanship can harmoniously coexist. For those inspired to adopt similar principles, exploring eco-friendly paints and upcycling techniques can elevate your projects with meaningful, environmentally conscious touches.
Integrating Interactive and Thematic Elements for Lasting Engagement
Transforming a simple play structure into an imaginative retreat involved the strategic addition of interactive features. I designed a handcrafted doorbell with weatherproof wiring, integrated solar-powered lighting for enchanting evening ambiance, and built a mini chalkboard wall to foster creativity. These features required advanced carpentry skills, including weatherproof joinery and electrical safety considerations. The use of solar lighting, in particular, exemplified my commitment to sustainability while enhancing functionality. Such elements not only captivated my children’s imaginations but also provided a platform for ongoing innovation. If you’re eager to explore complex woodworking or electronic integration, authoritative resources like advanced DIY techniques can guide you towards mastery.
Deepening Craftsmanship: The Art of Decorative and Functional Detailing
The magic of personalization lies in the details. I mastered intricate techniques such as decorative hardware installation, textured paint finishes, and thematic mural painting to elevate the playhouse’s charm. Employing advanced woodworking methods, I seamlessly integrated built-in shelves and custom furniture pieces, ensuring both form and function. These enhancements demanded patience and precision, pushing my skills toward professional levels. For aspiring craftsmen, exploring resources like creative DIY solutions can provide inspiration and technical guidance for elevating your projects with unique touches.
CTA: Elevate Your DIY Journey with Expert Techniques and Personal Touches
If you’re passionate about transforming basic structures into personalized masterpieces, I invite you to delve deeper into advanced DIY techniques. Sharing your experiences, exploring innovative materials, and continuously refining your skills can turn a simple project into a lifelong passion. Engage with communities, learn from authoritative guides, and don’t hesitate to experiment with new ideas—each step brings you closer to mastery. For comprehensive insights and to connect with other enthusiasts, visit home decor DIYs.
Things I Wish I Knew Earlier (or You Might Find Surprising)
Patience Is Your Best Tool
When I first started building the playhouse, I underestimated how crucial patience would be. Rushing through steps often led to mistakes, especially with fitting doors and windows. Taking my time allowed me to perfect each detail and avoid costly errors.
Invest in Quality Materials
I learned that choosing durable, weather-resistant wood like cedar saved me headaches down the line. Cheaper materials might save money upfront but often require frequent repairs, which can be frustrating and time-consuming.
Plan for Weatherproofing from the Start
Including weatherproofing measures early on, such as sealing joints and applying protective paints, significantly extends the life of the playhouse. It’s easier and more effective than trying to fix damage later.
Personal Touches Make All the Difference
Adding customized elements like decorative trims or themed murals transformed the playhouse from a simple structure into a magical space that my children love. It’s the small details that create lasting memories.
Building Is as Much About Learning as It Is About Creating
Every challenge taught me something new—whether it was measuring accurately or understanding how different materials react to weather. The process became a meaningful journey of growth and discovery.
Resources I’ve Come to Trust Over Time
- DIY Guides: Step-by-step DIY guides have been invaluable for navigating complex tasks with confidence.
- Home Improvement Tips: Expert home improvement resources help me understand weatherproofing and maintenance better.
- Creative DIY Ideas: Creative home decor blogs inspire me to personalize the playhouse uniquely.
Parting Thoughts from My Perspective
Building my DIY wooden playhouse was more than just a project; it was an experience that enriched my skills and deepened my appreciation for craftsmanship. The key takeaways are to be patient, choose quality materials, and infuse personal touches that make the space truly special. If you’re considering a similar project, remember that every challenge is an opportunity to learn and grow. I encourage you to start your own journey—don’t be afraid to experiment and put your personal stamp on it. If this resonates with you, I’d love to hear your stories or tips in the comments. Happy building!