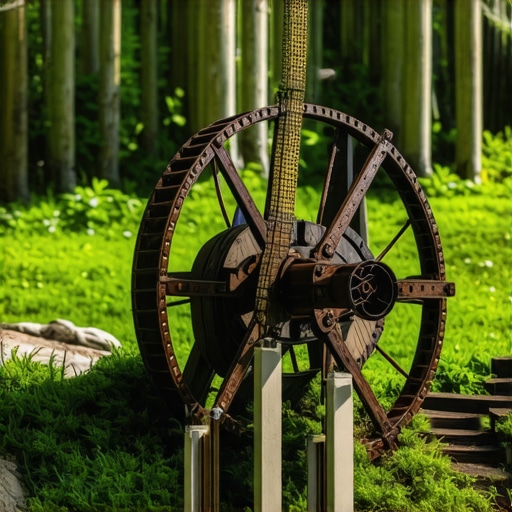
My Personal Journey into Miniature Water Wheel Crafting for Dioramas
As an avid model maker and diorama enthusiast, I often find myself captivated by the intricate details that bring a scene to life. One project that truly sparked my creativity was building a miniature water wheel, a charming addition that adds realism and dynamism to any landscape. I still remember the thrill of assembling my first tiny water wheel, and today, I want to share my step-by-step experience with you, hoping to inspire your next DIY adventure.
Getting Started: Gathering Materials and Inspiration
Before diving into the construction, I spent some time browsing online for inspiration and practical tips. I came across a detailed guide on DIY Water Windmill Craft, which provided invaluable insights. For my project, I used lightweight balsa wood, craft sticks, small gears, and a tiny motor—perfect for creating a realistic miniature water wheel. I learned that choosing the right materials not only enhances durability but also ensures the scale looks authentic.
Designing and Building the Water Wheel
Design is everything in miniatures. I sketched a simple plan, keeping in mind the scale and the scene I wanted to complement. Using a craft knife, I carefully cut out the wheel’s paddles from thin balsa wood sheets. Assembly required patience; I glued the paddles onto a central hub, ensuring they were evenly spaced. To add movement, I incorporated a small gear system, which I connected to a tiny motor I sourced from an old electronic device. The process was fascinating, and I found that precision is key to achieving a smoothly rotating wheel.
How Do You Ensure Realism in Miniature Water Wheels?
One question I often get is how to make miniatures look realistic. My secret is attention to detail—adding tiny rivets, weathering effects, and even a splash of water-colored paint to mimic flowing water. I also studied real water wheels through videos and photos, understanding their mechanics and aesthetics. This research helped me replicate authentic features, making my miniature water wheel not just a model but a realistic scene element. For further inspiration, I recommend exploring authoritative sources like DIY Eco-Friendly Projects for creative detailing ideas.
Final Touches and Sharing My Creation
After assembling the water wheel, I painted it with weather-resistant acrylics, carefully adding subtle shading to accentuate the wood grain. Placing it into my diorama, I was thrilled to see how this tiny feature brought the scene to life. If you’re interested in similar projects, I encourage you to try building your own water wheel—it’s a rewarding experience that combines craftsmanship with a touch of engineering.
Are you curious about other miniature projects or want to share your own DIY stories? Feel free to comment below or reach out through my contact page. Happy crafting!
Creating Authentic Miniature Water Wheels: Techniques from an Expert
One of the most captivating elements in diorama crafting is the water wheel, which adds a dynamic and realistic touch to any scene. When I started exploring this craft, I quickly learned that attention to detail makes all the difference. From selecting the right materials to understanding the mechanics, every step contributes to a convincing miniature water feature.
Designing with Precision: Planning Your Miniature Water Wheel
Before beginning construction, I recommend sketching your design, keeping in mind the scale and scene context. Think about the water flow, wheel size, and how it will integrate into the landscape. Using digital tools or traditional sketches helps visualize the final product and anticipate potential challenges. For inspiration, check out DIY Water Windmill Craft for detailed design ideas.
Material Selection and Construction: Building a Durable, Realistic Model
Choosing the right materials is crucial. I prefer lightweight yet sturdy options like balsa wood for paddles, craft sticks for structural supports, and tiny gears for movement. When assembling, ensure that each component fits snugly to prevent wobbling or misalignment. Incorporating a small motor, sourced from old electronics, provides realistic rotation. Proper gluing techniques and patience during assembly help achieve a smooth, functional wheel. For more insights into DIY building techniques, visit step-by-step DIY guides.
Enhancing Realism: Adding Details and Weathering Effects
Realism is in the details. Tiny rivets, weathered paint, and water effects elevate your miniature water wheel. I often add a splash of water-colored paint to mimic flowing water, which creates a more convincing scene. Studying real water wheels through videos and photographs helps replicate authentic features. Incorporating natural elements like moss or algae can also add a sense of age and integration into the environment. For creative detailing ideas, explore creative home decor crafts.
Troubleshooting Common Challenges in Miniature Water Wheel Projects
One common issue is ensuring smooth rotation. This often relates to gear alignment or motor power. Using a fine-tipped screwdriver or tweezers can help adjust gear placement accurately. If the wheel wobbles, check for uneven paddles or loose connections. Also, consider the water source; a small, controlled flow mimics real water dynamics and prevents excess wobbling or spinning too fast. Experimenting with different paddle materials or shapes can also improve efficiency and appearance.
What Are the Most Overlooked Details That Make a Miniature Water Wheel Truly Realistic?
In my experience, tiny imperfections—like minor weathering, subtle water stains, or irregular paddle wear—add authenticity. These small touches suggest age and usage, making the scene more believable. Incorporating natural textures, such as moss or dirt, can also enhance realism. For detailed techniques on weathering, visit deck staining and sealing tips. Remember, the key is balancing precision with natural imperfections.
Showcasing Your Masterpiece and Connecting with Fellow Enthusiasts
Once completed, placing your water wheel in a diorama is incredibly satisfying. Capture high-quality photos from multiple angles to highlight the craftsmanship. Sharing your work on forums or social media can inspire others and invite valuable feedback. If you’re eager to explore similar projects, consider building other water features or mechanical elements that complement your water wheel. For ongoing inspiration, I suggest reading more about eco-friendly and sustainable DIY projects at DIY eco-friendly solutions.
Have questions about building complex water systems or want to suggest your favorite techniques? Feel free to comment below or reach out via my contact page. Happy crafting and scene-building!
Refining Your Craft: The Subtle Art of Achieving Perfect Rotation and Authenticity
One of the most rewarding yet challenging aspects of miniature water wheel making is ensuring smooth, consistent rotation. From my experience, this often hinges on meticulous gear alignment and choosing the right motor—details that can easily be overlooked in the initial stages. I recall spending hours adjusting tiny gears with precision tweezers, realizing that even a slight misalignment could cause wobbling or uneven spinning, disrupting the scene’s realism. To combat this, I recommend experimenting with different gear ratios and considering the use of lubrication suitable for miniature models, which can dramatically improve performance and longevity.
Deepening Realism: Incorporating Natural Wear and Environmental Effects
Beyond basic weathering, authentic miniature water wheels benefit from subtle signs of aging—tiny scratches, slight paint chipping, and natural moss or algae growth. These details evoke a sense of history and integration into the environment, making the scene more convincing. For example, I often use a fine brush to add water stains or rust effects, inspired by close-up photographs of real water wheels. Studying real-world examples through videos and detailed images, like those shared in advanced weathering techniques, helps me replicate these aged features convincingly. Remember, the key is balancing natural imperfections with overall cleanliness to avoid overdoing it.
Handling Common Challenges: Fine-Tuning and Troubleshooting
In my journey, I encountered frequent issues like paddle warping or gear slippage. The solution often involved reassessing paddle shapes—sometimes, slightly curved paddles provided better water interaction and movement efficiency. I also found that ensuring tight, but not overly rigid, gear connections prevents unnecessary wobbling. When dealing with wobbling wheels, I carefully rebalanced paddles and checked for uneven glue application. For complex setups, I recommend documenting your assembly process step-by-step, which can help identify where misalignments or loose connections occur. For comprehensive guidance, exploring step-by-step DIY tutorials can be invaluable.
Exploring Advanced Materials and Techniques to Elevate Your Miniatures
As I gained confidence, I began experimenting with alternative materials—using thin brass sheets for paddles or incorporating real water-flow mechanisms with miniature tubing. These enhancements not only increase durability but also add a layer of complexity that elevates the scene’s realism. For example, embedding a tiny LED light beneath flowing water can simulate reflections, adding depth and vibrancy. Additionally, exploring innovative techniques like creating textured surfaces with two-part epoxy or natural clay can offer more authentic aged wood or stone effects. To learn more about integrating advanced materials, I suggest reviewing creative DIY solutions tailored for miniature projects.
Involving the Community and Sharing Your Progress
One of the most inspiring aspects of this craft is connecting with fellow enthusiasts. I often share my progress in online forums and social media groups, receiving invaluable feedback and new ideas. Documenting your projects with high-quality photos from multiple angles helps showcase your craftsmanship and provides inspiration for others. If you’re interested in building complementary features, such as water channels or mechanical gears, I recommend exploring additional resources like eco-friendly DIY projects that can integrate seamlessly into your diorama. Remember, every detail you add enriches the scene and brings your miniature water wheel to life.
Refining Mechanical Precision: Achieving Flawless Rotation in Miniature Water Wheels
One of the most intricate aspects of miniature water wheel craftsmanship is ensuring seamless, consistent rotation that mimics real-world mechanics. From my extensive experience, this involves meticulous gear alignment, selecting the appropriate motor, and fine-tuning the tension of moving parts. I recall experimenting with various gear ratios—sometimes incorporating micro-servo motors for better control—and adjusting gear mesh with precision tweezers. Applying a tiny amount of lubricant designed for miniature models significantly reduced wobbling and enhanced durability, as highlighted in advanced pyrography techniques. Achieving perfect rotation elevates your scene’s realism, making this step crucial for expert diorama builders.
Deepening Authenticity: Subtle Aging and Environmental Effects on Miniature Water Wheels
Beyond the mechanical precision, adding authentic aging details transforms a good model into a masterpiece. Tiny scratches, paint chipping, and natural moss or algae growth suggest age and environmental integration. I often use fine brushes to add water stains and rust effects, inspired by detailed photographs of real water wheels. Incorporating natural textures—such as applying a layer of two-part epoxy to simulate weathered wood or stone—can dramatically enhance believability. Studying real-world examples through videos and images, especially those documented in advanced weathering techniques, provides invaluable insights. Remember, the key is to strike a balance between natural imperfection and overall scene cleanliness to avoid overdoing age effects.
Expert Troubleshooting: Overcoming Gear Slippage and Wobbling Wheels
In my journey, gear slippage and wobbling were common hurdles. The solution involved careful re-examination of gear meshing, ensuring that each gear was perfectly aligned and secured. Sometimes, minor misalignments caused significant wobbling—requiring realignment or replacing worn gears. When paddles warp under tension, I replace them with thinner, more flexible materials to maintain shape integrity. For wobbling wheels, rebalancing paddles and adjusting glue points helped stabilize rotation. Documenting each assembly step proved invaluable, as it highlighted where misalignments occurred. For comprehensive guidance, I highly recommend exploring step-by-step DIY guides.
Innovative Materials and Techniques: Elevating Your Miniature Water Scene
Advancing beyond basic materials, I began experimenting with thin brass sheets for paddles, which offered greater durability and a realistic metallic sheen when polished. Incorporating miniature tubing to simulate water flow, coupled with LED lighting beneath flowing water, creates stunning visual effects—adding vibrancy and depth. For textured surfaces, I used natural clay and two-part epoxy to craft aged wood or stone, referencing techniques from creative DIY home decor. Embedding small, functional components like tiny valves or water channels increases scene complexity, creating an immersive experience. Experimenting with these advanced materials pushes your craftsmanship toward expert levels.
Engaging with the Creative Community: Sharing Progress and Gaining Inspiration
Connecting with fellow enthusiasts offers invaluable feedback and inspiration. I regularly share my projects online, highlighting details like gear alignment and weathering techniques, which sparks discussions and new ideas. High-quality photography from multiple angles showcases craftsmanship and invites critique. Building additional features—such as water channels or mechanical gear systems—complements your water wheel and enhances scene realism. For further inspiration, explore eco-friendly DIY solutions that can be integrated into your diorama environment, adding sustainability and storytelling depth. Remember, every added detail enriches your scene and represents your mastery in miniature artistry.
Elevating Your Craft: Integrating Complex Water Dynamics and Mechanical Artistry
For those seeking to push boundaries, integrating complex water dynamics can dramatically improve scene authenticity. Using micro-pumps or controlled water flow systems, you can simulate realistic water movement, creating ripples and splashes. Coupling this with mechanical systems—such as miniature gears driven by tiny motors—can produce synchronized, naturalistic rotations. I’ve explored embedding sensors and microcontrollers, like Arduino, to automate water flow and wheel rotation, adding a layer of interactivity and sophistication. Exploring such advanced techniques requires careful planning and experimentation but yields unparalleled realism. For in-depth guidance, visit innovative DIY methods. Dive into these complexities and let your creativity redefine miniature water scenes.
Things I Wish I Knew Earlier (or You Might Find Surprising)
Precision Over Speed
In my early days of crafting miniature water wheels, I underestimated the importance of meticulous gear alignment. Rushing through assembly often led to wobbling or uneven rotation, which broke the illusion of realism. Taking my time to carefully align gears and test rotations made a huge difference in the final look and function.
The Power of Weathering
Adding subtle weathering effects like tiny rust spots or water stains transformed my water wheels from looking new to convincingly aged. I learned that natural imperfections add authenticity, making your scene more believable and immersive.
Material Choices Matter
Experimenting with different materials, such as using brass sheets for paddles or natural clay for textured surfaces, opened new creative avenues. Choosing lightweight yet durable materials ensures your miniature can withstand handling and looks professional.
Patience is a Virtue
Building miniature water wheels requires patience and attention to detail. I often found that taking breaks and returning with fresh eyes helped me spot small imperfections and improve the craftsmanship.
Small Details Make a Big Difference
Incorporating tiny rivets, water effects, or even tiny algae patches can elevate your model’s realism. Don’t overlook these subtle touches—they’re what truly bring your scene to life.
Enjoy the Process
Finally, I realized that the journey is just as rewarding as the final product. Embrace the imperfections and learn from each project; it’s all part of developing your skills and style.
Resources I’ve Come to Trust Over Time
- DIYKutak.com: This site offers comprehensive guides on all levels, from beginner tips to advanced techniques, making it my go-to resource for troubleshooting and inspiration.
- Instructables: A treasure trove of user-submitted tutorials, I’ve learned countless tricks by browsing through detailed step-by-step projects shared by fellow hobbyists.
- YouTube channels such as “Miniature Masterpieces”: Visual learners will appreciate the detailed video walkthroughs that demonstrate techniques like gear assembly and weathering in real-time.
- Real-world references: Studying photos and videos of actual water wheels helps me understand mechanics and aesthetics better, ensuring my miniatures are as realistic as possible.
Parting Thoughts from My Perspective
Building miniature water wheels has become a delightful blend of art and engineering for me. The key takeaway is that patience, attention to detail, and a willingness to learn from mistakes lead to the most satisfying results. Whether you’re just starting or looking to refine your skills, remember that every project teaches you something new. If this resonates with you, I’d love to hear your thoughts or see your own creations—feel free to share your experiences or ask questions through my contact page. Keep crafting and exploring; your miniature worlds await!