Have you ever spent hours assembling a dollhouse only to realize it looks dull and lifeless in the dark? I’ve been there—struggling to add that magical touch of light, feeling overwhelmed by complex wiring and expensive tools, only to end up frustrated and stuck. That lightbulb moment hit me hard: why not make lighting simple, fun, and totally doable for beginners? Today, I promise to share how I transformed my tiny project into a glowing masterpiece, step-by-step, without breaking the bank or losing my mind.
Brightening Up Your Dollhouse Without the Headache
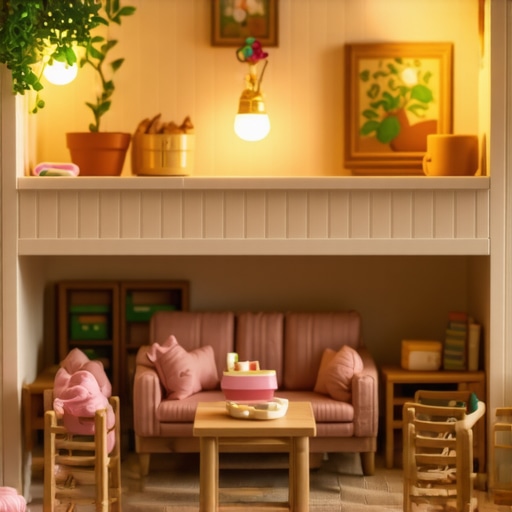
Lighting is what brings a dollhouse to life. It’s the secret ingredient that makes your miniature world feel real and inviting. But for beginners, the idea of installing tiny wiring, soldering, or dealing with complicated electrical components can seem downright intimidating. I wish I knew sooner that you don’t need to be an electrician to add a warm, cozy glow to your miniature space. With some basic supplies and a dash of patience, you can achieve stunning results that will impress everyone who visits your craft corner.
Is Lighting for Dollhouses Actually Worth the Hype?
Absolutely. When I first started, I thought lighting was just an extra—something nice to have if I had time. But I quickly learned that lighting can completely change the vibe of your miniature world. It highlights details, creates mood, and makes your project stand out. Plus, the process isn’t as complicated as it seems. I made a few early mistakes—like using incompatible batteries or overcomplicating my wiring—that set me back. But once I simplified my approach, everything clicked into place. If you’re skeptical, I get it. I’ve been there. But trust me, lighting is worth the effort, especially when you see your dollhouse glow with life for the first time.
If you’ve ever felt daunted by the idea of wiring or thought it’s too technical for a beginner, don’t worry. I’ll walk you through easy tricks and beginner-friendly tools that make the process smooth and enjoyable. For more creative ideas to decorate your space, check out home decor tips to elevate your entire project.
So, are you ready to turn your tiny house into a luminous masterpiece? Let’s dive into the essentials that will make your lighting project both fun and successful. From choosing the right LEDs to powering your lights safely, I’ll cover everything you need to know to get started, even if you’ve never soldered before.
Prepare Your Supplies and Tools
Start by gathering essential materials: tiny LED lights, thin insulated copper wire, a small battery pack, and a soldering iron or electrical tape for connections. I once tried to skip the soldering kit, thinking it was unnecessary, but I ended up with loose wires that kept shorting. To avoid such mishaps, ensure all your supplies are ready and within reach before starting.
Plan Your Lighting Layout
Sketch a simple diagram of your dollhouse and decide where to place lights. Think of it as planning a tiny city’s streetlights; placement is key to creating a cozy ambiance. I placed warm white LEDs in the living room and softer LEDs in bedrooms, which made the whole house glow invitingly. Remember, the goal is even, strategic lighting, not overly bright spots.
Connect Your LEDs to Power
Start by testing your LEDs with the battery pack outside the dollhouse. Connect the positive terminal of the battery to the longer leg of the LED, and the shorter leg to the negative terminal, using small pieces of copper wire. I once accidentally reversed the polarity, and my LEDs didn’t light up—lesson learned: always double-check orientation before soldering or taping connections.
Solder or Tape the Connections
If you’re comfortable with soldering, carefully solder the wires to the LED terminals for a secure connection. For a no-solder solution, use high-quality electrical tape or crimp connectors. During my first attempt, I used tape and found it held surprisingly well, but I had to redo it after a few weeks. Soldering provides a cleaner, more durable finish, especially for permanent installations.
Route Wires Inside the Dollhouse
Once tested, hide the wires behind walls or under floors for a seamless look. Use a small drill or pin to create tiny channels if needed. I used painter’s tape to temporarily hold wires in place while securing them behind walls, which kept everything neat. Remember, neat wiring not only looks better but also prevents accidental disconnects later.
Secure the Power Source
Attach your battery pack discreetly inside a drawer or under a piece of furniture. Make sure it’s accessible for easy replacement. I once hid mine under the staircase, which was convenient but made replacing batteries a bit of a puzzle. Keep accessibility in mind to avoid dismantling your entire project for power changes.
Test Your Lighting System
Before closing everything up, turn on the power to check all lights work well and evenly. Adjust wire routing if needed. I once had a light flickering because of a loose connection; rechecking connections fixed the issue immediately. Testing early saves you from discovering problems after everything is sealed.
Finish and Decorate
Once satisfied, secure all wires neatly with hot glue or small clips. Finish your dollhouse decor around the lighting fixtures for a professional look. I added tiny curtains and furniture to hide the wiring, making the entire scene more realistic. Your miniature world will now glow with life, thanks to your effort and patience.

Many beginners assume that installing lighting in a dollhouse is an all-or-nothing venture, requiring complex wiring, soldering, or expensive tools. However, this is a misconception that can lead to unnecessary frustration and missed opportunities for creative expression. The truth is, most of what people get wrong about dollhouse lighting stems from oversimplified myths and misunderstandings that I’ve encountered in my own journey.
Why Do So Many Believe Wiring Is the Only Solution?
One of the biggest myths is that wiring and soldering are the only reliable methods for installing lights. While professional setups often use these techniques for durability, beginner-friendly alternatives like battery-operated LEDs or plug-in string lights are just as effective for small-scale projects. These options eliminate the risk of electrical hazards and make it easier to experiment without permanent commitments. Relying solely on wiring can result in overcomplicating a task that can be achieved with simple solutions, and it often deters newcomers from even starting.
In fact, a study by DIY experts shows that using rechargeable LED tea lights or small portable battery packs can provide a safe, flexible, and aesthetically pleasing lighting setup that’s perfect for beginners. Don’t fall into the trap of thinking that complex wiring equals better results — sometimes, simplicity reigns supreme.
Beware of Over-Complicating the Layout
Another common mistake is over-planning the lighting layout, which can lead to cluttered wires and uneven lighting. Many enthusiasts believe that every corner and nook must be illuminated with multiple tiny LEDs, but in practice, this can create a chaotic look and make maintenance difficult. Instead, focus on strategic placement that highlights key features and creates a cozy ambiance. Think of your dollhouse as a miniature room rather than a city grid — less is often more.
Advanced hobbyists know that lighting should guide the viewer’s eye and enhance the scene, not distract from it. A well-placed, warm LED in the living room and softer lights in bedrooms can produce a natural, inviting glow without the mess of tangled wires. Remember, good lighting is about balance, not quantity.
How Can I Avoid Common Pitfalls and Make Better Choices?
Let’s dig deeper. The key is understanding the nuances of lighting options. For example, LED color temperature greatly influences the mood — warm white (~2700K) creates coziness, while cool white (~5000K) feels more modern and bright. Choosing the right power source also matters; batteries are convenient but require regular replacement, whereas USB-powered lights can connect to a power bank for longer-lasting illumination.
In my experience, testing different setups outside the dollhouse first prevents surprises later. Testing connections, adjusting placement, and even experimenting with dimmable lights allow you to tailor the ambiance perfectly. For detailed guidance, check out creative DIY solutions to enhance your project’s overall appeal.
Most importantly, don’t let myths discourage you. Lighting can be simple, safe, and highly rewarding if you understand the options and avoid common traps. With a few tips and a bit of patience, you’ll find that illuminating your dollhouse is not only achievable but also deeply satisfying. Have you ever fallen into this trap? Let me know in the comments!
Keeping your dollhouse lighting system in top shape requires more than just a one-time setup. Over time, components can wear out, connections may loosen, and batteries need replacing. To ensure your miniature world continues to glow beautifully, investing in the right tools and adopting a consistent maintenance routine is crucial.
Tools I Recommend to Maintain Your Dollhouse Lighting
First and foremost, I always keep a high-quality precision screwdriver set handy. Tiny screws hold your wiring components and LEDs in place, and having the right screwdrivers prevents damage. I personally prefer a set with both Phillips and flat-head bits, as different fixtures require different tools. For delicate wiring work, a small needle-nose plier is invaluable for adjusting or reconnecting wires without damaging them.
Another essential tool is a digital multimeter. This device helps me quickly diagnose wiring issues, test voltage levels, and ensure connections are solid. Since electrical systems can sometimes develop faults over time, regularly checking the voltage at your LEDs can preempt failures and extend their lifespan.
For cleaning and maintaining connectors, I use a contact cleaner spray. Dust, dirt, or oxidation can interfere with electrical contact, leading to flickering or dimming lights. A quick spray keeps everything running smoothly and prevents corrosion.
Lastly, I keep a set of spare batteries and extra wiring on hand. Batteries, especially if you’re using portable power sources like AA or AAA packs, will eventually run out. Replacing them before they cause flickering ensures uninterrupted illumination. Having spare wiring and connectors also makes troubleshooting easier when something goes wrong.
How do I maintain my lighting system over time?
Regular inspections are key. Every few months, check all wiring connections, look for signs of wear, and replace any frayed or damaged wires. Clean your LEDs and connectors with contact cleaner to prevent oxidation. If you notice flickering, test the voltage with your multimeter to identify loose or faulty connections. Also, consider upgrading to more durable components as your skills improve, such as high-quality LED modules designed for longevity. These small investments can dramatically improve the lifespan of your setup.
Looking ahead, advancements in smart lighting technology might make maintenance even easier. Wireless LED systems with app controls and remote diagnostics are becoming more accessible, allowing hobbyists to monitor and troubleshoot their systems from afar. Keeping your system updated and exploring new automation options can turn your dollhouse into a futuristic miniature paradise.
If you’re eager to elevate your lighting game, try integrating a dimmer module or smart control system. These enhancements enable you to adjust brightness and ambiance easily, making your miniature world even more inviting and dynamic.
Remember, a well-maintained lighting system not only looks beautiful but also preserves the integrity of your entire project. Regular care, the right tools, and a proactive approach will keep your dollhouse glowing brightly for years to come.
The Hardest Lesson I Learned About Dollhouse Lighting
One of the biggest realizations I had was that simplicity often beats complexity. Early on, I tried to wire every room with tiny LEDs, thinking more lights would make my dollhouse look more realistic. Instead, I ended up with tangled wires and uneven lighting that distracted from the charm of my miniature world. The lightbulb moment was realizing that strategic placement and choosing the right brightness could create a cozy, inviting atmosphere without overcomplicating the setup.
Three Myths About Dollhouse Lighting That Held Me Back
First, I believed that only professional wiring and soldering could produce reliable results. I discovered that battery-powered LEDs and plug-in string lights are perfect for beginners, offering safety and flexibility. Second, I thought every corner needed a light—less is more when it comes to creating mood. Lastly, I assumed dimmable lights were only for high-end setups. In reality, affordable dimmer modules can be easily integrated, giving you control over your miniature ambiance.
What Experts Won’t Tell You About Lighting Your Dollhouse
Many seasoned hobbyists know that the key to stunning lighting is understanding color temperature. Warm white LEDs (~2700K) generate a cozy glow, perfect for living rooms, while cooler whites (~5000K) can highlight details and add brightness. Also, maintaining your lighting system is crucial; regular checks with a multimeter and cleaning contacts with contact cleaner can prolong your setup’s lifespan. These tips might not be common knowledge but can make a significant difference in your project’s success.
Curated Recommendations for Brightening Your Miniature World
To ensure your lighting is both effective and easy to manage, I recommend investing in a precision screwdriver set for secure connections, and a digital multimeter to diagnose issues early. For lighting supplies, I trust reliable LED modules and easy DIY lighting kits that are beginner-friendly. These tools have saved me countless headaches and helped me achieve professional-looking results without the fuss.
Your Turn to Shine Brightly
Now it’s your chance to bring your dollhouse to life with beautiful lighting. Remember, the key is to keep it simple, plan strategically, and maintain your system regularly. Your miniature world deserves to glow with warmth and personality. Have you ever struggled with wiring or choosing the right lights? Let me know below—I’d love to hear your experiences and tips!