I’ll never forget the moment I tried to recreate a detailed fox portrait on a piece of wood, only to end up with a blurred, muddy mess. It was a lightbulb moment—my technique was missing a crucial element, and I was relying on basic shading instead of the layered, nuanced approach real masters use. That failure pushed me to dive deep into advanced pyrography techniques, transforming my art from simple sketches to lifelike wildlife masterpieces.
Why You Should Care About Advanced Pyrography Now
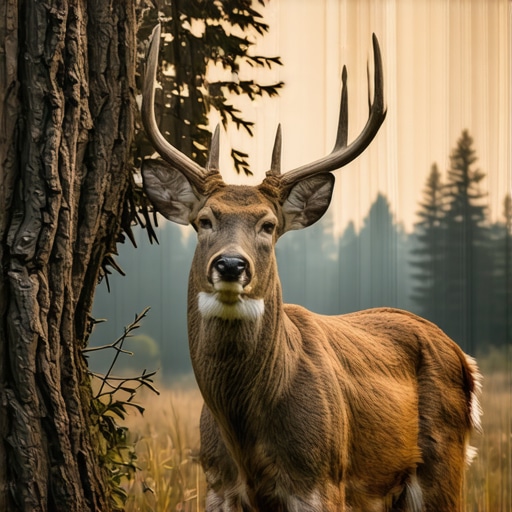
Wildlife artists often hit a wall when they try to push their work beyond the basics. The difference between a decent piece and a jaw-dropping, photorealistic work is often in the details—subtle textures, depth, and tonal variations that only come with refined techniques. In a world flooded with digital images, creating realistic wildlife art on wood feels both challenging and incredibly rewarding. It’s a skill that not only elevates your craft but also deepens your connection with nature and your audience.
But here’s the catch—many artists make common mistakes early on, like overusing the torch at high heat or underestimating the power of layered shading. I’ve been there. I once rushed through a piece, thinking quick strokes would save time. Instead, I ended up with scorch marks and uneven shading, which took hours to fix. Trust me, mastering these advanced techniques is worth the effort, and I promise, you can do it too.
Is It Really Worth The Hype
Absolutely. When I started applying layered shading, fine detail work, and proper wood preparation, my wildlife portraits gained a new level of realism. Viewers couldn’t tell if it was a photograph or wood art. This isn’t just about technical prowess; it’s about giving your art the depth and soul it deserves. And if you’re wondering whether it’s possible without fancy tools, I’ve got good news—most techniques can be done with a good pyrography pen and some patience. For more tips on creating professional-looking projects, check out this guide.
So, have you faced the frustration of trying to capture realistic textures or shadows? If so, you’re not alone. The good news is, I’ll walk you through proven methods to elevate your pyrography skills, step by step. Let’s dive into the world of layered shading, detailed textures, and tonal mastery—your future wildlife masterpieces are waiting.
Layer Your Shading for Depth and Realism
Start by selecting a high-quality pyrography pen with adjustable heat settings. I vividly remember once I attempted to shade a fox’s fur with quick, uniform strokes, but the result was flat and unnatural. Instead, I learned to build up layers gradually, starting with light strokes and increasing darkness in successive passes. Think of shading like painting with a pencil—layering creates depth and subtle tonal variations that mimic real textures.
Control Your Heat and Pressure
Adjust the pen’s temperature carefully; too hot, and you risk scorching the wood, too cool, and shading becomes uneven. I once used a too-high setting on a delicate area, creating a burn mark that took hours to sand out. Use light pressure for lighter shades and increase pressure slightly for darker tones. Maintaining consistent pressure is key to smooth, realistic shading. Practice on scrap wood to find your ideal settings before working on your main piece.
Build Texture Through Technique and Tooling
Texture is essential for photorealism. I achieved convincing fur textures by using a fine-tipped point and a stippling technique—rapid, small dots that resemble individual hairs. For rougher textures, like bark or feathers, employ cross-hatching or zigzag strokes. Remember, the goal is to mimic nature’s complexity, so don’t hesitate to vary your strokes. Using different tip shapes—sharp for detail, rounded for softer areas—adds layers of realism.
Use a Light Touch for Fine Details
Fine details bring your wildlife portrait to life. I once tried to carve every individual fur strand with heavy strokes, but it overwhelmed the piece. Instead, I switched to a very light hand, adding subtle highlights and tiny lines that hint at fur without overdoing it. A steady hand and patience are crucial here. If your hand jitters, rest your arm on a stable surface or use a magnifier for precision work.
Apply Tonal Variations Masterfully
Tonal variation creates the illusion of light and shadow. I recommend working from dark to light—start with the darkest areas and gradually build up lighter shades. Use a combination of shading and cross-hatching to define contours and volume. When I was working on a wolf’s face, I layered darker shades around the eyes and nose to create depth, then softened transitions with lighter strokes for areas catching light. Blending is key—try gentle feathering with a clean, cool pen tip to smooth transitions.
Maintain Consistency and Patience
Advanced pyrography demands patience. Rushing results in uneven shading and loss of detail. I learned this the hard way when I hurried through a detailed eagle portrait and ended up with uneven burns. Take your time, work in natural light, and step back frequently to assess your progress. Consistency in stroke direction and pressure ensures your work looks cohesive and hyper-realistic.
Seal and Protect Your Artwork
Once complete, protect your masterpiece with a clear, matte finish suitable for wood. This preserves your layered shading and textures. I’ve found that a light spray coating prevents smudging and enhances color depth. Remember, a well-protected piece maintains its photorealistic quality for years to come.
Many wildlife artists believe that mastering advanced pyrography is just about layering shades or perfecting textures, but there’s a sneaky misconception that can trip you up. The common myth is that more heat and faster strokes lead to quicker, better results. In reality, this approach often results in scorched wood, uneven shading, or loss of detail—mistakes that can take hours to fix and sometimes ruin the piece entirely.
Let’s dig deeper into this misconception. The real secret to photorealistic pyrography isn’t pushing your tool to its maximum or rushing through layers. It’s about controlling your heat, pressure, and timing with precision. For instance, experts like this comprehensive guide emphasize that layering gradually and maintaining a consistent, moderate temperature produces richer textures and more subtle tonal transitions. Overheating not only damages your wood but also diminishes the depth you aim to achieve.
What Most Artists Overlook When Layering Shading
One often-overlooked nuance is the importance of patience and the incremental buildup of tones. Many beginners think that a single heavy pass will fill in shadows or textures adequately. But seasoned pyrographers know that multiple light passes, allowing each layer to cool slightly, create depth and realism that a single stroke cannot. This is the advanced nuance that separates amateur work from professional-quality art.
Another trap is neglecting the importance of proper wood preparation. Using uneven or soft wood can lead to inconsistent burns, regardless of your technique. Experts recommend sanding the surface smooth and applying a light sealing layer before starting. This step minimizes uneven absorption of heat and ensures your shading layers build up uniformly, a detail often missed by those rushing into complex projects.
Finally, a critical mistake is underestimating the power of tonal variation. Relying solely on black-and-white shading without subtle gradations results in flat images that lack depth. Advanced artists focus on creating a full spectrum of tones—darker shadows, mid-tones, and soft highlights—by carefully adjusting heat and pressure. This nuanced control is what brings realism to wildlife art, making subjects like fur, feathers, or bark appear three-dimensional and lifelike.
Have you ever fallen into this trap? Let me know in the comments. Remember, the devil is in the details, and mastering these advanced techniques can elevate your pyrography from good to breathtaking. Keep experimenting with control and patience, and your wildlife portraits will become more lifelike and compelling every time.
Maintaining your pyrography setup is crucial to ensure consistent results and extend the lifespan of your tools. One of my top recommendations is investing in a high-quality, adjustable heat control pen. I personally use the BurnMaster Pro because it offers precise temperature regulation, which is vital for layered shading and fine details. A reliable power supply with stable voltage also prevents fluctuations that can damage your tips or cause uneven burns. Regularly cleaning your tips with a damp cloth or specialized tip cleaner keeps them free of charred wood residue, ensuring smooth strokes and longevity.
Another essential tool is a good set of replacement tips. I prefer silicon-coated tips for their durability and heat retention. Switching tips based on the texture or detail work can dramatically improve your efficiency and results. For example, finer tips are perfect for detailed fur or feather textures, while broader tips speed up shading larger areas.
Proper wood preparation tools matter too. Sanding blocks with fine-grit sandpaper (around 220 grit) ensure the surface is smooth, which helps prevent uneven burns. Applying a light sealant or wood conditioner before starting work can also minimize absorption inconsistencies, especially when working on softer woods. I recommend using a high-quality sealant to protect your finished piece.
For long-term results, storing your tools properly is key. Use a dedicated toolbox with individual compartments to prevent tips from knocking against each other. Keep your pyrography pen in a stand or holder to avoid damage to the cord or tip. Regularly inspecting your equipment for wear and tear helps catch issues early, preventing costly repairs or replacements.
As for future trends, advancements in digital control modules and temperature sensors are making pyrography more precise and accessible. Integrating smart tools that connect to apps for real-time temperature monitoring is on the rise, making it easier to maintain consistent heat levels over extended sessions.
**How do I maintain my pyrography tools over time?** The key is consistent cleaning, proper storage, and regular calibration of your heat settings. This not only prolongs your equipment’s life but also ensures your art remains sharp and professional-looking.
Try incorporating a dedicated tip cleaner and a storage stand into your setup today. These small investments can significantly improve your work quality and make your projects more enjoyable. For more insights on maintaining your tools, visit this guide to beginner-friendly DIY projects.
The Hardest Lesson I Learned About Pyrography
One of my biggest breakthroughs was realizing that layering and patience trump rushing when it comes to realistic textures. Early on, I believed that pressing harder and moving faster would produce better shadows, but I found that controlled, incremental shading created depth and life in my wildlife portraits. This lesson taught me to slow down and focus on building up tones gradually.
3 Myths About Pyrography That Held Me Back
I used to think you needed expensive tools or special woods to achieve photorealism. Turns out, with a good pyrography pen and proper surface prep, you can create stunning realism. The myth that high heat speeds up work is false; it often damages the wood and blurs details. Debunking these myths opened new avenues for my art.
What Experts Won’t Tell You About Layered Shading
Patience and subtlety are key. Experienced pyrographers layer multiple light passes, allowing each to cool slightly before adding the next. This technique produces richer textures and smoother gradients. Rushing or applying heavy pressure in a single pass can flatten your work and obscure fine details. Learning this has transformed my approach to wildlife art.
Curated Tools That Changed My Workflow
My essential pyrography setup includes an adjustable heat control pen like the BurnMaster Pro for precise temperature regulation. I also rely on fine-tipped tips for detailed fur and feathers, and a high-quality wood sealer to ensure smooth shading. These tools help me achieve consistent, professional results every time.
Let Your Art Speak for Itself
Now that you know the value of patience, control, and layered shading, it’s your turn to try. Wildlife pyrography is a rewarding journey that demands attention to detail and a gentle touch. Keep experimenting, and you’ll soon create portraits that captivate and inspire. Remember, every master was once a beginner—your photorealistic wildlife art awaits.