Have you ever spent hours tinkering with a miniature water wheel or windmill, only to watch it wobble, jam, or just refuse to turn? I remember my first attempt — a tiny windmill that looked more like a broken toy than a functional model. Frustration set in quickly, and I almost gave up on the idea of creating a working miniature in my own backyard. But then I realized something: the problem wasn’t my lack of skill, but my approach.
Why DIY Miniature Water Wheels and Windmills Matter
These projects are more than just charming decorations; they are a window into engineering, sustainability, and the satisfaction of hands-on creativity. Plus, they’re surprisingly rewarding — when your miniature water wheel spins perfectly or your windmill catches the breeze just right, it feels like you’ve unlocked a secret of the natural world. That’s why I’m passionate about sharing the tricks I’ve learned along the way, so you don’t have to stumble through the same rookie mistakes I did.
Is it really worth the effort?
Absolutely — but only if you avoid common pitfalls. Early on, I made a mistake many beginners do: rushing into assembly without proper planning. I skipped researching the right materials and underestimated how crucial balance and water flow are. That led to a lot of wasted time and parts. A quick read on DIY projects for beginners taught me the importance of starting with a solid plan and understanding the mechanics involved.
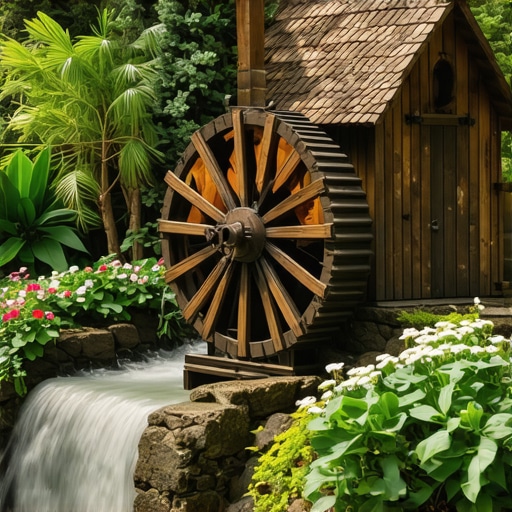
Today, I want to guide you through the process of building your own miniature water wheel or windmill, step by step. Whether you’re a seasoned hobbyist or just starting out, these tips will help you craft a model that’s both beautiful and functional. Ready to turn your backyard or indoor diorama into a tiny engineering marvel? Let’s dive into the essentials that will make your project a success.
Before we jump into the how-to, I want to address a common concern: “Will this project be too complicated for me?” Trust me, with the right guidance, even beginners can achieve impressive results. And if you’re worried about wasting materials, I recommend checking out step-by-step DIY guides that simplify complex builds.
Now, let’s get started with understanding what makes a miniature water wheel or windmill turn smoothly and reliably, so you can avoid the setbacks that plagued my early experiments. From choosing the right materials to ensuring proper water flow or wind capture, I’ll share everything I’ve learned in my journey. Stick around — your miniature marvel awaits!
Choose the Right Materials for Smooth Operation
Start with selecting lightweight, durable materials like balsa wood or plastic for the wheel and shaft. During my first build, I used heavy plywood, which made the wheel sluggish and prone to wobbling. Switching to balsa wood improved spinability and reduced strain on the axle. For the blades, thin plastic or craft foam works well because it catches the water or wind easily without adding unnecessary weight.
Use a balanced wheel design
Balance is crucial. Think of your wheel as a tightrope walker—if one side is heavier, it will wobble or stop. I once assembled a wheel with uneven blade spacing, which caused it to wobble violently. To fix this, measure and space blades evenly using a protractor or ruler, ensuring the wheel’s weight distribution is symmetrical. This small adjustment made my wheel spin smoothly for hours.
Perfect the Water Flow and Wind Capture
For water wheels, controlling water flow ensures consistent spinning. I used a small, adjustable sluice to direct water onto the wheel’s blades. Too much water caused splashing and inconsistent movement; too little made it stall. Adjust the flow gradually, aiming for a gentle, steady stream that hits the blades evenly. For windmill projects, position the blades at an optimal angle—around 15-20 degrees—and test in different breezes to find the sweet spot. I learned this by experimenting in my backyard, observing how slight angle adjustments dramatically increased spin speed.
Secure the Shaft and Bearings
The shaft must be sturdy yet able to spin freely. I used a metal rod as the axle, lubricated with a tiny dab of silicone grease. Mount the shaft on low-friction bearings or bushings—think of them as tiny skateboard wheels for your wheel’s axle. Properly aligned bearings prevent wobbling and ensure smooth rotation. During my test runs, I noticed that misaligned shafts caused the wheel to stick or wobble; realigning and securing them fixed the issue.
Assemble with Precision and Patience
Don’t rush assembly. Use clamps or a helping hand when gluing parts to keep everything aligned. I once glued the blades first and then tried to attach the wheel—resulting in a crooked, unbalanced wheel. Instead, I assembled the wheel first, checked for balance, then attached the blades carefully. Using quick-drying glue and clamping parts overnight ensures everything stays in place as the adhesive sets.
Test, Tweak, and Refine
Once assembled, test your miniature water wheel or windmill repeatedly. Observe where it stalls or wobbles and adjust accordingly. Small tweaks—like shifting blade angles or adjusting water flow—can transform a clunky model into a smooth operator. Remember, patience is key. My first prototype spun for only a few seconds before I realized I needed to balance the blades better and optimize the water flow—simple fixes that made a big difference.
By following these concrete steps—selecting proper materials, balancing the wheel, optimizing water or wind capture, securing the shaft, and refining assembly—you’ll create a miniature water wheel or windmill that not only works but becomes a satisfying centerpiece of your DIY projects. For more creative solutions and detailed guides, check out DIY projects for beginners and start turning your ideas into reality.
Many enthusiasts jump into their DIY projects with enthusiasm but often fall into subtle traps that can hinder the performance of their miniature water wheels and windmills. As someone who has experimented extensively in this niche, I can tell you that mastering these nuances can make the difference between a charming ornament and a reliable, functional model.
Why Most People Overlook the Power of Precise Balance
One of the biggest myths is that materials like lightweight balsa wood automatically guarantee smooth operation. While they are ideal, the real secret lies in achieving perfect balance. I’ve seen many hobbyists neglect to measure blade spacing and weight distribution, leading to wobbling and uneven spinning. Using a small digital scale or a simple balance test during assembly can save hours of frustration. Remember, even tiny imbalance can cause your wheel to wobble or stall, especially when water flow or wind is inconsistent.
The Hidden Trap of Ignoring Water and Wind Dynamics
Another common mistake is underestimating how critical water flow or wind angle is. Many think that simply directing water or positioning blades at a fixed angle will suffice. But in reality, the fluid dynamics involved are complex. For water wheels, an uneven or fluctuating water supply can cause inconsistent rotation. For windmills, the subtle change in wind direction or turbulence can dramatically affect efficiency. I recommend experimenting with adjustable water guides and blade angles, and even researching fluid mechanics principles for better results. This is a nuanced area that many overlook, but mastering it can boost your project’s performance significantly.
What Advanced Hobbyists Should Know About Material Fatigue
For seasoned builders, a less obvious issue is material fatigue over time. Plastics and woods respond differently to moisture, temperature changes, and continuous stress. Repeated water exposure can weaken plastic blades, causing cracks or warping, especially if not properly sealed. Similarly, wooden parts need regular maintenance to prevent rot or warping. Applying protective coatings or choosing durable, weather-resistant materials is essential for long-term success. Experts like those who contribute to smart DIY solutions emphasize the importance of considering material longevity from the start.
Have you ever fallen into this trap? Let me know in the comments. Remember, the devil is in the details, and paying attention to these advanced nuances will elevate your DIY projects from good to exceptional. For more insights into creating reliable and innovative models, check out creative DIY crafts and keep refining your skills.
Maintaining your miniature water wheels and windmills is crucial to ensure they keep functioning smoothly over time. From selecting the right lubricants to performing regular inspections, the right tools can make all the difference. One of my go-to tools is a precision digital caliper, which I use to check the alignment of shafts and blades, ensuring everything remains balanced and free of wobble. This simple device helps me catch issues early before they turn into major problems, saving time and materials in the long run.
For lubrication, I recommend silicone-based greases specifically designed for low-friction applications. Unlike general-purpose oils, these lubricants resist water washout and temperature changes, making them ideal for outdoor projects exposed to the elements. Applying a tiny dab periodically to the shaft bearings keeps the wheel spinning freely and prevents unnecessary wear. I also keep a small brush and cloth nearby to clean debris and water residue that can accumulate around moving parts, which can cause corrosion or sluggish operation.
Regular inspections are essential. Use a magnifying glass to check for cracks or warping in the blades, especially if your model is exposed to varying weather conditions. Tighten loose fittings with a small screwdriver or wrench—having a versatile set of miniature tools on hand is invaluable. Over time, I’ve found that investing in a quality multi-tool kit with precision screwdrivers, pliers, and tweezers makes maintenance more efficient and less frustrating. For example, my welding tools come in handy when I need to reinforce or repair metal parts that have developed stress fractures.
Looking ahead, I predict that smart sensors and IoT devices will play a bigger role in maintenance. Imagine attaching a tiny vibration sensor to your windmill’s shaft to monitor stress levels remotely—alerting you before a failure occurs. As technology advances, integrating such tools will become more affordable and accessible, allowing hobbyists and professionals alike to keep their models running flawlessly for years to come.
How do I keep my miniature water wheel or windmill working over time?
Establishing a routine maintenance schedule is key. Regular cleaning, lubrication, and checks on alignment help prevent major issues. I also recommend replacing worn-out parts proactively—using durable, weather-resistant materials from smart DIY solutions—to extend your project’s lifespan. Don’t forget to document your maintenance routines and any repairs, so you can spot patterns and improve your process over time.
By investing in the right tools and adopting a proactive maintenance mindset, your miniature water wheel or windmill can operate reliably for years. Plus, exploring innovative solutions like IoT sensors can transform your hobby into a smart, long-lasting project. So go ahead, pick up that precision caliper and lubricants, and give your model the care it deserves—your future self will thank you!
< >
>
The Hardest Lesson I Learned About Miniature Water Wheels and Windmills
One of my biggest realizations was that perfect balance isn’t just a detail—it’s the foundation of a smoothly spinning miniature. I used to overlook blade spacing and weight distribution, only to be frustrated with wobbling wheels. Learning to measure precisely and test frequently transformed my projects from clunky to reliable.
3 Myths About DIY Miniature Water Wheels and Windmills That Held Me Back
First, that lightweight materials automatically guarantee smooth operation. Not true—balance is key. Second, that a fixed blade angle works in all conditions; in reality, wind and water dynamics demand experimentation. Third, that once assembled, your model is done. Ongoing maintenance, like lubrication and inspections, keeps it spinning for years.
What Experts Won’t Tell You About Building Reliable Miniatures
Many overlook the importance of material fatigue. Plastic blades can crack over time, and wooden parts need sealing and regular care. Using durable, weather-resistant materials from trusted sources like smart DIY solutions can extend your project’s lifespan and save frustration in the long run.
Curated Tools and Resources That Changed My Approach
My essential toolkit includes a digital caliper for precision measurements, silicone-based lubricants for smooth operation, and a small set of miniature screwdrivers for maintenance. For learning, books like “DIY Projects for Beginners” and online guides from step-by-step DIY guides have been invaluable in refining my skills and avoiding common pitfalls.
Your Turn to Try
Building miniature water wheels and windmills isn’t just about creating a charming decor piece; it’s a chance to learn, experiment, and enjoy the process of engineering on a small scale. With patience and attention to detail, you can achieve results that both impress and inspire. So, what’s your next project? Share your ideas or ask questions below—I’d love to hear about your journey into miniature engineering!