My Personal Journey with Leather Repairs
I remember the first time I noticed scratches on my beloved leather sofa—my heart sank. It was a mix of frustration and determination to restore its beauty. Over the years, I’ve learned that restoring damaged leather upholstery isn’t just about superficial fixes but about understanding the material and applying the right techniques. Today, I want to share some personal insights and expert methods that have helped me bring my leather furniture back to life.
Understanding Leather Damage: Why Do Scratches and Wear Occur?
Leather is a durable but sensitive material. Frequent use, sharp objects, or even sunlight can cause scratches and wear. Personally, I found that regular cleaning and conditioning help prevent some damages, but accidents happen. Recognizing the type of damage is crucial. For superficial scratches, gentle polishing might suffice, but deeper wear requires more specialized care.
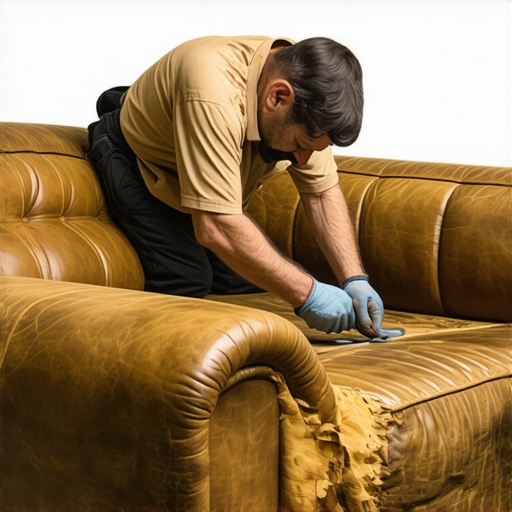
Expert Techniques to Remove Scratches and Restore Shine
How can I effectively hide or eliminate scratches on leather?
One of my go-to methods involves using a leather repair kit, which includes color-matching compounds, conditioners, and sealants. I start by cleaning the area with a soft cloth and leather cleaner, then carefully apply the colorant that matches my furniture. For minor scratches, a leather conditioner with a slight pigment can help blend the imperfections. I also discovered that applying a small amount of olive oil or almond oil can temporarily conceal scratches, but for long-term results, professional-grade products are recommended. For instance, professional restoration tips emphasize patience and the importance of using compatible products.
DIY Leather Restoration: Step-by-Step
If you’re like me and enjoy DIY projects, restoring leather can be a rewarding experience. Start with cleaning thoroughly, then gently sand down any rough patches with fine-grit sandpaper. Next, apply a leather filler for deeper scratches, followed by a color-matched dye. Finish with a high-quality leather conditioner to restore suppleness and shine. I’ve found that consistency and patience are key—sometimes, multiple applications are necessary to achieve the desired look.
Maintaining Your Leather Sofa to Prevent Future Damage
Prevention is better than cure. Regularly cleaning with a soft cloth and using leather conditioners keeps the material hydrated and resistant to scratches. I also keep sharp objects away from my furniture and avoid placing it in direct sunlight, which can accelerate wear. For extra protection, I use slipcovers or throw blankets, especially if I have pets or kids around.
What are the best products for repairing and maintaining leather upholstery?
There are many on the market, but I recommend researching products with good reviews and proven results. Brands like Leather Honey and Fiebing’s offer reliable conditioners and color restorers. Additionally, consulting with a professional or reading trusted sources like expert guides can provide valuable tips tailored to your specific needs.
If you’ve ever faced similar issues with your leather furniture, I’d love to hear your experiences. Share your tips or ask questions in the comments below—together, we can master the art of leather restoration!
Mastering the Art of Leather Restoration: Advanced Techniques and Insider Tips
When it comes to restoring leather furniture, understanding the intricacies of the material can make all the difference. Beyond basic cleaning, expert restoration involves a nuanced approach that considers the type of damage, leather finish, and the best products to use. For instance, repairing deep scratches and preserving the natural sheen requires a combination of professional-grade fillers, dyes, and conditioners. These tools work together to seamlessly blend repairs with the surrounding material, ensuring your furniture looks as good as new. I often recommend exploring professional restoration tips for detailed guidance, as they emphasize patience and compatibility of products for lasting results.
What are the subtle signs of leather deterioration that experts should recognize early?
Early indicators such as a slight loss of suppleness, tiny cracks, or a dull surface can signal the need for preventative treatment. Recognizing these signs allows for timely intervention, preventing minor issues from escalating into major repairs. Regularly inspecting your leather furniture and performing gentle maintenance, like conditioning with high-quality products, helps prolong its lifespan and maintain a luxurious appearance. Additionally, understanding the differences between various types of leather—like full-grain, top-grain, or bonded—enables tailored care strategies that respect each material’s unique qualities.
Deep Dive into DIY Leather Repair: Techniques for the Enthusiast
If you’re passionate about DIY projects, mastering leather repair can be both rewarding and cost-effective. Start with thorough cleaning using a pH-balanced leather cleaner, then move on to repairing superficial scratches with color-matched repair kits. For deeper scratches or tears, applying a leather filler with a palette knife ensures a smooth surface before dyeing. When choosing dyes, opt for water-based or alcohol-based products that are compatible with your leather type to prevent further damage. Finishing with a high-quality conditioner restores moisture and enhances the leather’s natural shine. Remember, multiple applications may be necessary to achieve a flawless look, and patience is key—sometimes, waiting between layers yields the best results.
The Role of Preventative Maintenance and Environmental Control
Prevention is undeniably better than cure. Consistent cleaning and conditioning create a protective barrier that guards against scratches, UV damage, and drying out. I recommend avoiding direct sunlight and sharp objects, which can accelerate wear. Using protective covers or throws, especially if pets or children are involved, can significantly extend the life of your leather furniture. Additionally, maintaining a stable humidity level in your home prevents leather from drying or cracking over time. For those looking to elevate their maintenance routine, exploring eco-friendly and natural products, like plant-based conditioners, can offer effective care without harmful chemicals.
Which innovative products or techniques are transforming professional leather restoration today?
Recent advancements include the development of micro-encapsulated conditioners and smart dyes that adapt to leather’s natural oils and aging process, providing a more seamless repair. These innovations not only improve aesthetic outcomes but also enhance durability, making repairs last longer. For a comprehensive understanding of cutting-edge methods, consider consulting trusted sources such as expert guides. Combining expert knowledge with quality products ensures your leather restoration projects are both successful and sustainable.
If you’re eager to deepen your skills or share your own restoration stories, I invite you to comment below. For more expert DIY tips, don’t miss out on exploring our comprehensive guides on home improvement and DIY crafts.
Refining Your Leather Repair Skills: Embracing the Nuances
Over time, my journey with leather restoration has revealed that every piece of furniture or accessory has its unique story, its own set of challenges. While beginner techniques can work wonders for superficial scratches, truly mastering leather repair involves understanding the subtle nuances of the material—its grain, finish, and aging process. For instance, I’ve learned that aging leather develops a natural patina that many enthusiasts aim to preserve rather than erase, which requires delicate handling and specialized products. Recognizing these details allows for repairs that blend seamlessly, maintaining the authentic character of the piece while restoring its beauty.
Deep Dive into Leather Types: Tailoring Your Approach
One of the most fascinating aspects I discovered is the importance of identifying the leather type—full-grain, top-grain, bonded, or faux—and customizing my repair approach accordingly. Full-grain leather, with its natural imperfections and durability, responds differently to fillers and dyes than bonded leather, which is more prone to cracking after repairs. I now spend time researching the specific characteristics of my leather pieces, which has significantly improved my results. For example, using an alcohol-based dye on full-grain leather can restore color vibrancy without compromising its natural texture, a technique I highly recommend exploring for professional-grade repairs.
Expert-Recommended Products and Their Role in Advanced Restoration
My toolbox has expanded to include some of the most highly regarded products in the industry. Brands like Leather Master and Coconix offer advanced repair kits that include flexible fillers, color-matching dyes, and protective sealants. These products are formulated to work with different leather finishes, ensuring longevity and aesthetic consistency. I’ve found that combining these with techniques like micro-needling to improve dye penetration can elevate the quality of repairs. For those interested in diving deeper, I recommend consulting detailed guides such as expert restoration insights, which emphasize the importance of product compatibility and patience in achieving seamless results.
Addressing Common Challenges: Cracks, Fading, and Texture Loss
One challenge I frequently encounter is repairing cracks that have developed over time. In such cases, I’ve learned that using a combination of leather filler and a heat gun to slightly warm the area can improve adhesion and flexibility. For fading and loss of texture, applying a revitalizing conditioner with tiny pigment particles can help restore both color and suppleness. It’s fascinating how subtle adjustments—like controlling the temperature during application or choosing the right finishing products—can make a significant difference. Recognizing early signs of deterioration, such as slight stiffness or dullness, enables me to intervene proactively, preventing more extensive damage and prolonging the life of my leather items.
Incorporating Environmental and Maintenance Strategies for Longevity
In my experience, environmental control plays a crucial role in maintaining the integrity of leather. Consistent cleaning with pH-balanced solutions and conditioning with high-quality products create a protective barrier against future damage. I’ve also adopted the habit of using UV-protective sprays to shield my leather from sunlight, which often accelerates fading and cracking. Interestingly, natural remedies like beeswax or lanolin-based conditioners can also provide effective hydration without harsh chemicals. Maintaining a stable humidity level in my home helps prevent drying or swelling, ensuring my leather stays supple and beautiful for years to come. For those seeking innovative solutions, exploring eco-friendly products that incorporate micro-encapsulated conditioners can offer both beauty and sustainability—an area I’m excited to continue exploring, inspired by recent advancements in the field.
How can I recognize the early signs of deterioration to intervene effectively?
Early indicators such as slight stiffness, minor cracks, or a dull surface are signals to act promptly. Regular inspections, combined with gentle cleaning and conditioning, can prevent minor issues from escalating. Understanding the specific leather finish—whether matte, semi-gloss, or high-gloss—helps in selecting the appropriate repair products. For example, using a gloss-enhancing conditioner on a semi-gloss surface can restore shine without over-saturating the leather, maintaining its natural appearance. Recognizing these signs and responding with tailored care not only preserves the aesthetic but also extends the lifespan of your leather investments.
If you’ve delved into advanced leather restoration techniques or faced unique challenges, I invite you to share your experiences or ask questions. Exploring these topics together enriches our collective knowledge and passion for craft. For further inspiration and detailed guides, don’t hesitate to visit our home improvement resources and discover how mastering these techniques can transform your DIY projects into true works of art.
Unveiling the Nuances of Leather Aging and Patina Preservation
As my journey in leather restoration deepened, I discovered that understanding the natural aging process of leather is paramount. Leather develops a unique patina over time, creating a rich, distinguished look that many aficionados aim to preserve. To maintain this character, I employ gentle cleaning methods that respect the leather’s natural oils, avoiding harsh chemicals that could strip its depth and texture. Recognizing early signs of patina deterioration, such as dullness or uneven coloration, allows me to intervene with tailored conditioning, ensuring the leather’s authenticity and charm remain intact.
Expert Strategies for Repairing Deep Cracks and Texture Loss
Deep cracks present a formidable challenge, but with a nuanced approach, they can be effectively addressed. I utilize flexible leather fillers that adapt to movement, preventing further splitting. Applying these fillers with a fine spatula ensures a seamless integration with surrounding areas. Once cured, I carefully sand the surface with ultra-fine grit to achieve a smooth texture. For restoring lost texture, I often incorporate micro-needling techniques that enhance dye penetration and improve adhesion of repair compounds. This sophisticated process requires patience and precision but yields results that are virtually indistinguishable from the original leather.
What advanced products and techniques can elevate your leather repair projects?
Recent innovations include micro-encapsulated conditioners that release nourishing oils gradually, preserving leather suppleness over time. Additionally, smart dyes that adjust to leather’s natural oils and aging patterns offer a more authentic color match, as highlighted by industry expert professional restoration guides. Combining these cutting-edge products with techniques like heat-assisted dyeing allows for seamless, durable repairs. For those eager to refine their skills, exploring advanced tutorials and product reviews can be invaluable, helping ensure your restoration work stands the test of time.
Incorporating Environmental Controls for Optimal Leather Longevity
Environmental factors profoundly influence leather’s durability. I have adopted strategies such as maintaining consistent humidity levels and avoiding prolonged exposure to direct sunlight, which can accelerate fading and cracking. Implementing UV-protective sprays and natural conditioners like lanolin or beeswax creates an effective barrier against environmental stressors. Moreover, I regularly inspect my leather pieces for early deterioration signs, enabling prompt intervention that preserves their aesthetic and structural integrity. Utilizing eco-friendly products not only benefits the environment but also ensures the longevity of the leather without compromising its natural qualities.
Harnessing the Power of Precise Color Matching and Seamless Blending
Achieving a flawless repair hinges on impeccable color matching. I employ professional-grade, water-based dyes that blend seamlessly with the leather’s original finish. Using specialized tools like airbrushes or fine-tipped brushes, I apply dyes in thin layers, gradually building up color and translucency. This meticulous process allows for precise control, ensuring repairs are virtually invisible. Additionally, understanding the leather’s finish—whether matte, semi-gloss, or high-gloss—is crucial to selecting compatible sealants and conditioners that preserve the original look and feel.
How can you develop your skills in subtle leather repairs and color blending?
Practicing on scrap pieces or less visible areas of furniture can build confidence and finesse. Studying professional restoration videos or participating in workshops can provide invaluable hands-on experience. Remember, patience and attention to detail distinguish amateur fixes from expert-level craftsmanship. For further insights, exploring detailed guides and product reviews can significantly enhance your mastery, transforming DIY repairs into artful restorations that extend your furniture’s life and beauty.
If you’re passionate about elevating your leather repair techniques or wish to share your experiences, I invite you to engage with our community. Your insights and questions can inspire others and foster a deeper appreciation for this intricate craft. For ongoing inspiration and expert tips, don’t hesitate to visit our home improvement resources.
Things I Wish I Knew Earlier (or You Might Find Surprising)
1. Not All Scratches Are Created Equal
In my early days repairing leather, I thought scratches were scratches. Turns out, superficial marks can often be treated with simple conditioners, but deeper scratches require fillers and dyes. Recognizing the difference saved me time and improved my results.
2. Patina Is a Friend, Not an Enemy
Over time, leather develops a natural patina that adds character. I used to think it was damage, but now I see it as part of the leather’s story. Preserving it requires gentle cleaning and conditioning, respecting the aging process.
3. Patience Is Key in DIY Repairs
Rushing repairs often led to mismatched colors or uneven textures. I learned that multiple thin layers of dye and filler, allowed to dry fully, produce seamless results. Patience truly pays off.
4. The Importance of Testing Products First
I used to jump straight into repairs with new products, only to find they didn’t match or caused discoloration. Now, I test on hidden areas or scrap leather first, saving headaches later.
5. Proper Surface Preparation Changes Everything
Cleaning and lightly sanding the leather before applying repairs ensures better adhesion and a more natural finish. Skipping this step can make even the best products look tacky or uneven.
6. Environmental Factors Matter
Sunlight, humidity, and temperature all influence the success of repairs. I keep my workspace cool and shaded, and I avoid direct sunlight during curing, to ensure the best results.
7. Even Small Repairs Take Skill
Addressing tiny cracks or scratches may seem simple, but matching textures and colors is an art. Practicing on scrap pieces has improved my finesse significantly.
8. Investing in Quality Tools and Products Saves Money in the Long Run
Affordable repair kits often lead to subpar results, requiring rework. High-quality dyes, fillers, and applicators make a noticeable difference in the final look and durability.
9. Continuous Learning Makes Perfect
Leather repair is a craft that evolves. Reading expert guides and watching tutorials keeps me updated on new techniques and products, helping me perfect my skills over time.
Resources I’ve Come to Trust Over Time
- Leather Honey: A highly recommended conditioner that keeps leather soft and protected; I’ve used it for years and swear by its effectiveness.
- Fiebing’s Leather Dye: Consistent color-matching dye that blends seamlessly; a staple in my toolkit.
- Professional Leather Repair Kits: Brands like Coconix offer comprehensive sets that include fillers and colorants—great for DIYers aiming for professional results.
- Leather Repair Expert Guides: Online resources and tutorials from industry professionals have been invaluable for deepening my understanding and troubleshooting.
Parting Thoughts from My Perspective
Mastering leather repair has been a journey filled with surprises and learning curves. The most valuable takeaway from my experience is that patience, proper preparation, and quality products are essential for achieving seamless repairs that preserve the leather’s natural beauty. Whether you’re fixing superficial scratches or tackling deep cracks, respecting the nuances of the material makes all the difference. If this resonated with you, I’d love to hear your thoughts or tips. Feel free to share your experiences in the comments, and remember—every scratch has a story, but with the right approach, you can keep that story beautiful for years to come.