I remember the first time I tried to create a complex Shibori pattern, only to end up with a muddled mess of colors and creases. It was frustrating—like trying to solve a puzzle without the picture on the box. That lightbulb moment made me realize: mastering advanced folding techniques is the key to unlocking truly stunning textiles. If you’ve ever felt overwhelmed by the intricate patterns or unsure where to start with complex folds, you’re not alone. Many enthusiasts hit a wall early on, thinking that simple methods are enough. But trust me, once you learn the right techniques, your designs will transform from amateur to art. Today, I’m going to guide you through these advanced folding methods so you can create textiles that are as unique as your fingerprint. We’ll cover the essential folds, tips for precision, and how to combine techniques for spectacular results. Ready to elevate your Shibori game? Let’s dive in and turn your fabric into a masterpiece.
Why Basic Shibori Isn’t Enough for True Artistry
At the beginning, I too relied on basic folds—accordion, circle, and simple pleats. They’re great for learning, but they limit your creative potential. As I progressed, I realized that mastering complex folds like the arashi (storm) or tessellation patterns opens a whole new world of possibilities. These techniques allow you to craft textiles with depth and movement, making each piece a conversation starter. But here’s the catch: many people skip the step of understanding the intricacies of these advanced folds, leading to inconsistent results. I made that mistake early on—trying to rush through without careful planning. The result? Uneven dye absorption and lost detail. Over time, I discovered that patience and precision are your best friends when folding for complex Shibori designs. To truly stand out, you need to go beyond the basics and embrace these sophisticated techniques. Curious? Check out [this comprehensive guide](https://en.diykutak.com/shibori-tie-dyeing-techniques-advanced-folding-design-tips) for detailed steps and tips.
Is Mastering Complex Folds Actually Worth the Hype?
I used to wonder if investing time in complex folds was just a fancy trend. Turns out, it’s more than hype. The difference in texture, pattern clarity, and visual impact is night and day. When I first tried a tessellation fold, I was amazed at how symmetrical and mesmerizing the result looked—like a piece of wearable art. The trick is that these folds demand attention to detail, but the payoff is stunning, one-of-a-kind textiles. If you’ve ever hesitated because you feared the process would be too complicated, I get it. Trust me, the learning curve is real, but so is the reward. Start small, practice consistently, and you’ll see your designs evolve. Remember, even the most seasoned artisans had to learn these techniques step by step. For a deep dive, explore [this resource](https://en.diykutak.com/shibori-tie-dyeing-techniques-advanced-folding-design-tips), which breaks down the advanced folds into manageable steps.
Now that you know why these techniques matter and that the effort is absolutely worth it, let’s prepare to get your hands on the fabric and start folding with purpose. Are you ready to transform your textiles and create works of art that truly stand out? Let’s go!
,
Choose the Right Fabric and Prepare It Properly
Start with high-quality, natural fibers like cotton or silk, as they absorb dye more evenly and vividly. Wash your fabric thoroughly to remove sizing, oils, or residues that might interfere with dye absorption. Once clean, let it dry completely before folding. During my first attempt, I skipped this step, and the colors bled unevenly, ruining my intricate design. Proper preparation is essential to achieve sharp, crisp patterns. For more home improvement tips, check out this guide.
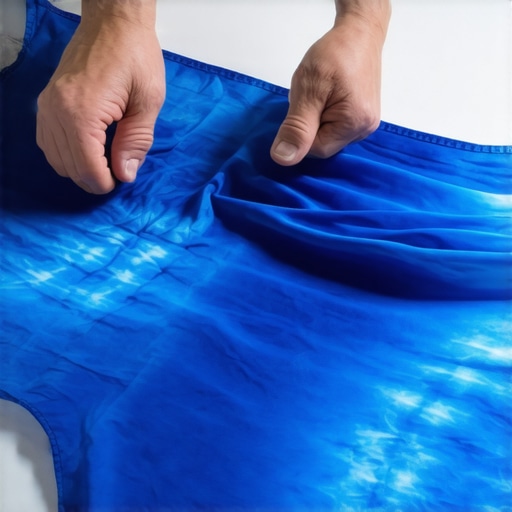
Master the Art of Precise Folding
Complex folds require patience and precision. Use sharp tools like bone folders or the edge of a ruler to make crisp, clean creases. When I tackled a storm arashi fold, I carefully pinched and folded the fabric in sections, ensuring each pleat was even. The key is to work slowly, adjusting as needed to keep the pattern symmetrical. Think of folding like origami—accuracy makes all the difference. For detailed folding techniques, explore this resource.
Layer and Secure the Folds Effectively
Once folded, secure your fabric with rubber bands, string, or clips. The tightness influences dye absorption—too loose, and the pattern blurs; too tight, and the fabric can tear. I once wrapped a large piece too loosely, resulting in a muddled pattern. Tightening the bands created sharp, well-defined lines. Experiment with different securing methods based on your desired pattern. For complex tessellations, consider sectioning the fabric into smaller parts for more control. For more advanced solutions, visit this guide.
Dye Strategically and Control the Process
Apply dye carefully within the folded sections, using brushes or squeeze bottles for precision. For layered folds, start with lighter shades and build depth gradually. When I tried a double-layered pattern, I used a sponge to dab dye onto the creases, ensuring no bleeding into adjacent areas. Covering or protecting certain sections with plastic can create resist effects, adding complexity to your design. Remember, patience during dyeing yields cleaner, more defined patterns. For home decor ideas, see this collection.
Rinse and Reveal Your Masterpiece
After dyeing, let the fabric sit for the appropriate time to set the color. Rinse thoroughly in cold water until the water runs clear, then gently unpin and unfold. The reveal is always exciting—each pattern is unique. I once rushed this step, and colors ran into each other, muddying the pattern. Patience here preserves the sharpness of your design. Dry your fabric flat to prevent distortion. With practice, your complex folds will produce textiles that look like art. For more DIY projects, visit this page to find inspiration.
Many enthusiasts believe that mastering complex Shibori folding techniques is just about following step-by-step instructions to achieve stunning patterns. However, the real nuance lies in understanding the subtle interplay between fabric tension, dye absorption, and folding precision. A common myth is that more intricate folds automatically produce better results. In my experience, the secret is in controlling tension and securing the fabric evenly—small adjustments can dramatically impact the clarity of the pattern. For example, uneven tension can cause dyes to bleed or create asymmetrical designs, which often disappoints even experienced crafters. It’s essential to develop a keen eye for these details, much like a painter honing their brushwork.
What advanced pitfalls do even seasoned crafters fall into?
One frequent mistake is rushing the folding or dyeing process. Beginners and experts alike sometimes underestimate the importance of patience during each stage, especially when working with layered or tessellated folds. Rushing can lead to inconsistent dye application or fabric tension issues, ruining what could have been a masterpiece. Additionally, neglecting fabric preparation—such as thorough washing and drying—can cause unpredictable dye absorption, affecting the pattern’s sharpness. Studies on dye fixation, like those referenced in textile research journals, emphasize how proper fabric pre-treatment enhances pattern clarity and colorfastness. So, the key is to approach each step with deliberate care, not just technical skill.
Have you ever fallen into this trap? Let me know in the comments! Remember, embracing the finer nuances of advanced folding techniques can elevate your textile art from good to extraordinary. For more insights on perfecting your craft, explore this detailed guide.
Keep Your Tools in Top Shape to Ensure Flawless Results
Investing in quality tools is essential when working with complex Shibori techniques. I personally recommend using a bone folder because it allows for precise creases without damaging delicate fabrics. Unlike regular rulers or fingernails, a bone folder provides consistent pressure, ensuring sharp, clean folds that are crucial for intricate patterns. Additionally, I always keep high-quality rubber bands on hand; opting for thicker, elastic bands prevents slipping and uneven tension, which can distort your design. For securing large sections, clamps or clips are invaluable—they offer a stronger grip and allow you to work on multiple folds simultaneously without worry about slipping. Regularly check your tools for wear and tear, replacing any that lose elasticity or become damaged, as this could compromise your pattern accuracy.
Maintain Your Equipment for Long-Term Success
To keep your tools performing optimally, clean your bone folders and clamps after each project to remove dye residue and fabric fibers. Use a damp cloth or mild soap solution, avoiding harsh chemicals that may degrade the material over time. Store your tools in a dedicated organizer or toolbox to prevent damage and ensure quick access during your next session. Furthermore, sharpening or replacing blades in any cutting tools you use can help maintain crisp edges for folding. I’ve found that developing a routine maintenance schedule not only extends the lifespan of my tools but also improves the quality of my work over time.
How do I maintain my folding and securing tools over time?
Proper maintenance involves regular cleaning, gentle handling, and correct storage. For example, avoid bending or forcing clamps beyond their elastic limits, as this can cause them to lose tension. Periodically inspect your rubber bands for cracks or stiffness; replacing them ensures your folds stay tight and patterns remain sharp. For tools like bone folders, lightly sanding any rough edges can prevent fabric snags. I also recommend keeping a small container of isopropyl alcohol or disinfectant wipes nearby to clean your tools before and after use, preventing dye buildup and bacterial growth. These simple steps help preserve your equipment’s functionality and ensure your advanced folds come out perfect every time. For more professional tips, check out this guide.
Future of Shibori Tool Innovation
As the craft evolves, I predict we’ll see more specialized tools designed specifically for complex folds—like adjustable tension clamps or digital fold guides. These innovations could make intricate techniques more accessible and consistent, especially for beginners. Embracing smart tools and proper maintenance now will prepare you for this exciting future and help you stay ahead in your textile artistry.
Ready to elevate your Shibori game? Start by inspecting your current tools and giving them a thorough clean. Experiment with a new securing method like clamps for your next project—see how it improves your pattern sharpness. Remember, the key to mastering these advanced techniques is consistent care and high-quality equipment.
The Hardest Lesson I Learned About Shibori Mastery
One of the most profound lessons I discovered was that patience in folding and dyeing can make or break your design. Rushing through the process often leads to blurred patterns and uneven colors, no matter how intricate your folds are. I once spent hours perfecting a tessellation pattern, only to realize I didn’t secure the fabric tightly enough, causing the dye to bleed and distort the pattern. This taught me that every small tension adjustment, every careful crease, is crucial for achieving stunning results.
Why I Almost Gave Up on Complex Folds (And Why You Shouldn’t)
Initially, I thought that complicated folds like arashi or tessellation were too advanced for me. I feared the steep learning curve and the risk of ruining fabric. But I found that breaking down each fold into manageable steps, practicing on scrap fabric first, made a significant difference. Now, I see these advanced folds as the key to creating textile art that truly stands out. If you’re hesitant, start small and be patient—your future masterpieces await.
The Unexpected Power of Tension and Securing Techniques
One insight that transformed my approach was understanding how fabric tension and securing methods impact pattern sharpness. Using the right tension with rubber bands or clamps ensures clean lines and prevents dye bleeding. I experimented with different securing techniques—tight bands, clips, even custom jigs—and found that consistency is king. This not only improves pattern clarity but also boosts confidence in executing complex designs.
My Secret Weapon: High-Quality Tools and Preparation
Investing in a good bone folder, sturdy clamps, and elastic bands made my work much more precise. Proper fabric preparation—washing thoroughly and drying completely—also proved essential for vibrant, crisp patterns. Over time, I developed a routine of tool maintenance and fabric pre-treatment that keeps my projects consistent and professional-looking. These small details, often overlooked, are what elevate your craft from good to extraordinary.
Embracing the Future of Shibori Innovation
Looking ahead, I believe new tools like adjustable tension clamps and digital fold guides will revolutionize complex Shibori. Staying open to these innovations and maintaining your tools well will position you at the forefront of textile artistry. The journey of mastering advanced folding is ongoing, but with patience and care, you’ll create textiles that are as unique as your artistic vision.